| Author |
JayTownsend
|
| Method |
Solo |
| Victor |
United States |
| Play Date |
2017-09-25 |
| Language |
English |
| Scenario |
KWCA035
|
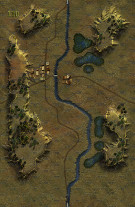
Korean War: Counter-Attack, scenario #35: Shield for Yongsan
The Shield for Yongsan scenario is about control of the east-west road running across both maps 112 & 110. The Americans must clear it of undemoralized NKPA units and the North Koreans simply have to control one hex of it. Both sides enter the maps from opposite ends of the maps, so there is a lot of movement in the first 10 turns or so. The North Koreans have a mix of: INF, SMG, HMG & ATR units and the Americans have a mix of: INF, HMG, ENG, I&R, 3.5inBAZ, M16, M19 and M26 units. This a smaller scenario but plays out like a larger one.
It looks pretty easy for the Americans, especially the way I played/managed the North Korean side. Time is a factor for the Americans to clear the NKPA from the road west. I brought the North Koreans on the map with time to dug-in along the road and the Americans were able to push them off the road and inflict heavy casualties on them, by leading with their armor vehicles. The M16 has a mighty DF value but I always get too close to the action with it and loss a step, as its armor protection is pretty weak but other than that and a few disrupted Infantry type units, the Americans cleared the road, taking almost all 23 turns to do it however.
This is where I realized my mistakes as the North Korean player and remember reading this historical actions as well. First I dug-in with larger groups of NKPA units and waited for the Americans to blast me out of my positions, hoping to maybe get some assaults in. But with these heavy American armor units leading the way, they just blasted the dug-in units to bits and opened the road. If, I would have spread out my North Korean units across the maps in smaller groups, as they have five leaders not counting the KOM, I could have made the Americans chase them down, thus spreading them out, so they couldn’t concentrate their fire power. Later, toward the end the scenario NKPA units could filter back on to road across the two maps, having a much better chance of setting up a road block historically and winning the scenario in PG terms for having an undemoralized step in the east-west road.
I actually thing if I replay this one as mentioned above, the NKPA will have a much better chance of winning, than just setting up for target practice. I forgot to mention, the Americans did win the first 8 activations amazingly. Also, the M16 Halftracks do not stand up well to the NKPA ATR units.
|