| Author |
JayTownsend
|
| Method |
Solo |
| Victor |
Draw |
| Play Date |
2017-07-02 |
| Language |
English |
| Scenario |
KWCA008
|
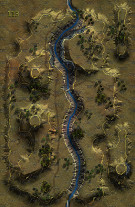
Korean War: Counter-Attack, scenario #8: Battle within the Bulge
Another battle in the famous Naktong Bulge/river area. This time the victory conditions are different and fought over the Map #13 gorge, with the bridge intact and the North Koreans staging or setting up two more underwater bridges for the battles to come. The victory conditions are spread over the map, with 2 points for each 60 meter hill controlled and there are two of them, 2 points for controlling bridge hex on hex #0708, 1 point for each underwater bridge hex controlled and 1 point for each enemy step eliminated. Both sides roll for initiative coming on opposite sides of the map. The 60 meter hill hexes are on the NKPA side of the map but the Americans can reach the bridge hex first and the underwater bridge hexes are up for grabs. With so many objectives I made the mistake with both sides of trying to get too many at once. This spread everyone out into separate battles going on simultaneously within the Naktong Bulge. The Americans made the mistake of going after the 60 meter hill hexes and the North Koreans made the mistake of going after the central bridge hex number 0708 instead of defending the underwater bridges well enough. Both wasted valuable steps.
Other than my major mistakes on both sides of the fence, either side could have won but instead it was a Draw. The North Koreans lost 9 steps and the Americans lost 9 steps, so that was wash but the NKPA got 4 points for controlling both 60 meter hexes and 1 point for controlling one underwater bridge, while the American received 2 points for controlling bridge hex 0708 and 1 point for controlling one of the underwater bridge hexes. North Koreans 15 points, the Americans 12 points for a Draw, as one side needs to win by five or more for a minor victory or 11 or more for a major victory.
I must play this one again and keep my objectives limited for each side and it should be and interesting result. I did quit this scenario 3 turns early as both sides were pretty well deleted and demoralized that I could not organized another attack or see the results changing.
Added: neither side controlled the whole east-west road that was worth 5 points.
|