
|
Joint Operations Counter Attack #4 |
||
|---|---|---|
| (Defender) North Korea | vs | United States (Attacker) |
| Formations Involved |
|---|

| Total | |
|---|---|
| Side 1 | 2 |
| Draw | 0 |
| Side 2 | 1 |


| Overall Rating, 4 votes |
|---|
|
3
|
| Scenario Rank: --- of 913 |
| Parent Game | Counter Attack |
|---|---|
| Historicity | Historical |
| Date | 1950-08-07 |
| Start Time | 07:00 |
| Turn Count | 25 |
| Visibility | Day |
| Counters | 112 |
| Net Morale | 0 |
| Net Initiative | 0 |
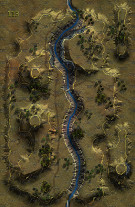
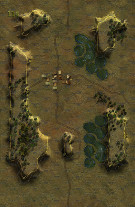
| Maps | 2: 113, 114 |
| Layout Dimensions | 56 x 43 cm 22 x 17 in |
| Play Bounty | 179 |
| AAR Bounty | 165 |
| Total Plays | 3 |
| Total AARs | 2 |
| Battle Types |
|---|
| Road Control |
| Conditions |
|---|
| Off-board Artillery |
| Randomly-drawn Aircraft |
| Smoke |
| Scenario Requirements & Playability | |
|---|---|
| Counter Attack | Base Game |
| Introduction |
|---|
|
The veteran North Korean 6th Division had begun its existence as the 164th Division of the Chinese Communist People’s Liberation Army, a unit of Korean volunteers. As such it had a great deal of combat experience behind it, and used that in the early morning hours of August 7th to infiltrate into the American positions and seize key high ground including Hill 255 overlooking the road leading to the vital supply center of Masan. Task Force Kean flung whatever Army and Marines units it could gather at Hill 255 to eliminate this threat. |
| Conclusion |
|---|
|
Army and Marine artillery poured thousands of rounds onto the NKPA positions, with tank and mortar fire adding to the bombardment along with repeated airstrikes. For three days the veteran 6th Division held its ground, leaving behind 120 dead when they finally pulled back in good order on the afternoon of the 9th. |

|
|
|---|
| AFV Rules Pertaining to this Scenario's Order of Battle |
|---|
|
| Chosŏn inmin'gun |
|---|
|


| Army |
|---|
|


| Marine Corps |
|---|
|


| 1 Errata Item | |
|---|---|

|
The 8-3 Marine Infantry counter appears in most of the Saipan 1944 and Marianas 1944 scenarios, replacing the 10-3 DF valued Marine counters for those scenarios and is currently published in the most recent Saipan printing. (JayTownsend
on 2015 Dec 26)
|
| Korean War: Counter-Attack, scenario #4: Joint Operations | ||||||||||||
|---|---|---|---|---|---|---|---|---|---|---|---|---|
Korean War: Counter-Attack, scenario #4: Joint Operations The veteran North Korean 6th Division had infiltrated in great force into the American lines and the American responded with Task Force Kean, using both Army and Marine units to try and drive them back out. The Victory conditions are about knocking the NKPA off all the east-west road and adjacent hexes on map 113, where the North Koreans have dug-in with good defensive terrain to their advantage. Step losses do not matter! The American enter the east edge of map 114, with the stronger Marines attacking up the center and the Army units split into two groups, flanking the Marines on the right and left. Both sides have a good amount of off-board artillery and the American get air-cover for three turns. With such a larger American attacking force it takes almost five turns just to get into attacking positions. The Sherman tanks flanks to the far left, to get around the gorge hexes but the North Korean have managed to cover their flanks with small units, to slow the American down and assault the Sherman tanks losing a step of SMG Infantry but taking out a Sherman tank step in return and both sides check for morale of their remaining units in the assault. The Marines push forward up the center but get hit with 22 points of off-board artillery that roll a 12 on dice causing a 2X, losing two steps of Marine Infantry and the Leader in the casualty check as well. Not the start I had planned. But on the next turn I get a little payback and hit the NKPA with a B29 which hits one hex knocking out a NKPA Infantry step but misses the second hex. The NKPA mortar are giving the American problems as well, until some of their artillery suppresses them for a while. The fighting lasted all 25 turns, in the bloodiest combat I have experienced in Counter-Attack so far. Towards the end, the North Koreans start to get encircled and bunched up in the middle of map 113 but still dug-n around the east-west road and the Americans attack in really bunched up and disorganized at this point. A Marine Colonel tries to open a hole with a brave charge but two Marine steps are lost to adjacent enemy NKPA units, which are too happy to shoot at Americans. Some American Army and Marine units are now mixed in some hexes in this squeezed in area. In the end I could not remove all the North Koreans from the road and adjacent hexes in the 25 turns, as three or four more hexes were still not cleared, resulting in the North Korean victory. In was one of the bloodiest PG scenario I have played. I think the North Koreans lost 46 steps, 5 leaders and one Kommissar. The Americans lost 11 Marine steps, 2 Leaders and the Army also lost 11 steps and 1 Leader, for a total of 22 American steps and 3 Leaders. Granted tanks count double and the Americans lost two tank steps, one to assault and one to a hidden Su-76 that was later knockout by a Marine M26 Pershing tank. Historically it took the Americans three days to knock the NKPA back from these positions and with the casualties rates I had, I can see why. But if I had 3-4 more turns I think I could have done it but maybe not with acceptable casualty rates. Historically the 6th Division withdrew in good order but I doubt they would have in my game. And I thought the Americans were going to win this scenario, no problem. Maybe next time! |
||||||||||||
| 0 Comments |
| Should be titled No Speed Assault | ||||||||||||||
|---|---|---|---|---|---|---|---|---|---|---|---|---|---|---|
The Germans are defending their position with an infantry division. The AT unit is enough to thwart the USSR armor. The map has two 20 meter one hex hills. Bruce put his 105 5-6 batteries on each hill to control the map. The rest of his units are on the edge. The 5 - 6 at 6-9 hexes are 2 AT values. So are my tanks. I was going to go to the hill and DF them with 3 or 4 of them in two hexes. Does not work. Yes my tanks have a range of 5 w/a -2 to DF (Dug-In, uphill, >2 hexes). The 105 have full 5 point against my tanks 2 AT defense value. I went along the edges to exit the map. I kept rolling bad on the morale checks. His OBA and on map artillery got some X's. The Soviets failed (DZ'ed) and with a 7/6 morale hard to 5 or less to recover to disrupted.Loading troops on trucks is asking for losses. Moving by foot is going to run out the clock in German favor. This is for collectors. |
||||||||||||||
| 0 Comments |