Panzer Grenadier Battles on April 27th:
Arctic Front Deluxe #40 - Children's Crusade Broken Axis #14 - Târgu Frumos: The Second Battle Scenario 3: Sledge Hammer of the Proletariat
Army Group South Ukraine #6 - Consternation Road to Berlin #73 - She-Wolves of the SS
Errors? Omissions? Report them!
Kempf VI: Like Dominoes They Fell
Burning Tigers #6
(Attacker) Germany vs Soviet Union (Defender)
Formations Involved
Germany 19th Panzer Division
Soviet Union 305th Rifle Division
Soviet Union 92nd Guards Rifle Division
Soviet Union 96th Tank Brigade
Display
Balance:


Overall balance chart for KRBT006
Total
Side 1 3
Draw 0
Side 2 1
Overall Rating, 5 votes
5
4
3
2
1
4.2
Scenario Rank: 42 of 913
Parent Game Burning Tigers
Historicity Historical
Date 1943-07-11
Start Time 09:15
Turn Count 22
Visibility Day
Counters 169
Net Morale 1
Net Initiative 2
Maps 3: 40, 42, 43
Layout Dimensions 84 x 43 cm
33 x 17 in
Play Bounty 179
AAR Bounty 159
Total Plays 4
Total AARs 3
Battle Types
Delaying Action
Exit the Battle Area
Urban Assault
Conditions
Entrenchments
Minefields
Off-board Artillery
Randomly-drawn Aircraft
Smoke
Scenario Requirements & Playability
Burning Tigers Base Game
Introduction

Reviewing the first week of Operation Citadel, the headquarters staff at Army Detachment Kempf found agonizingly slow progress, with its 6th Panzer Division suffering the loss of over half of its armor. In one last desperate attempt to effect a breakout, Detachment headquarters ordered the 19th Panzer Division to assist 6th Panzer Division by advancing on the east bank of the Northern Donets River. They hoped that giving the Soviets two advancing forces on either side of the river would divide the defenders' attention enough to overcome them.

Conclusion

Adding a second panzer division finally moved III Panzer Corps forward. The 6th Panzer Division advanced six miles and secured Kazachie while 19th Panzer Division stormed through Khokhlovo, Kiselevo and Sabynino before halting for the night. They shredded 7th Guards Army's defenses beyond repair, forcing that formation to send out a frantic cry for help that evening.


Display Relevant AFV Rules

AFV Rules Pertaining to this Scenario's Order of Battle
  • Vulnerable to results on the Assault Combat Chart (7.25, 7.63, ACC), and may be attacked by Anti-Tank fire (11.2, DFT). Anti-Tank fire only affects the individual unit fired upon (7.62, 11.0).
  • AFV's are activated by tank leaders (3.2, 3.3, 5.42, 6.8). They may also be activated as part of an initial activating stack, but if activated in this way would need a tank leader in order to carry out combat movement.
  • AFV's do not block Direct Fire (10.1).
  • Full-strength AFV's with "armor efficiency" may make two anti-tank (AT) fire attacks per turn (either in their action segment or during opportunity fire) if they have AT fire values of 0 or more (11.2).
  • Each unit with an AT fire value of 2 or more may fire at targets at a distance of between 100% and 150% of its printed AT range. It does so at half its AT fire value. (11.3)
  • Efficient and non-efficient AFV's may conduct two opportunity fires per turn if using direct fire (7.44, 7.64). Units with both Direct and AT Fire values may use either type of fire in the same turn as their opportunity fire, but not both (7.22, 13.0). Units which can take opportunity fire twice per turn do not have to target the same unit both times (13.0).
  • Demoralized AFV's are not required to flee from units that do not have AT fire values (14.3).
  • Place a Wreck marker when an AFV is eliminated in a bridge or town hex (16.3).
  • AFV's do not benefit from Entrenchments (16.42).
  • AFV's may Dig In (16.2).
  • Open-top AFV's: Immune to M, M1 and M2 results on Direct and Bombardment Fire Tables, but DO take step losses from X and #X results (7.25, 7.41, 7.61, BT, DFT). If a "2X" or "3X" result is rolled, at least one of the step losses must be taken by an open-top AFV if present.
  • Closed-top AFV's: Immune to M, M1 and M2 results on Direct and Bombardment Fire Tables. Do not take step losses from Direct or Bombardment Fire. If X or #X result on Fire Table, make M morale check instead (7.25, 7.41, 7.61, BT, DFT).
  • Closed-top AFV's: Provide the +1 modifier on the Assault Table when combined with infantry. (Modifier only applies to Germans in all scenarios; Soviet Guards in scenarios taking place after 1942; Polish, US and Commonwealth in scenarios taking place after 1943.) (ACC)
  • Tank: all are closed-top and provide the +1 Assault bonus, when applicable
  • Tank Destroyer: do not provide the +1 Assault bonus, even if closed-top (SB)
  • Anti-Aircraft Weapon Carrier: apply a -1 modifier to an air attack if within three hexes of the targeted hex (15.14).
  • Prime Movers: Transports which only transport towed units and/or leaders (May not carry personnel units). May or may not be armored (armored models are open-top). All are mechanized. (SB)
  • Unarmored Weapon Carriers: These are unarmored halftracks (Bufla and Sk7/2) or fully-tracked vehicles (Karl siege mortar) with mounted weapons. All are mechanized, except the BM-13 (Katyusha rocket launcher mounted on a truck). They are weapon units, not AFV's, so they are never efficient and cannot be activated by tank leaders. (SB)

Display Order of Battle

Germany Order of Battle
Heer
  • Motorized
Soviet Union Order of Battle
Army (RKKA)
Guards
  • Motorized
  • Towed

Display Errata (5)

5 Errata Items
Overall balance chart for 20

The reduced direct fire value of the Heer HMG became 5-5 starting with Fall of France.

(plloyd1010 on 2015 Jul 31)
Overall balance chart for 41

All SS PzIVH tanks should have a movement of 8.

(Shad on 2010 Dec 15)
Overall balance chart for 63

The morale and combat modifiers of German Sergeant #1614 should be "0", not "8".

(Shad on 2010 Dec 15)
Overall balance chart for 951

The reduced direct fire value in Kursk: Burning Tigers is 4-4.

(plloyd1010 on 2015 Jul 31)
Overall balance chart for 993

Kommissars never get morale or combat modifiers. Ignore misprints.

(Shad on 2010 Dec 15)

Display AARs (3)

Dominos...With Headstones
Author Retiredgrunt17
Method Solo
Victor Soviet Union
Play Date 2017-11-15
Language English
Scenario KRBT006

The German attack looked to be sneaky, bypassing the Soviet strongpoint on map 43, engaging it with 2 companies of infantry and some support. But, the Soviets disrupted the bypassing Germans with arty/OBA. The Germans did manage to capture (the Soviets didn’t defend) Kiselevo. The Germans never really got on track, with DF added to the mix when they got within range of the units around Sabynino. For the Germans it was very frustrating to see each probe and mass for attack either disrupted or stopped short. For the Soviets, vodkas all around.

0 Comments
You must be a registered member and logged-in to post a comment.
Kiselevo becomes a "mini-Stalingrad"!
Author Schoenwulf
Method Solo
Victor Germany
Play Date 2016-03-02
Language English
Scenario KRBT006

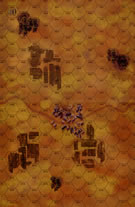
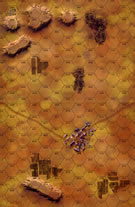
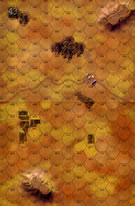
On the morning of July 11, 1943, elements of the 19th Panzer Division on the southern flank of Army Detachment Kempf were sent north to assist 6th Panzer Division to secure a foothold along the Northern Donets River. They encountered Soviet troops from the 92nd Guards Rifle Division, 305th Rifle Division and 96th Tank Brigade. The primary objectives of the German campaign were to secure the towns of Sabynino and Kiselevo, while breaking though the Soviet lines to the north. The Guards were positioned 2Km east of Kisolevo with a picket set up on the farm SE of the town. The 305th Rifle Division was set up primarily west/southwest of town with a heavy concentration in Sabynino and entrenchments in the fields surrounding the city. Armor and infantry were positioned around the woods approx. 1 Km west of Kisolevo and ready to move quickly east into the town. Two T-34’s were also assigned to support the Guards east of town. The German divisions made a strong push directly toward Kiselevo in an attempt to split the Soviet forces, with minor thrusts on both flanks. The Soviets countered by quickly moving both tanks and wagons into Kiselevo. However, by 1030, the German Panzers had eliminated both a T-34C and T-34B from the town. In the ensuing battle over the next hour, the Germans continued to press forward, eliminating two more tanks (a T-34C and T-70) from Kiselevo as well as a number of infantry and HMG platoons. By 1130, another T-34B was eliminated and the town was being heavily assaulted by German troops; the Germans had only lost two AFV’s to this point, a Pz.IIIJ and a Marder, the last to an attack by an IL-2M. Assaults on the town itself followed with the loss of the Kommissar at noon, and thinking that the attack on the town was winding down, some troops began to shift their attention SW toward the well-fortified Sabynino. By 1230, the last T-34C was forced to retreat from Kiselevo, and it was subsequently destroyed by an Hs.129 attack. The Soviet response had been to shift the 92nd Guards Rifle Division from the east to the hills north of town to prepare for a counterattack, where they were met by two Panzers on the prowl northward. Between 1300 and 1400 hours, two German engineers were lost trying to clear the minefields around Sabynino, while Soviet troops began to slowly move from that town NE to aid the remaining SMG platoons that were still bravely holding their ground in Kiselevo. The German Panzers and their supporting troops finally managed to clear the last Soviet SMG platoon from Kiselevo at 1430 and were able to secure the town, but the beleaguered tank-riders were heralded as heroes of the Soviet Union for their endurance in the face of strong German firepower. At that point, the battlefield was awash with disrupted and demoralized troops, and neither side was in any position to mount a counterattack. The Germans had secured their route to the north through Kiselevo, but conquest of Sabynino would have to wait for another day. The Germans had at least secured a minor victory.

This 3-map scenario has the following objectives: German need to exit 20 steps off the north edge, and secure both towns of Sabynino and Kiselevo for a major victory, while the Soviets need to prevent these three objectives from being reached. Soviet setup is made slightly difficult since all units must be placed on either Map 40 or 43, which leaves Kiselevo and the entire center unprotected. Strong Soviet positions were set up on both flanks, with a mobile force or T-34’s and SMG riders ready to move to the center quickly. AT guns were well emplaced across both flanks with some firing lines into the center map. The German strategy could be to either take Sabynino or Kiselevo first in a show of force, since the Germans have twice as many tanks as the Soviets, with stronger armor and efficiency allowing two AT shots per turn; this results in 28 AT shots per turn to 7 for the Soviet tanks. Both sides also have AT artillery and rifles, but these are much less mobile. The strategy used by the Germans here was to push for Kiselevo first, which would create a putative route for unit exits around either side of the ridge north of town. As it played out, Kiselevo became a mini-Stalingrad, with a remaining T-34C and two now-dismounted SMG platoons (from this and another unit) forming a group that withstood numerous assault attempts from superior German firepower. The battle for Kiselevo lasted for 20 of the 22 turns, and the town was cleared on the last turn when the final SMG in the assault hex was forced to flee on a failed recovery check. At that point the German units in the assault hex were demoralized, but one had been eliminated allowing a fresh unit to enter and finally secure the town. A strong perimeter had prevented other Soviet units from sneaking in unmolested on the last turn. The scenario is interesting from the standpoint of assumed predictability. At the start, it appears that the Germans will dominate the entire time, but the Soviet units had remarkable resilience in this play. By the time Kiselevo was under some level of control, the Germans had neither the time nor available troops to seriously threaten Sabynino and its well-mined surrounding area. Thus, the Germans only secured a minor victory, and that happened on the last turn!

This also concluded a play-through of the six Army Detachment Kempf scenarios, with the Germans securing two major and two minor victories, while the Soviets secured two minor victories (in Scenarios #2 and #3).

0 Comments
You must be a registered member and logged-in to post a comment.
No memory
Author gulatum (Germany)
Method Dual Table Setup + Voice Chat
Victor Germany
Participants davidthedad
Play Date 2018-06-24
Language English
Scenario KRBT006

I can't remember how this one played out. I don't think they fell like actual dominoes, but they did concede defeat.

0 Comments
You must be a registered member and logged-in to post a comment.
Errors? Omissions? Report them!
Page generated in 0.4 seconds.