
|
Kempf V: That Old Strategic Sense Burning Tigers #5 |
||
|---|---|---|
| (Defender) Germany | vs | Soviet Union (Attacker) |
| Formations Involved | ||
|---|---|---|
| Germany |  |
320th Infantry Division |
| Soviet Union |  |
201st Tank Brigade |
| Soviet Union |  |
213th Rifle Division |
| Soviet Union |  |
31st Antitank Brigade |

| Total | |
|---|---|
| Side 1 | 4 |
| Draw | 0 |
| Side 2 | 1 |


| Overall Rating, 6 votes |
|---|
|
3.83
|
| Scenario Rank: 176 of 913 |
| Parent Game | Burning Tigers |
|---|---|
| Historicity | Historical |
| Date | 1943-07-07 |
| Start Time | 08:00 |
| Turn Count | 20 |
| Visibility | Day |
| Counters | 103 |
| Net Morale | 1 |
| Net Initiative | 2 |
| Maps | 2: 41, 43 |
| Layout Dimensions | 86 x 28 cm 34 x 11 in |
| Play Bounty | 155 |
| AAR Bounty | 159 |
| Total Plays | 5 |
| Total AARs | 3 |
| Battle Types |
|---|
| Breakout |
| Delaying Action |
| Hill Control |
| Road Control |
| Conditions |
|---|
| Off-board Artillery |
| Randomly-drawn Aircraft |
| Smoke |
| Terrain Mods |
| Scenario Requirements & Playability | |
|---|---|
| Burning Tigers | Base Game |
| Introduction |
|---|
|
Once Operation Citadel started, Stavka followed a comprehensive and well-conceived plan of slowing down the attackers with prepared defensive positions. Once the Hitlerites became entangled in the defensive works the Red Army launched aggressive counterattacks with special attention paid to the defenders' flanks. On the far southern flank of Army Detachment Kempf the Germans noted the significant Soviet buildup that had begun the previous day. |
| Conclusion |
|---|
|
The Germans planned for this sector to remain a quiet backwater. The Soviets upset the plan and stretched the meager assets of Group Raus almost to the breaking point with their numerous attacks over the last two days. Nevertheless, tenacity and ingenuity allowed the Germans, after much heavy fighting, to hold on without drawing on the armor spearhead to the north for support. |

|
|
|---|
| AFV Rules Pertaining to this Scenario's Order of Battle |
|---|
|
| Heer |
|---|
|


| Army (RKKA) |
|---|
|


| Guards |
|---|
|

| 5 Errata Items | |
|---|---|

|
The reduced direct fire value of the Heer HMG became 5-5 starting with Fall of France. (plloyd1010
on 2015 Jul 31)
|

|
The morale and combat modifiers of German Sergeant #1614 should be "0", not "8". (Shad
on 2010 Dec 15)
|

|
The movement allowance on the counters in Airborne is misprinted. It should be "3." (rerathbun
on 2012 Jan 30)
|

|
The reduced direct fire value in Kursk: Burning Tigers is 4-4. (plloyd1010
on 2015 Jul 31)
|

|
Kommissars never get morale or combat modifiers. Ignore misprints. (Shad
on 2010 Dec 15)
|
| Erhard's Lucky Day! | ||||||||||||
|---|---|---|---|---|---|---|---|---|---|---|---|---|
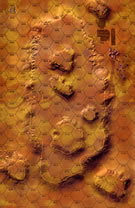
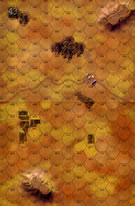
On the morning of July 7, 1943, elements of the 320th Infantry Division of Raus Corps, who were situated on the southern flank of Army Detachment Kempf, were engaged by Soviet troops from the 213th Rifle Division and 201st Tank Brigade. The German forces were dug in with their front line just west of a trail than ran north to south. On their left flank, they had a 50mm gun with infantry/HMG support on the 20-meter ridge that ran west to east along the northern valley to cover their left flank. On the right flank, they had an 88mm gun on a 20-meter hill that had a screen of infantry and HMG platoons to the east. The German center was strongly supported on a 40-meter bluff directly west of the trail, with infantry & HMG platoons, mortar platoons, and both a 20mm and 75mmIG guns in dug-in positions. The Germans only had two armored platoons, a Marder III and a StuG IIIG, and both were held back behind the west woods to be mobilized as needed. The Soviet forces grouped their armored platoons on their left flank, along with SMG’s riding on the some of the T-34’s. A 45mm gun emplacement guarded the town in the southeast sector. The Soviet right flank was covered by infantry, HMG platoons, and a 45mm gun along with anti-tank rifles on the 20-meter ridge overlooking the flank. The center of their lines was held with a front line of infantry and HMG units on the 20-meter ridge east of the trail, and a grouping of Katyusha, mortar (82 and 120mm) and artillery (76.2mm) were situated on a 40-meter bluff behind the front line. A charge by the Soviets at 0800 hours was rebuffed by the German center, and the first hour brought significant Soviet loses due to accurate and deadly fire from the 88mm piece (eliminated a T-34B and T-70), German infantry assault (eliminated a T-34C), and OBA (eliminated 120mm mortar platoon). The Soviet forces on the left pulled back, while the German unit on the single 40-meter knob on the German right flank held firm against withering fire from combined Soviet infantry, HMG and T-34-C. Over the course of the next hour, the center ridge west of the east trail was a scene of heavy fighting with limited Soviet progress; however, the StuG IIIG eliminated another T-70 on the Soviet left, and a T-34C with help from the Marder III. Shortly after 1000, an IL-2M squadron missed hitting the Marder III, which subsequently finished off another T-34C that had been crippled by the StuG GIII. German mortar fire eliminated the only remaining Katyusha platoon from the east central ridge. The Soviets continued to press forward on the central ridge, but lost two officers to decapitation, which forced a major forward to coordinate the attacks. At 1045, the Soviet artillery finally destroyed both the 75mmIG gun and the pesky 88mm, but not before another T-70 fell to the latter. At 1100, the German major was eliminated by a T-34C, and command passed to a captain hidden behind the central ridge. A T-34B that had gotten past the ridge into the central steppe area was destroyed by the Marder III. The latter unit had pronounced success and a bit of battlefield luck, as it was strafed again by an IL-2M squadron that missed. Much of the remaining combat occurred on the central ridge, but the ensuing loss of the Soviet Lt. Colonel compromised the progress. The battle ended at 1245 with a handful of units still engaged in assaults in which the Soviets attempted unsuccessfully to remove the German forces from the high ground there. Since all German forces had been committed to that effort, there were no reserve forces guarding the west trail, resulting in a German minor victory. This scenario has a narrow 2-map playing surface, resulting in extensive skirmishing. The Soviets need to exit 15 steps, secure the north/south trail free from any German troops, and control all 40-meter hill hexes for a major victory, while the Germans need to prevent these three objectives from being reached. The trail objective seemed misplaced to me, as it would seem easy for the Germans to leave a unit on the trail on Map 43, which is well behind where the fighting took place. Could it be that the designers had a typo and meant Map 41? However, this battle may have had very skewed results due to unbelievably good die rolls for the Germans; thus very few Soviet units were even able to reach the east edge of Map 43! In the opening, the Germans first die roll was fortuitous, resulting in a 2-step loss for the Soviet infantry in the center. The first turn alone produced two German rolls of “2” at optimal times, while the Soviet die rolls throughout the game were lackluster at best; this made a disaster of Soviet morale checks, and a lot of difficulty recovering units. If the German Marder III has not been demoralized without recovery for a couple of turns late in the game, there would have been no problem getting it west to the trail on Map 43 for a major German victory, since all other units were either tied down in assaults on the central ridge, or lacked sufficient movement to reach the west trail. Adding an echo to the German good fortune, they won the initiative for the last ten turns of the game, which provided further advantage. The magnitude of German good fortune is reflected in the step losses, 54 for the Soviets and 21 for the Germans. At game end, there were very few units in good order after so many exchanges. All in all, a fun scenario because of the compression from north to south with most of the engagement being fought on Map 41, but the trail objective, as written, seems an easy one for the Germans despite the fact that it is the one that wasn’t reached in this play. Disrupting the seemingly indestructible Marder at the perfect time was the one break that the Soviets got in what was otherwise a long day for them. |
||||||||||||
| 0 Comments |
| Retreat! | ||||||||||||
|---|---|---|---|---|---|---|---|---|---|---|---|---|
This was an example of brains over brawn. The Soviets conducted a massed demonstration to the German front, only to shift to their right, after holding down Germans in 4 assaults. While this was happening the bulk of the Soviets bypassed Map 41 and exited map 43. The assaults drug out a bit, but in the end the Soviets cleared the trail and exited 17 steps. The German counterattack never got going as they just did not have the assets for it. Soviet victory. |
||||||||||||
| 0 Comments |
| Peasants to the Slaughter | ||||||||||||||
|---|---|---|---|---|---|---|---|---|---|---|---|---|---|---|
The Soviets lost this in the set-up phase of the game. We always use the double blind rules with observation points. This allows for a lot of slick set up opportunities. The Germans set up their defensive line in a kind of arc just in front of the road on the farther board. They had no one in the hills or closer to the Russian jumping off point other than one lone officer acting as an artillery observer. But that Observation Point could have seen any Germans on the hill board. So, I set up my artillery behind the big hills, thinking that they would be help dislodge the Germans from the hill. And they might have in fact done this, but the Germans were a whole board away! The Russians were harassed by artillery and long range fire once they got out of the hills; I took nearly 16 step losses by the end of turn 10. The Germans had taken none. I couldn't get my artillery up to the front quickly enough to make a difference, and the RKKA are too brittle to withstand all that long range fire, not to mention the threat of that German 88 mm picking off a tank every turn. I tried massing my infantry at one point in the German line, but that just meant I created a target rich environment for the defenders! I was out-generaled before the battle even began. |
||||||||||||||
| 0 Comments |