
|
Mt. Austin IV Jungle Fighting #13 |
||
|---|---|---|
| (Defender) Japan | vs | United States (Attacker) |
| Formations Involved | ||
|---|---|---|
| Japan |  |
10th Mountain Gun Battalion |
| Japan |  |
124th Infantry Regiment |
| Japan |  |
228th Infantry Regiment |
| United States |  |
132nd "Queen of Battle" Infantry Regiment |

| Total | |
|---|---|
| Side 1 | 1 |
| Draw | 1 |
| Side 2 | 2 |


| Overall Rating, 5 votes |
|---|
|
2.8
|
| Scenario Rank: 822 of 913 |
| Parent Game | Jungle Fighting |
|---|---|
| Historicity | Historical |
| Date | 1943-01-01 |
| Start Time | 09:45 |
| Turn Count | 16 |
| Visibility | Day |
| Counters | 60 |
| Net Morale | 2 |
| Net Initiative | 1 |
| Maps | 1: Guad-ME |
| Layout Dimensions | 84 x 55 cm 33 x 22 in |
| Play Bounty | 142 |
| AAR Bounty | 153 |
| Total Plays | 4 |
| Total AARs | 4 |
| Battle Types |
|---|
| Rural Assault |
| Conditions |
|---|
| Entrenchments |
| Hidden Units |
| Off-board Artillery |
| Randomly-drawn Aircraft |
| Scenario Requirements & Playability | |
|---|---|
| Battle of the Bulge | Counters |
| Guadalcanal | Maps + Counters |
| Jungle Fighting | Base Game |
| Introduction |
|---|
|
With all three battalions of the 132nd Regiment finally available, the Americal Division renewed its attack against the GIFU position. Some difficulty was encountered in moving the battalions into position, but the attack finally went forward on New Years Day. The fresh 2nd Battalion was to drive beyond the Japanese position and isolate it from the reminder of the Japanese lines to the east. |
| Conclusion |
|---|
|
The Japanese held off the American attack for the third time. This plus the initial failures led to the regimental commander's relief late in the day. (There is some question whether he was relieved by higher command or actually requested relief.) On the positive side the 2nd Battalion managed to skirt the GIFU position and secure a strong position between it and the Japanese line. The Japanese in the GIFU position were now cut off. Lt. Col. Alexander George, the new commander, rallied his men by walking up and down the line, rifle in hand, clad only in shorts and a cap. This demonstration of the lack of danger (and poor Japanese accuracy) did much to bolster the morale of the regiment. |
| Additional Notes |
|---|
|
Cassino '44 or Elsenborn Ridge may be used instead of Battle of the Bulge for the U.S. units. |

|
|
|---|
| Imperial Japanese Army |
|---|
|


| Army |
|---|
|


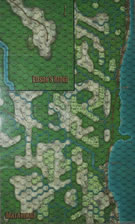
| Jungle Fighting, scenario #13, Mt. Austin IV | ||||||||||||
|---|---|---|---|---|---|---|---|---|---|---|---|---|
Jungle Fighting, scenario #13, Mt. Austin IV A pretty straight forward scenario, the Americans must control two or more Japanese entrenchments and the Japanese must keep control of all seven. Anything else is a Draw. All fought in very difficult terrain but with some off-board artillery. In slugfest battle the Americans got control of only one Japanese entrenchment with the 7/7 morale and contested a few others, for Draw result. I like to revisit these older scenarios sometime, it is kind of fun! |
||||||||||||
| 4 Comments |
| Slog, slog, slog & slog | ||||||||||||||
|---|---|---|---|---|---|---|---|---|---|---|---|---|---|---|
I am actually a little surprised at my victory. The Americans come to fight with a lot of infantry weapons and little else. Artillery support expires early, air support is anemic, American morale is inferior. While historically accurate, the situation does not look positive. I closed on the one exposed Japanese position. It was quickly abandoned when the attritional liability became apparent. The action gave me a draw, but also left the prospect of fighting entrenched Japanese infantry in the jungle. I pursued a strategy of attrition, hoping to thin the Japanese out enough to force one more entrenchment, and having the counterattack forcing another hole. About turn 13 the situation looked like it would turn eventually, but I was running out of time. On turn 15 I couldn't wait any longer and I assaulted the weakened hex in front of me. The start of the turn did not look good. I lost the initiative roll, and one of my leaders was disrupted. The assault did work though, and the entrenchment was cleared. I got lucky against the counterattack. That suddenly sealed the game. |
||||||||||||||
| 0 Comments |
| Jungle Fighting #13 | ||||||||||||
|---|---|---|---|---|---|---|---|---|---|---|---|---|
This one is nearly identical to Jungle Fighting 12 except both sides are a tiny bit weaker. This time the Americans decide to motion all of their troops to the Japanese right, and in addition to focus firing all their support on the exposed entrenchment, hit it solidly with both battalions in a hope to dislodge it. The drawback to this is the Japanese can make their defense denser on the right as they only have to prevent walk ins on the left. OBA is entirely ineffective for the Americans, all 4 turns it is present. Air strikes do nothing, but werent really expected to. Sporadic op fire from the entrenchments scores a few disruptions, but only enough to force the Amercians to spend an extra couple turns. The only thing effective on approach is Japanese OBA which is able to fully suppress 1st battalions HMGs and send them fleeing. With 1st batallion sweeping down into the southern jungle on the Japanese right, 3rd battalion gets ther HMGs in position to also fire on the exposed trench while sitting in the sliver of jungle up the middle. The rest of the battalion makes its wider move and hits the focused point in conjunction with 1st battalion through the Jungle. Japanese play a semi active defense, still having their insane assault bonuses to stack. One x2 INF stack counterattacks the 3rd battalions HMG stack and drives them off before returning, while the other X2 INF stack hits approaching 3rd battalion INF in open ground. The US will feed enough bodies to keep that second assault going the whole game, pinning the Japanese in place and out of the trench line. A third weaker counterattack of INF + 2x INF red hits 1st battalion in the Jungle and sees off 3 INF there, while the Americans finally roll well and knock out the two red inf and pin the last full inf in place. The rest is able to get adjacent and start pouring fire into the exposed entrenchment which has 2xHMG. It takes a lot of fire but they ulimately eliminate one and dis the other and charge in after a few turns. They are able to contest the hex, but the last counterattack stack, returning from seeing off 3rd battallion's HMGs is able to fully win back the hex. Had OBA for the Americans done anything at all they likely could have drawn this one, a win would only come if they could sneak an INF around the back or something to tag one more trench. Active defense with Japanese INF that cares not for step losses is still really tough to beat with morale 7 though. A Japanese win, but a close one. |
||||||||||||
| 0 Comments |
| A Slow Grind | ||||||||||||||
|---|---|---|---|---|---|---|---|---|---|---|---|---|---|---|
For the Americans to win, they must capture two entrenchments. Nothing else matters. One of the entrenchments the Japanese are tasked to defend is in open ground, and thereby subject to continuous aerial and bombardment attack. This fact, combined with my smaller force, convinced me that my best chance as the Japanese was to forfeit the forward entrenchment and expend all my efforts defending all the others. In other word - play for the draw. Peter did well to grind away at my beleaguered troops from all sides. He finally captured his second entrenchment on the 3rd to last turn. My last, desperate counter-assault was cut to ribbons with no survivors. Utterly defeated, the Japanese surrendered. Hidden units played no meaningful role in the scenario, so this would be suitable for solo play. |
||||||||||||||
| 0 Comments |
Was that one hex the Americans got 0328, perhaps? It is the only exposed Japanese starting hex.
Yes it was but I had two more contested ones.
With the Americans assaulting at -2, and the Japanese having a perpetual +2, Thos hexes will be contested a very long time.
Drew and I are playing this same scenario right now.
It was a frustrating scenario. I needed a couple more turns to maybe win. I should have assaulted earlier as the Americans.