
|
Memel Land Iron Wolves #2 |
||
|---|---|---|
| (Defender) Lithuania | vs | Germany (Attacker) |
| Formations Involved | ||
|---|---|---|
| Germany |  |
1st Cavalry Division |
| Lithuania |  |
Cavalry Division |

| Total | |
|---|---|
| Side 1 | 3 |
| Draw | 0 |
| Side 2 | 1 |


| Overall Rating, 4 votes |
|---|
|
3.25
|
| Scenario Rank: --- of 913 |
| Parent Game | Iron Wolves |
|---|---|
| Historicity | Alt-History |
| Date | 1939-03-01 |
| Start Time | 12:00 |
| Turn Count | 16 |
| Visibility | Day |
| Counters | 57 |
| Net Morale | 0 |
| Net Initiative | 1 |
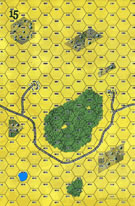
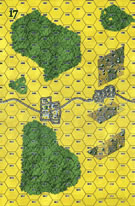
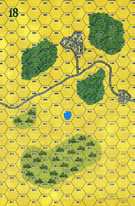
| Maps | 3: 15, 17, 18 |
| Layout Dimensions | 84 x 43 cm 33 x 17 in |
| Play Bounty | 159 |
| AAR Bounty | 159 |
| Total Plays | 4 |
| Total AARs | 3 |
| Battle Types |
|---|
| Exit the Battle Area |
| Conditions |
|---|
| Off-board Artillery |
| Scenario Requirements & Playability | |
|---|---|
| Eastern Front | Counters |
| Iron Wolves | Base Game |
| Road to Berlin | Maps |
| White Eagles | Counters |
| Introduction |
|---|
|
Grossly outnumbered by the total strength of the German Wehrmacht, Lithuania's three infantry divisions could have made a stand against the limited forces the Germans could have deployed from East Prussia. German troops still had to be detailed to watch the French and Czech frontiers, and British and French naval power could have interdicted sea communications with the rest of Germany. In that situation, Lithuania's general reserve — a single brigade of cavalry with some tank support — would have to seal off any breakthrough. |
| Conclusion |
|---|
|
Lithuania, like Poland, had a long cavalry tradition and, like the Poles, had gained a great deal of battlefield experience in their 1919 war against the Soviet Union. Still, the Lithuanian cavalry was well-regarded and likely would have given a good account of itself had it been allowed to fight for its country. |

|
|
|---|
| AFV Rules Pertaining to this Scenario's Order of Battle |
|---|
|
| Heer |
|---|
|


| Army |
|---|
|


| 1 Errata Item | |
|---|---|

|
The reduced direct fire value of the Heer HMG became 5-5 starting with Fall of France. (plloyd1010
on 2015 Jul 31)
|
| Fun cavalry dustup |
|---|
|
I still haven't gotten the hang of cavalry in PG. They're so fragile and I tend to be very impetuous with them. In this case the attacking Germans deployed their motorized HMGs and mortar to soften up the Lithuanian road block, although it was OBA that did the job. Then German cavalry charged and wiped out the roadblock, covered by A/Cs that took out the Lith. A/C. It was at this point that my Lithuanian cavalry went nuts and started charging the Germans all over the place. They took heavy casualties before the German cavalry broke through and made for the Eastern map edge. German major victory. |
| 0 Comments |
| Failure to focus. |
|---|
|
This 16 turn scenario caught me off guard, I though it would prove difficult to stop the Germans from getting ten steps off the east end of the map. I was wrong and the scenario proved very educational. This scenario is a great introduction to the strengths and limitations of cavalry. Cavalry is tough to employ, and has been since the advent of the pike. Modern arms makes it even more difficult to employ. It is also a very good scenario to think in terms of how and where to defend, how to set-up an engagement area. The Germans start disadvantaged, with a slightly lower initiative rating than the Lithuanians and yet they are on the offensive. The Lithuanians assumed some risk by ceding most of the map to the Germans, but ended being a very smart move. They set-up there roadblock company in the far east (board 17) setting up in the eastern situated between a large wooded area to the north, and a smaller one to the south. The Germans ended up starting first, one of the few times they were able to start with the initiative. The Germans choose wisely to lead with their Armored cars the only reconnaissance units they had (sorry, apparently cavalry aren't automatically considred reconnaissance assets). They pushed both AC units along the high speed avenue of approach (the road). The Lithuanian's are able to start employing elements of their Cavalry Brigade. In the first turn they only moved their HMG platoons on wagons to reinforce the units in the town, and increase the effectiveness and leathality of the engagement area in the center. They also push out their own AC Platoon, who also used the high speed road to move as far to the west as possible. They kept the Cavalry Platoons out off board and out of the fight. First contact was between armored cars of both sides starting on the third turn around the woods and town hexes vicinity of 0804. The Fighting was inconclusive and the Lithuanian AC retreated as the bulk of the German Cavalry approached. When the German Armored cars identified the Lithuanians engagement area (around turn 5 or 6) they decided to skirt the woods to the North of the Engagement Area, but using one company and an Armored car cover the flank of the German advance. It is then that the Lithuanians release their cavalry held off board. One company of Lithuanian Cavalry Attacked north, with the remainder attacking through the Engagement Area. Due to the failure of the Lithuanian Cavalry to destroy the Germans over the next few turns, the Forces located in the Engagement Area move out of dug in positions and town hexes to advance to the north. It was only in the south western portion of the line where the Lithuanians have the most success; however, the even with overall failure of Lithuanan Cavalry to destroy German forces in their charge attempts, they manage to stop the German advance to the north, and start to put pressure on German forces from the south as they attempted and envelopment. In the end, it was a close and bloody fight. The Lithuanians lost 14 steps, and the Germans 12. The off board artillery proved to be the biggest killer in the game, and severely hampered offesive operations on both sides. The Germans were only able to get 4 steps off the east end of the map before the end of final turn, far less than the 10 they were tasked with. End talley was Lithuanians 22 and German 18, for a Lithuanian Minor Victory (just barely). Had it been an 18 turn game the Germans would have likely earned a Major Victory (as they just broke through in the North). Could they have done it earlier - Yes. Problem was that the Germans load focus; they didn't mass enough force against the Lithuanian Cavalry in the North. They were spread out to far to the south east and were focused too focused on (feared) enveloping forces from the south.Dynamic game. Tough fight. Realistically portrayed the challenges associated with using Cavalry. Lessons learned / Observations - 1) Understand mission requirements. Plan how to use your forces to best accomplish the mission. While the enemy has a vote and will doe its best to ruin your perfect plan, stay on task. Keep asking yourself how do I accomplish my mission. 2) Terrain considerations are always significant in a fight. Employ your forces to maximize your fields of fire, while minimizing the enemy fields of fire. Also, think of how to use terrain to conceal the approach of very vulnerable elements. If you can't be spotted, you can't be engaged. 3) Cavalry is vulnerable. To fight more effectively - try to have two leaders with each company in of cavalry if you can. Spread your cavalry so that no more than one platoon is each hex. This minimizes the ability of artillery to mass on and disrupt or destroy your cavalry. It also minimizes the effectiveness of direct/opportunity fire. If maneuvered correctly, they can still charge into the same hex and benefit from the advantage of a cavalry charge. 4) Combined Arms can significantly improve the success of a charge. Maneuver infantry or other forces next adjacent to an enemy force to force opportunity fire. It may significantly improve your ability to successfully conduct a charge. 5) Don't be afraid to use overrun. Though not as effective as a charge, it can be used to allow forces cut off by enemy advance to return to friendly lines. If you find this helpful.... please drop me a line. |
| 0 Comments |
| Stand back! Another kill box |
|---|
|
I'm starting to get the hang of these battles. When you are defending against an enter and exit force it is imperative to shape the battlefield. This means that you are looking to funnel the advance somewhere where you can create a bottleneck. In the case of cavalry versus cavalry this has to happen quickly but you have the force and speed to do so. In this case it was important for the Lithuanians to hold back their HMGs until the path of the German cavalry was clear. As the Germans slogged through the swamps after an abortive attempt to break the roadblock the HMGs set up a gauntlet through which the Germans would have to run. With opportunity fire against cavalry disruption and demoralization was quite likely. The only wild card were the armored cars which quickly sped around the swamp and avoided the AT fire. The Lithuanians chose to ignore the ACs which almost resulted in a loss. Behind the HMGs the Lithuanians were running a large group of cavalry to close off the German exit. It was this group that the German ACs attacked. After a turn or two the Lithuanians were able to close in on the German cavalry and get into an assault. In the final analysis the Germans were unable to get the ten or more steps off the board to avoid the Lithuanian bonus, with only seven steps exiting (including the ACs). The slaughter of horses and men in the kill box was extensive. I assume that the Germans could have been more aggressive in trying to destroy the blocking force but that would have taken time and there was precious little time to spend fighting if they were to be able to exit the board. All in all a very good study of cavalry. The Lithuanians were careful to avoid getting too close to the German cavalry in order to maintain their ability to have devastating opportunity fire. The Germans had less of a chance to pursue fire tactics and had to absorb the Lithuanian fire and keep moving. In addition the poor DF of the German cavalry made such fire anemic anyhow. I give it a "3". It is a tough road for the Germans but some good morale check rolls would give them a real chance. They were only two units away from a win. |
| 0 Comments |