
|
Over the Nieman Iron Wolves #1 |
||
|---|---|---|
| (Defender) Lithuania | vs | Germany (Attacker) |
| Formations Involved | ||
|---|---|---|
| Germany |  |
11th Infantry Division |
| Germany |  |
4th Panzer Brigade |
| Lithuania |  |
1st Infantry Division |

| Total | |
|---|---|
| Side 1 | 0 |
| Draw | 0 |
| Side 2 | 6 |


| Overall Rating, 6 votes |
|---|
|
3.67
|
| Scenario Rank: 272 of 913 |
| Parent Game | Iron Wolves |
|---|---|
| Historicity | Alt-History |
| Date | 1939-03-01 |
| Start Time | 06:45 |
| Turn Count | 24 |
| Visibility | Day |
| Counters | 110 |
| Net Morale | 1 |
| Net Initiative | 1 |
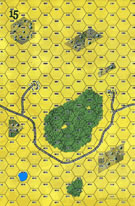
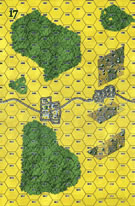
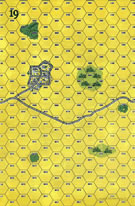
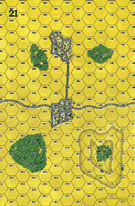
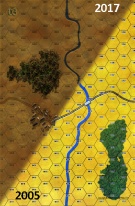
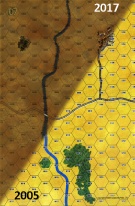
| Maps | 6: 15, 17, 19, 21, 3, 7 |
| Layout Dimensions | 86 x 84 cm 34 x 33 in |
| Play Bounty | 190 |
| AAR Bounty | 159 |
| Total Plays | 6 |
| Total AARs | 3 |
| Battle Types |
|---|
| Inflict Enemy Casualties |
| River Crossing |
| Urban Assault |
| Conditions |
|---|
| Off-board Artillery |
| Scenario Requirements & Playability | |
|---|---|
| Eastern Front | Maps + Counters |
| Iron Wolves | Base Game |
| Road to Berlin | Maps |
| White Eagles | Counters |
| Introduction |
|---|
|
Lithuania seized the Baltic port of Memel (Klaipeda in Lithuanian) from League of Nations control in 1923, and incorporated it into the republic as an autonomous region. The repressive regime of Antanas Smetona in Lithuania alienated many inhabitants of the area, even ethnic Lithuanians. In early 1939 Adolf Hitler began agitating for the territory's return to Germany, threatening the use of force if he did not get his way. |
| Conclusion |
|---|
|
Lithuania did not, in fact, resist Hitler's demands and hoped the acquiescence would buy them their freedom. But trapped between two brutal dictators, their own little dictatorship could not long remain independent. Had the Lithuanians chosen to fight, the first line of resistance would have been the Nieman River. The new German panzer force was not yet the powerful iron fist that would crush army after army, and the 4th Panzer Brigade was a pure tank force that would later be divided between the ad-hoc Kempf and 10th Panzer Divisions for the invasion of Poland. |

|
|
|---|
| AFV Rules Pertaining to this Scenario's Order of Battle |
|---|
|
| Heer |
|---|
|


| Army |
|---|
|


| 3 Errata Items | |
|---|---|

|
The reduced direct fire value of the Heer HMG became 5-5 starting with Fall of France. (plloyd1010
on 2015 Jul 31)
|

|
The morale and combat modifiers of German Sergeant #1614 should be "0", not "8". (Shad
on 2010 Dec 15)
|

|
The movement allowance on the counters in Airborne is misprinted. It should be "3." (rerathbun
on 2012 Jan 30)
|
| Un sangriento cruce de río |
|---|
|
En este gran escenario (por el tamaño, el número de fichas y la calidad), tropas alemanas de infantería acompañadas de tanques Pz I y Pz II deben cruzar el río Niemen y penetrar en territorio lituano, que está defendido únicamente por tropas de infantería y seis batería de artillería y AT. El escenario es hipotético, ya que la batalla nunca se produjo en realidad. Los alemanes tiene una mejor moral y una poderosa artillería a larga distancia. El río puede cruzarse por dos puentes intactos y a través del procedimiento habitual para ls ríos "mayores". Los alemanes dividen sus tropas en dos grupos aproximadamente iguales; cada grupo debe cruzar el río por uno de los puentes. No obstante, los tres pelotones de tanques Pz I se corren hacia el extremo derecho del campo de batalla para cruzarlo con ayuda de ingenieros fuera del alcance de la artillería lituana. Los lituanos defienden cada uno de los puentes con una compañía de infantería protegida por pozos de tirador. Estas posiciones son el primer blanco de la artillería y morteros alemanes, que las debilitan y son posteriormente asaltadas por infantería alemana. El resultado era previsible, pero los lituanos consiguen ganar tiempo. Una vez vencida la resistencia inicial, los lituanos forman una línea de resistencia en las carreteras norte-sur intentando retardar el inexorable avance alemán. El resto de fuerzas lituanas se refugia en las ciudades para defenderlas. El avance alemán es lento, pero poco a poco va venciendo la resistencia lituana. Los alemanes sufren el lógico degaste y en los últimos turnos, a causa de la aplicación de la regla "fog of war", el progreso es pequeño. No obstante, al final los alemanes consiguen una victoria mayor por estrecho margen. Las bajas son muy elevadas en ambos bandos (37 steps los lituanos y 20 los alemanes). Puntos de victoria: 42 los lituanos y 64 los alemanes. Escenario muy interesante, aunque estimo que los lituanos llevan las de perder. |
| 0 Comments |
| Big |
|---|
|
This is a big scenario, with lots of units, and lots of boards and lots of objectives but where the difference lies between the Germans and the Lithuanians is that the Germans have lots of good leaders and all the big guns. I really enjoyed the river crossing scenarios in First Axis because the Soviets often had trouble getting their engineers in place, but when there is a bridge and the attacker has a ton of artillery and the defender cannot blow the bridge the result is usually pretty safe to say that the attacker will cross the river. The Lithuanians set up to defend both bridges and to keep an engineer assisted crossing under surveillance to permit their 75s to hit the engineers. Turns out that the engineers weren't necessary. The German OBA and mortars hit the eastern bridge hard enough to rout the defenders and permit a crossing by turn 3, basically on the march. The western bridge held much longer but the attacking force was much smaller, finally falling on turn 10. The Geman force screened Lithuanian troops in the woods trying to recover their morale and moved towards the closest town and began investing it. By turn 17, both that town and the furthest town to the west were falling to strong German assaults and the Lithuanian forces were in retreat to the two towns in the northeast corner of the board. At that point the Lithuanians conceded a German major victory. The Germans had not lost a single tank (the AT guns were hammered by the OBA, etc and never got a shot off). All of the Lithuanian artillery had been eliminated and losses in total were 25 Lithuanian losses against 9 German losses. Certainly a little less luck with the artillery rolls and a more reasonable leader mix (nearly every German leader had morale modifiers and 3 had +2s, while there were only two Lithuanian leaders with morale modifiers at all) would have led to a closer result, at the point where I called it the Germans led 52 to 29 and were pulling away quickly. Still it was a lot of fun to play and the FOW rolls are very important in this large scenario. The key, however was always the guns. I give it a "4". |
| 0 Comments |
| Bloody River Crossing. |
|---|
|
This was the first scenario I played after completing the vassal academy. I completed it over a period of two weeks. It was a fairly large scenario, covering an obscure topic. Beyond that there were several other attractive features - 1) A mix of armor, infantry, AT guns, and indirect fire (both on and off board, 2) practice using engineers, 3) tough lessons about the placement, use, and movement of AT weapons, 4)the challenge of a River Crossing, and 5) a huge map with varied terrain that allowed the Lithuanian player to practice a defense in depth. The scenario itself was fun and challenging for both sides. The Lithuanians drew several strong junior leaders to leader their roughly 1.5 battalions worth of troops. They had about a batteries worth of Artillery (AT capable) and a companies worth of antitank capabilities, to defend a broad front (almost 7 km). The key terrain were the two bridges spaced exactly 4kms (20 spaces) apart and proved to be the focal point of their defense. They were significantly outclassed in artillery, which if massed and the rolls were good, could decimate the Lithuanian defenses. They were also far less mobile than the Germans, who had a large number of relatively weak tanks (PZ Is and IIs). Additionally, due to lack of transport and dearth of artillery it pretty much relegated the forced the Lithuanians to fight two separate fights (one in the west and the other in the east. Their ability to reinforce- specifically from east to west (or vice versa) would have been time consuming and extremely hazardous - It could take the Germans between 7-9 turns to reinforce, let alone the Iron wolves. The German's didn't have a significantly larger force, with barely 2 battalions worth of troops. Their good leaders, strong off-board artillery, on board mortar support, tanks (even weaker tanks are better than none) were decisive to the overall outcome of the fight. The one big weakness is the inability of the Armor and Infantry to work seemlessly together (See special rules). You can't activate armor and infantry at the same time, even if in the same hex. The only exception is combining efforts in an assault and that's when both units are present, which takes at a lot of action segments to make happen. Lithuanian's conducted a defense in depth with a company dug in and defending each of the bridges. AT platoons were placed in the woods to provide overwatch on both bridges. They had a company defending the western town, one in the town NW of the eastern bridge, another in the heights overwatching the eastern Bridge, and the final company split between the two Eastern villages at the northern end of the map. All forces were either dug in, in the woods, or in town hexes. The Germans had a fixing force of two reinforced companies with some engineer, mortar, and tank support attack the bridgehead in the west, while the bulk of their forces attacked in the east. The outcome was surprising.... The Lithuanian forces actually rolled well. They ended up fight the. germans to a standstill in the west for 14 turns in assaults just north of the bridge - and didn't finally give way at the bridge until turn 17. The German's were decimated in the west and didn't take a single town hex. Engineers supported the river crossings. Though plagued by artillery fire, the German's got enough combat power across the river to finally help with the assault on the Bridges. In the east the Lithuanian's held the German's at the river line for 12-turns. That despite facing the preponderance of German artillery fire In the east. AT fire almost completely stopped traffic on the bridge (two wrecks, one more would have made the bridge useless for several turns), Good Lithuanian small unit leaders placed up front to support recover rolls, and first fire capability for dug in troops helped immensely in both cases. Lithuanian artillery placed in forest hexes, and on the reverse slope of the eastern hill allowed the massing of limited Lithuanian artillery, safe from German counter fire (as no German leaders could spot the Lithuanian Artillery), which wreaked havoc with river crossing operations and prevented in the east.. Once however the river crossing was effected things started to progress for the Germans. The tanks were critical in maneuvering and conducting massed direct fire at close range (usually 1 hex) at units defending towns, ICW indirect fire. Assaults the supported by infantry and engineers usually were able to attack disrupted or demoralized troops more effectively. By turn 14 they were attacking into the town just NW of the eastern bridge. By turn 17 it was cleared. By turn 20, the hill was taken and the pesky reverse slope Lithuanian Artillery was destroyed. Finally, the weakly held town along the road due north of the eastern river was taken by turn 22 with most of the NE town taken by the end of turn 24. It was a fun game, but a bloodbath for both sides. Overall German Major victory with 75 to 35 VPs. Most of the German VPs came from the capture of two bridges and 11/16 town hexes. Step loses were 30 for the Lithuanians and 29 for the Germans (including 5 x double counted tank steps lost). The game could have been called by turn 21 or 22 as a major German victory; however, up until turn 14 it seemed like it could be a draw. Not sure how balanced this game is, but I think the Lithuanian's had a fighting chance provided I did a few things differently. I can think of two specific improvements for executing the Lithuanian Defense, and it was all in the Eastern half of the Map. I could have done better in placing a second AT platoon, and maybe practicing a little less tactical patience. Starting with AT platoon placement - I had one AT Platoon way up north in a town that did nothing until the end fo the fight. It should have been placed within range of the bridge, but in a different hex than the other AT platoon. I could have also potentially risked placing one of my precious Artillery platoons to also provide AT support to the eastern bridge as well. If you can close the eastern bridge (see wreck rule), it would significantly slow down the assault in the east. Three wrecks stops movement across that chokepoint (the Lithuanians managed to kill two steps of armor on the eastern bridge), and it takes time to remove wrecks and attack using the bridge, or conducting river crossing ops. It could potentially give the Lithuanian a chance at victory. Had the Lithuanians stopped movement across the bridge with a third German armored step loss in the hex, it would have allowed the Lithuanians to mercilessly pound the German's river crossing operations with the reverse slope artillery. With the Lithuanian's I was also overly tactical patient. The defense in depth had no interlocking fields of fire, leading to several very compartmentalized fights. I feared the German field artillery, and I never reinforced the eastern bridgehead. I think I could have easily dispersed my forces keeping no more than one PLT per hex while maneuvering to reinforce, thus making a much less lucrative target for German Field Artillery, and sustaining the fight at the river. Overall. Lots of fun, and a number of good challenges. Highly recommend. |
| 2 Comments |
Did you play it with Vassal or on the table?
Yes you can activate armor and infantry in the same hex. You may activate any or all units/leaders in a hex in a given activation. The question comes in with leadership. Tank leaders may not activate personnel units for a combat/assault move. Infantry leaders may not activate armor in that way either. Combining fire gets complicated too.
Peter,
First off, I played it on Vassal. Second, I understand and agree with you because it is how the rules are written; however, it was one of the scenarios special rules that prevented activating armor and infantry at the same time. This was due to the recent creation of this armored formation, it’s armor pure organization, and it unfamiliarity with combined arms tactics. Made things more challenging for the Germans in some respects.Mike
P.S. I intend to review your 4th edition house rules this weekend. I want to confirm that I have access.