
|
On the Donnerberg Invasion of Germany #14 |
||
|---|---|---|
| (Attacker) United States | vs | Germany (Defender) |
| Formations Involved | ||
|---|---|---|
| Germany |  |
12th Infantry Division |
| United States |  |
3rd "Spearhead" Armored Division |

| Total | |
|---|---|
| Side 1 | 1 |
| Draw | 0 |
| Side 2 | 0 |


| Overall Rating, 1 vote |
|---|
|
3
|
| Scenario Rank: --- of 913 |
| Parent Game | Invasion of Germany |
|---|---|
| Historicity | Historical |
| Date | 1944-09-21 |
| Start Time | 07:00 |
| Turn Count | 24 |
| Visibility | Day |
| Counters | 58 |
| Net Morale | 1 |
| Net Initiative | 2 |
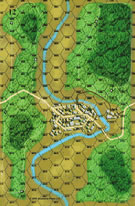
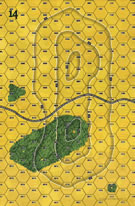
| Maps | 3: 12, 14, 23 |
| Layout Dimensions | 84 x 43 cm 33 x 17 in |
| Play Bounty | 170 |
| AAR Bounty | 171 |
| Total Plays | 1 |
| Total AARs | 1 |
| Battle Types |
|---|
| Rural Assault |
| Scenario Requirements & Playability | |
|---|---|
| Airborne - IE | Counters |
| Battle of the Bulge | Maps |
| Elsenborn Ridge | Maps + Counters |
| Invasion of Germany | Base Game |
| Road to Berlin | Maps |
| Introduction |
|---|
|
Seeking to widen the breach in the German lines east of Aachen, 3rd Armored Division sent a depleted task force from its Combat Command B against Hill 287, known to the Germans as the Donnerberg. The height overlooked Stolberg, an important town now held by the Americans, and division command feared the Germans would use it to spot for artillery fire. With their remaining tanks and armored infantry, Task Force Mills charged up the hill. |
| Conclusion |
|---|
|
In a quick assault, Task Force Mills took the hilltop and cleared off the German defenders. The Germans had placed their anti-tank guns behind the hill's crest to shield them from the direct fire of the American tank destroyers and self-propelled artillery supporting the attack, and when the American tanks crested the hill the Germans knocked out half of them. The Americans had their objective, but had paid too much for it in the estimation of their division command, Maj. Gen. Maurice Rose. |

|
|
|---|
| AFV Rules Pertaining to this Scenario's Order of Battle |
|---|
|
| Heer |
|---|
|


| Army |
|---|
|


| 7 Errata Items | |
|---|---|

|
The reduced direct fire value of the Heer HMG became 5-5 starting with Fall of France. (plloyd1010
on 2015 Jul 31)
|

|
The morale and combat modifiers of German Sergeant #1614 should be "0", not "8". (Shad
on 2010 Dec 15)
|

|
Strongpoints are single step units and can be eliminated with X results like any other single step unit. (Shad
on 2010 Dec 15)
|
|
|
The standard mix of strongpoints may be downloaded from Avalanche Press: http://www.avalanchepress.com/German_Strongpoints.php This is the standard mix found in Airborne, Airborne-IE, and Edelweiss Expanded. The strongpoint mix in Cassino '44 is different from that of other PG games. (plloyd1010
on 2012 Feb 01)
|
|
|
Strongpoints are affected by the terrain in their hex just like any other unit.
Even though they can't move, they can attack using Assault Combat if an enemy unit moves into their hex.
They may not dig in or benefit from entrenchments.
(rerathbun
on 2014 Apr 21)
|

|
The movement allowance on the counters in Airborne is misprinted. It should be "3." (rerathbun
on 2012 Jan 30)
|

|
The M18 has a special rule in Battle of the Bulge but it applies globally: "A two-step M18 unit can fire one anti-tank shot and move half its movement allowance (retain fractions) in a single impulse. The order in which it does these two actions is the player's choice." (Shad
on 2010 Dec 15)
|
| On the Donnerberg #14 | ||||||||||||
|---|---|---|---|---|---|---|---|---|---|---|---|---|
Copied over from older game into the new version: *I was looking to play something from North of Elsenborn and something not too long and I ran across this scenario and it included a M12 155mm SP unit, which I have never pushed across a map board yet and the scenario looked interesting, so I went for it. • Map 23 is kind of odd, as setup is on Map 12 for the Americans and map 14 for the Germans and all the victory objectives are on map board 14 as well, so the only need for map board 23, is maybe to retreat demoralized units. *The German setup on the big hill on map 14, with Infantry, support weapons, Strongpoints, AT-guns and dug-in with off-board artillery. The Americans Have Infantry, armor, SP’s, Mortars, APCs and Airpower but more important to this scenario, SMOKE! The M7, M12 & the Mortar can all fire it. In fact, without it, this would have been a difficult scenario to play offensively, as the Americans had to come out of the forest, right into the face of the large defended hill hexes. *The Americans were able to use the smoke as cover and close fast, the use direct fire of a powerful armor and Infantry force for it’s size, then throw in their on board SP fire (M12 24 points + M7 18 points = 42 points of Bombardment power) and with airpower, they were able to drive to Germans from the hills. They had to regroup a couple of times and took some losses but the Germans took more losses, and left the battlefield with the American in control with a Major victory. |
||||||||||||
| 0 Comments |