Panzer Grenadier Battles on April 27th:
Arctic Front Deluxe #40 - Children's Crusade Broken Axis #14 - Târgu Frumos: The Second Battle Scenario 3: Sledge Hammer of the Proletariat
Army Group South Ukraine #6 - Consternation Road to Berlin #73 - She-Wolves of the SS
Errors? Omissions? Report them!
Reconnaissance in Force
Invasion of Germany #2
(Defender) Germany vs United States (Attacker)
Formations Involved
Germany 116th Panzer Division
Germany 394th Sturmgeschutz Brigade
United States 3rd "Spearhead" Armored Division
Display
Balance:


Overall balance chart for InoG002
Total
Side 1 0
Draw 0
Side 2 1
Overall Rating, 1 vote
5
4
3
2
1
4
Scenario Rank: --- of 913
Parent Game Invasion of Germany
Historicity Historical
Date 1944-09-13
Start Time 14:00
Turn Count 24
Visibility Day
Counters 122
Net Morale 0
Net Initiative 2
Maps 2: 22, 25
Layout Dimensions 56 x 43 cm
22 x 17 in
Play Bounty 182
AAR Bounty 171
Total Plays 1
Total AARs 1
Battle Types
Inflict Enemy Casualties
Rural Assault
Urban Assault
Scenario Requirements & Playability
Afrika Korps Counters
Cassino '44 Counters
Elsenborn Ridge Maps + Counters
Invasion of Germany Base Game
Introduction

Due to inter-Allied politics, 3rd Armor Division's attack on the Siegfried Line was officially listed as a reconnaissance in force. But privately, Task Force Doan was instructed to breach the line at any cost. Around Schmidthof they found out what that meant.

Conclusion

While elsewhere 3rd Armor just rolled over disheartened Germans, at Schmidthof they encountered die-hards. When asked to surrender they shouted profanities and brought in armor support. Both sides suffered horribly with the Americans taking the brunt of the punishment. At dusk Col Doan walked from tank to tank (those that had survived) giving orders and restoring confidence, but it took until midnight before they were able to break through.


Display Relevant AFV Rules

AFV Rules Pertaining to this Scenario's Order of Battle
  • Vulnerable to results on the Assault Combat Chart (7.25, 7.63, ACC), and may be attacked by Anti-Tank fire (11.2, DFT). Anti-Tank fire only affects the individual unit fired upon (7.62, 11.0).
  • AFV's are activated by tank leaders (3.2, 3.3, 5.42, 6.8). They may also be activated as part of an initial activating stack, but if activated in this way would need a tank leader in order to carry out combat movement.
  • AFV's do not block Direct Fire (10.1).
  • Full-strength AFV's with "armor efficiency" may make two anti-tank (AT) fire attacks per turn (either in their action segment or during opportunity fire) if they have AT fire values of 0 or more (11.2).
  • Each unit with an AT fire value of 2 or more may fire at targets at a distance of between 100% and 150% of its printed AT range. It does so at half its AT fire value. (11.3)
  • Efficient and non-efficient AFV's may conduct two opportunity fires per turn if using direct fire (7.44, 7.64). Units with both Direct and AT Fire values may use either type of fire in the same turn as their opportunity fire, but not both (7.22, 13.0). Units which can take opportunity fire twice per turn do not have to target the same unit both times (13.0).
  • Demoralized AFV's are not required to flee from units that do not have AT fire values (14.3).
  • Place a Wreck marker when an AFV is eliminated in a bridge or town hex (16.3).
  • AFV's do not benefit from Entrenchments (16.42).
  • AFV's may Dig In (16.2).
  • Open-top AFV's: Immune to M, M1 and M2 results on Direct and Bombardment Fire Tables, but DO take step losses from X and #X results (7.25, 7.41, 7.61, BT, DFT). If a "2X" or "3X" result is rolled, at least one of the step losses must be taken by an open-top AFV if present.
  • Closed-top AFV's: Immune to M, M1 and M2 results on Direct and Bombardment Fire Tables. Do not take step losses from Direct or Bombardment Fire. If X or #X result on Fire Table, make M morale check instead (7.25, 7.41, 7.61, BT, DFT).
  • Closed-top AFV's: Provide the +1 modifier on the Assault Table when combined with infantry. (Modifier only applies to Germans in all scenarios; Soviet Guards in scenarios taking place after 1942; Polish, US and Commonwealth in scenarios taking place after 1943.) (ACC)
  • Tank: all are closed-top and provide the +1 Assault bonus, when applicable
  • Assault Gun: if closed-top, provide the +1 Assault bonus, when applicable
  • Tank Destroyer: do not provide the +1 Assault bonus, even if closed-top (SB)
  • APC – Armored Personnel Carrier: These are Combat Units, but stack like Transports. They can transport personnel units or towed units. They are not counted as combat units for the +1 stacking modifier on the Direct Fire and Bombardment Tables (4.4). They may be activated by regular leaders and tank leaders (1.2, 3.34, 4.3, 5.43). They do not provide the +1 Assault bonus (ACC).
  • Armored Cars: These are Combat Units. They are motorized instead of mechanized. All have their own armored car leaders, who can only activate armored cars (6.85). Do not provide the +1 Assault bonus (ACC).
  • Reconnaissance Vehicle: 8.23 Special Spotting Powers Both foot and vehicle mounted recce units (1.2) possess two special spotting abilities. The first ability is that they can spot enemy in limiting terrain at one hex further than the TEC specifies for other units and leaders. For example, an enemy unit in town can normally be spotted at three hexes or less, but a recce unit can spot them at four hexes.Their second ability is that they can place a Spotted marker on any one enemy unit they can spot per turn, just as if the enemy unit had "blown its cover" by firing. Such Spotted markers are removed as described earlier.
  • Unarmored Weapon Carriers: These are unarmored halftracks (Bufla and Sk7/2) or fully-tracked vehicles (Karl siege mortar) with mounted weapons. All are mechanized, except the BM-13 (Katyusha rocket launcher mounted on a truck). They are weapon units, not AFV's, so they are never efficient and cannot be activated by tank leaders. (SB)

Display Order of Battle

Germany Order of Battle
Heer
  • Mechanized
  • Misc
United States Order of Battle
Army
  • Motorized
  • Towed

Display Errata (7)

7 Errata Items
Overall balance chart for 20

The reduced direct fire value of the Heer HMG became 5-5 starting with Fall of France.

(plloyd1010 on 2015 Jul 31)
Overall balance chart for 63

The morale and combat modifiers of German Sergeant #1614 should be "0", not "8".

(Shad on 2010 Dec 15)
Overall balance chart for 543

The SK 7/2 appearing in 1940: Fall of France is actually a SK 6/2, but misprinted by APL. Hence it should be unarmored in that game. The SK 7/2, which appears in other games is correctly printed with an armor of 0.

(plloyd1010 on 2022 Apr 28)
Overall balance chart for 527

Strongpoints are single step units and can be eliminated with X results like any other single step unit.

(Shad on 2010 Dec 15)
Overall balance chart for 527

The standard mix of strongpoints may be downloaded from Avalanche Press:

http://www.avalanchepress.com/German_Strongpoints.php

This is the standard mix found in Airborne, Airborne-IE, and Edelweiss Expanded. The strongpoint mix in Cassino '44 is different from that of other PG games.

(plloyd1010 on 2012 Feb 01)
Overall balance chart for 527 Strongpoints are affected by the terrain in their hex just like any other unit. Even though they can't move, they can attack using Assault Combat if an enemy unit moves into their hex. They may not dig in or benefit from entrenchments.
(rerathbun on 2014 Apr 21)
Overall balance chart for 54

The movement allowance on the counters in Airborne is misprinted. It should be "3."

(rerathbun on 2012 Jan 30)

Display AARs (1)

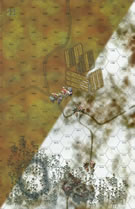
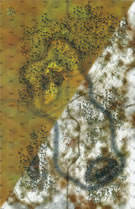
The 3rd Armored Division hits the Siegfried Line
Author Fanghawk
Method Solo
Victor United States
Play Date 2022-11-16
Language English
Scenario InoG002

Shermans and loaded M3’s hit a strongly fortified position. The German’s layered defense included mines, wire, anti-tank ditches, entrenchments, AT guns, and strongpoints.

It was initially tough sledding for the Americans as they tried to negotiate obstacles and get into position. The Germans were able to get in some good hits whittling away at the US assets and forcing the Americans through minefields to close for Assault. I’ll have to re-think the best ways to use all the fortifications as it was just a matter of time, and numbers, that allowed the Americans through. Once they were able to get past the speed bumps their overwhelming firepower won the day. It’s a fascinating puzzle for both sides and a high re-playability factor due to the available choices. I thoroughly enjoyed it (though the sheer number of fortifications can be a bit daunting to set up).

As an added bonus I used the spiffy yellow-orange counters from Spearhead Division. Pretty colorful map with everything that was going on.

0 Comments
You must be a registered member and logged-in to post a comment.
Errors? Omissions? Report them!
Page generated in 0.804 seconds.