
|
October on the Matanikau II Guadalcanal #19 |
||
|---|---|---|
| (Attacker) United States | vs | Japan (Defender) |
| Formations Involved | ||
|---|---|---|
| Japan |  |
29th Infantry Regiment |
| Japan |  |
3rd Kure Special Naval Landing Force |
| Japan |  |
4th Infantry Regiment |
| Japan |  |
5th Yokosuka Special Naval Landing Force |
| United States |  |
1st "The Old Breed" Marine Division |
| United States |  |
1st Marine "Edson's" Raider Battalion |

| Total | |
|---|---|
| Side 1 | 1 |
| Draw | 4 |
| Side 2 | 1 |


| Overall Rating, 6 votes |
|---|
|
3.33
|
| Scenario Rank: 531 of 913 |
| Parent Game | Guadalcanal |
|---|---|
| Historicity | Historical |
| Date | 1942-10-08 |
| Start Time | 14:30 |
| Turn Count | 108 |
| Visibility | Day & Night |
| Counters | 247 |
| Net Morale | 0 |
| Net Initiative | 1 |
| Maps | 1: Guad-ME |
| Layout Dimensions | 84 x 55 cm 33 x 22 in |
| Play Bounty | 199 |
| AAR Bounty | 165 |
| Total Plays | 6 |
| Total AARs | 2 |
| Battle Types |
|---|
| Inflict Enemy Casualties |
| Conditions |
|---|
| Hidden Units |
| Off-board Artillery |
| Randomly-drawn Aircraft |
| Terrain Mods |
| Scenario Requirements & Playability | |
|---|---|
| Guadalcanal | Base Game |
| Introduction |
|---|
|
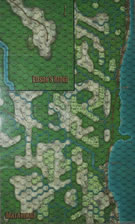
As dawn broke on the 8th October the two combatants viewed each other across the Matanikau, except where the Japanese held the east bank 1000 yards inland. Heavy rain prevented much in the way of movement and any combat until the middle of the afternoon when the Whaling Group and the 7th Marines crossed the river and turned for the coast. |
| Conclusion |
|---|
|
The Marines ended the 9th with a withdrawal to their perimeter after clearing the west bank of the Matanikau and destroying the Japaneses defenders. American casualties for the three day operation were 65 dead and 125 wounded. Japanese casualties are less well documented, but the 4th Regiment alone probably lost more than 600 killed. The operation succeeded in preventing the Japanese placement of artillery on the east bank of the river and forced them to expend their meager resources defending against the American attack rather than attacking themselves. |

|
|
|---|
| AFV Rules Pertaining to this Scenario's Order of Battle |
|---|
|
| Imperial Japanese Army |
|---|
|


| Imperial Japanese Navy |
|---|
|


| Marine Corps |
|---|
|


| Tug of war across the Matanikau | ||||||||||||
|---|---|---|---|---|---|---|---|---|---|---|---|---|
Another epic 'Guadalcanal' scenario which challenged both my wits and endurance, lasting 95 of 108 turns before ending in a stalemate. The set-up and goals are similar to the preceding scenario: #18- "October on the Matanikau I" but with the objectives a little further west this time with the Japanese mostly situated on the other side of the Matanikau, desperately trying to hold on to that west bank area. Also, the Japanese have their SNLF and Army relief forces deployed a little closer to the main defenses this time but will still take quite a bit of time to get into the fray having to move through a lot of jungle and river hexes to make contact with marine forces. The main Japanese forces are also a bit more depleted in strength with more reduced units yet their morale is still strong apart from the SER units. Again, like the previous engagement, both sides have two means of achieving their VCs; either hex control or inflicting enemy step losses. Of course to meet either side's geographical VCs will result in having to eliminate a lot of enemy steps so it will be a very long battle of attrition. The first day of the battle begins in the afternoon (14:30) with only a few hours of daylight to work with. Once night falls both sides will be faced with units becoming disrupted after moving so it is urgent to keep reinforcing units on the move, fog of war permitting. On the first turn both sides were able to activate all of their units with an epic total of 49 activations between them which was a good start. Also on the first turn, American OBA (3x18) was able to eliminate a Japanese INF step straight away (The Americans have to eliminate 21 Japanese steps to win; the Japanese must eliminate 15 American steps). This time around the opposing sides are already in DF/spotting range of each other so losses begin to mount very quickly. Again, the marines have the edge with direct firepower while the Japanese are the masters of assault; but the Japanese are on the defense trying to hold the west bank and are stretched thin waiting to be reinforced so their losses are a lot higher than the marines. At 19:15/turn 20, visibilty begins to decrease and the marines begin to settle and dig-in a strong line on the east bank of the Matanikau without too many casualties from opportunity fire. Some elements of scouts and raiders have managed to move far enough to open up a second front on the south flank and the Americans have established a very strong firing line going into the first night. With both sides becoming disrupted from night movement the Japanese are really out of their element, not risking any assaults. This is not very characteristic of the Japanese who are renowned for night assaults but by October the tide had really begun to turn against them on Guadalcanal and this scenario (and the one before) demonstrates that quite well. The battle rages on through the night but remarkably in favor of the marines. The Americans are able keep their lines intact and extend them a few hexes across the Matanikau preventing the Japanese from keeping control of their geographical VCs. During the night the Americans only lose one further step while the Japanese perish in the masses. Right after sunrise on the second day American Naval and Marine air support begins to appear in strength for once and in notable strength; and at 06:45/turn 66, the Americans have reached their VCs by having eliminated 21 Japanese steps. Now there was only one thing left for the Japanese to do: assault, assault and assault. Holding onto territory is no longer of any importance, the Japanese can only fight for a draw and storm as many marine postions as possible with predictably high casualties. Then, at 07:45/turn 70, a random event changes the American orders requiring the Japanese to eliminate 17 American steps rather than just 15 steps, making the Japanese situation even more desperate. But the Americans too were faced with their own dilemma: how to last 38 more turns without losing 11 more steps? This was the same problem in the previous battle, how to hold on to victory without withdrawing too far and letting the Japanese retake their lost positions? So wave after wave of Japanese assaults take place throughout the day while the Americans mostly remain static and hope for the best with first fire advantages from occupying jungle and/or river hexes. The American lines are broken through in many places and some elements of marines on the south flank are isolated and driven away further south and west, all the way to the Galloping Horse area of the map. In fact, one demoralized and fleeing scout unit has to move to a xx17 hex which releases the Japanese Army reserves of the 1st Battalion, 29th Infantry Regiment and a potential hornet's nest has been shaken. Though they had a long distance to travel to get into the action it did certainly turn the heat up. At a huge human cost the many Japanese assaults do begin to push American losses up and, unlike the previous battle, even the SNLF units begin to straggle into the now broken American lines. The map board is now a mess with units spread-out everywhere and there is a sea of disrupted/demoralized markers to compliment the chaos. However, despite reinforcements straggling into the fray the Japanese assaults are losing steam and manpower. It boils down to just having to eliminate one more american step to force a draw though so the Japanese use every dirty trick and make every human sacrifice possible to force a draw and not further shame their emperor. Turns began to pass at an agonizingly slow pace to the point of wanting to give up with the Japanese and let the Americans take the win but just one more American loss beckoned. By now every Japanese assault was a long shot but as long there was a sliver of hope left of surviving the American first-fire and getting an X result, they continued. And then it happened at 14:00/turn 95; an assault gets through attacking on the 9 column and a 6 is rolled -it was finally finished! So this one was tough to rate; there were times, many times that I wanted to give it a "4" and it probably deserves that much but by the end of this grueling feat of endurance I felt quite drained so gave it a modest "3" rating in the end and felt like I deserved a medal for seeing it through. I can only imagine how frustrating this one would be in a face-to-face match without calling it quits and it would be a question of how bad do you want to win or save face with a draw? -depending on what side you are playing. Like the preceding scenario the Americans "won" first with inflicting enemy losses but the real challenge was how to hold onto that victory? Again, what I did like about the overall scheme was how it seemed to accurately portray the historical situation. It's October on Guadalcanal and the Japanese are down but not quite out; soon the Marines will be relieved by the Army for mop-up operations and Guadalcanal will be secured. Having played out most of the 'Guadalcanal' scenarios I am wanting more and being a stickler for completion intend to move on to 'Jungle Fighting' for the complete Guadalcanal experience, taking the good with the bad. Yes, there are a few stinkers in the game but the good scenarios are damned good. A final note on the human cost for the Japanese to secure a draw before the conclusion of turn 95: 10 leaders ( 1 x CAP, 9 x LT and 1 x SGT), 30 INF, 4 ENG, 4 SER and 9 steps of HMG. American losses were: 1 x MAJ, 1 x CAP, 1 x LT, 9 MAR, 3 HMG, 2 SCOUT and 3 RAID steps; 47 Japanese steps to 17 American; and over 3 Japanese leaders eliminated for every American leader lost. One thing for certain is that there was no shortage of action with this one! |
||||||||||||
| 0 Comments |
| Bank Foreclosure | ||||||||||||
|---|---|---|---|---|---|---|---|---|---|---|---|---|
Battle Report: On the afternoon of October 8th, 1942, fighting continued along the north stretch of the Matanikau River on Guadalcanal. Japanese troops from 1st, 2nd, and 3rd Battalions of the 4th Infantry Regiment formed a strong defensive line south along the river from the village with reinforcement, and additional artillery support from the 3rd Battalion in the area west of the river. The 5th regiment of the “Thundering Third” (3rd Battalion, 1st Marine Division) headed west along the coastal track and eliminated a Japanese 70mm platoon that was based in the village, while elements of the Edson’s Raiders took fire from the Japanese artillery as they crossed the central swampy area. Directed OBA from the Americans took out a Japanese 70/105 combined fire battery on the ridge a couple of klicks west of the village, but the defenders in the village itself held strong. The Raiders exchanged fire with Japanese units from the 2nd Battalion (2/4) as they moved west 2 km southwest of the village, and that confrontation accelerated quickly to hand-to-hand combat. The Raiders suffered significant casualties and were reinforced by Marine units from the 2nd Regiment (3/1). As night fell, skirmishes were still occurring in the village despite repeated American efforts to control it. The Japanese line followed the west bank of the river to the southwest ending on an open ridge. The Americans had established a few tenuous footholds on the west bank of the river creating breaks in the Japanese line. Sporadic fighting broke out throughout the night, but most of the activity was dedicated to resting and repositioning forces for the next morning’s confrontation. Spirits were dampened somewhat by a brief thunderstorm that occurred at 2245 hours. Early the next morning (0130 hours), the Marine leaders were notified of an ammunition shortage that eliminated any offshore artillery support for the next day. Soon after that, the 3rd Kure and 5th Yokosuka Landing Forces arrived at the front lines from west. By that time, units from the 5th Regiment (2/1 and 3/1), 7th Regiment (3/1) and the Whaling Group of the 1st Division were all engaged in either skirmishes or support along the river line. Another more sustained thunderstorm occurred for an hour beginning at 0415 hours and turned the area to mud. As dawn broke, the lines along the river were still being contested while the Japanese units remaining in the village had been surrounded by various units from the “Thundering Third”. US Marines (7/3/1) attempted to turn the Japanese right on the SW ridge but were repelled after a 90-minute firefight that ended at 0900 hours. Meanwhile, scout platoons from the Whaling Group of the 1st Division moved around the still-contested village west along the coastal track and assaulted the mortar group on the ridge 1 km to the west; with the help of reinforcements from their unit, they occupied the ridge by 0830 hours. More rain fell from 0930-1030 and again from 1145-1230, but the soggy battlefield did not slow the action. At 1115, the Marines finally took control of the village after almost 21 hours of sporadic skirmishing. The US troops that had already moved around the village were now reinforced via the coastal track; they were pressing the Japanese left flank into the jungle south of the coastal track. At 1245 hours, combined forces from the 3rd Marine Battalion again pressed the Japanese right in a pincer move, and the Japanese forces were contained in a half-kilometer area that was being enveloped on all sides except for the eastern swampy region. By 1615, all Japanese troops had been cleared to establish a US-controlled perimeter extending 1 Km west of the river. The Cactus Air Force did an excellent job of screening the Japanese 29th Infantry Regiment, 1st Battalion, from moving east to attack the American line. While the objective of the mission was achieved, the Americans considered it a pyrrhic victory at best due to the loss over 300 men. Analysis: This is a lengthy scenario comprised of 108 turns. Hex control and step loss are objectives for both sides. This often seems to result in draws, since one side can have the requisite enemy step losses for victory, but still needs to clear the enemy units from the objective hex perimeter specified in the rules. In accomplishing the latter, steps are lost by the attacker giving the other side the requisite step loss that it needs for victory, or a draw in this case. The scenario was played using 4th Edition rules and the village rules from Kokoda Campaign for the village hex at the river mouth. Jungle disorientation was not used since it had not been used in the original scenario, presumably because by this time both the Americans and Japanese had mapped the jungle surrounding the Matanikau. The American player will find it slow-going bringing units onboard from the east due to the entry through jungle and the lack of extending command to adjacent hexes. After ten turns, all American units were on the board, but it took several more turns to get them formed and into play. After 40 turns, the Marines had taken out 33 Japanese units while losing 14, so they were only one step loss away from a draw. Even though the Marines were cautious in the early morning hours, the Japanese rolled “snake eyes” on a direct fire attack and secured the step loss needed for the draw. At that point, the Americans pressed the attack to see if they could match the historical action in which they cleared the west bank and caused significant Japanese casualties. Due to two separate “New Orders” events, the Japanese step loss required for a Marine victory had been increased to 25. This was not an issue, as the Americans had caused 49 step losses, while losing only 20, by the time dawn broke on the 9th. However, an event roll that cost the Americans the use of OBA for the remainder of the scenario compromised their ability to move forward with support on the second day of the battle. Nonetheless, the final analysis when the battle ended on the 104th turn showed 95 step losses for the Japanese (4 step losses were taken by the 29th Infantry Regiment since some of those units were situated on the xx15 hexes ready to move east; the Cactus Air Force kept them in check) compared to 27 for the Americans, and 36 Japanese leaders lost to only 11 for the Americans. This scenario is a very long one with a draw being practically a predetermined outcome due to the overlapping objective areas and the resultant step loss that would most likely occur for either side while clearing the area. Since each side must either have very limited step losses or clear their zone, hitting the step loss minimums is bound to happen for both sides, hence a draw. With that in mind, I have rated this scenario a “3” primarily because of its historical feel rather than its playability. Slogging through the whole day & night, complete with thunderstorms, really gave the sense of the battle. There is one “gamey” feature that gives the Americans an advantage, the limit on the Japanese 29th Infantry; they are not allowed to move east unless the Americans move into the xx17 row, So, it behooves the US player to avoid getting too far West, and thereby leaving those Japanese units sitting on the sidelines for the battle. The only situation that the US player would need to be that far west would be if the US had taken enough VP step losses for a Japanese victory, and the US needed to clear their victory objective perimeter. |
||||||||||||
| 0 Comments |