
|
Kursk - South Flank Scenario 20: Misfire II: Nepkhaevo Variant Panthers #4 |
||
|---|---|---|
| (Defender) Germany | vs | Soviet Union (Attacker) |
| Formations Involved | ||
|---|---|---|
| Germany |  |
3rd SS "Death's Head" Division |
| Soviet Union |  |
2nd Guards Tank Corps |
| Soviet Union |  |
4th Guards Motorized Rifle Brigade |

| Total | |
|---|---|
| Side 1 | 1 |
| Draw | 0 |
| Side 2 | 0 |


| Overall Rating, 1 vote |
|---|
|
5
|
| Scenario Rank: --- of 913 |
| Parent Game | Variant Panthers |
|---|---|
| Historicity | Alt-History |
| Date | 1943-07-08 |
| Start Time | 12:00 |
| Turn Count | 20 |
| Visibility | Day |
| Counters | 247 |
| Net Morale | 0 |
| Net Initiative | 1 |
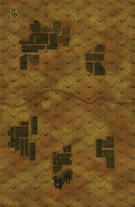
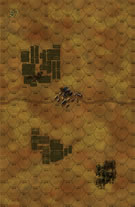
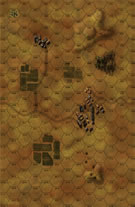
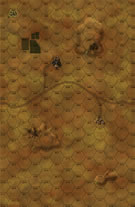
| Maps | 4: 36, 37, 38, 39 |
| Layout Dimensions | 86 x 56 cm 34 x 22 in |
| Play Bounty | 236 |
| AAR Bounty | 171 |
| Total Plays | 1 |
| Total AARs | 1 |
| Battle Types |
|---|
| Hill Control |
| Inflict Enemy Casualties |
| Road Control |
| Urban Assault |
| Conditions |
|---|
| Off-board Artillery |
| Randomly-drawn Aircraft |
| Reinforcements |
| Scenario Requirements & Playability | |
|---|---|
| Variant Panthers | Base Game |
| South Flank | Maps + Counters |
| Introduction |
|---|
|
In sixteen hours of fighting on July 7th, 2nd Guards Tank Corps had been forced east of the Lipouyi Donets River. Today they were ordered to turn the tables on their tormentors with a dawn attack. It was noon before they managed to start their advance. |
| Conclusion |
|---|
|
The Luftwaffe pulled off a first on this day when they blunted an enemy armor attack without ground support. In less than an hour, 50 Soviet tanks were left smoldering and their supporting infantry scattered. To add insult to injury, Death’s Head Division managed to run 2nd Guards Tank Corps out of Nepkhaevo during the day’s fighting. To say the least, Stavka was not pleased. |
| Additional Notes |
|---|
|
The Skoda Panther counters replace the PzIIIj or PzIVe and PzIVf2 tanks in this scenario. |

|
|
|---|
| AFV Rules Pertaining to this Scenario's Order of Battle |
|---|
|
| Schutzstaffel |
|---|
|


")
")
")
")


| Army (RKKA) |
|---|
|


")


| Guards |
|---|
|


| 4 Errata Items | |
|---|---|

|
All SS 105mm guns should have white, indirect fire values. (Shad
on 2010 Dec 15)
|

|
All SS 75mm IG guns are direct fire weapons (black), not indirect (white). (Shad
on 2010 Dec 15)
|

|
The reduced direct fire value of the SS HMG is 5-5 in Beyond Normandy and Road to Berlin. (plloyd1010
on 2015 Jul 31)
|

|
Kommissars never get morale or combat modifiers. Ignore misprints. (Shad
on 2010 Dec 15)
|
| Cats Hold the Line! | ||||||||||||
|---|---|---|---|---|---|---|---|---|---|---|---|---|
The fourth scenario of the Variant Panthers module is played with Scenario #20 from Kursk:South Flank (“Misfire II:Nepkhaevo”). This playthrough used the Skoda variant, i.e. six Pz42t’s were substituted for the ten PzIIIj’s in the German reinforcements. The German setup was concentrated on the center covering the road on Map 39 and protecting the town on Map 37. A small contingent of forces with an SCH, HMG and 75mm IG covered the road on Map 36 and the southern approach to the town on Map 37. The Soviet units were aligned in a long hook from the east edge of Map 38 to the southern end of the fields, with the RKKA units in reserve behind the Guards line; the latter units were stacked for maximum combined bombardment. With only 20 turns to achieve at least three objectives for victory, the Soviets have to advance into the German fields of fire as soon as possible, which doesn’t provide the luxury of softening the German lines as much as one might like. The Soviets managed to take out the German 88mm early with a nice bombardment roll, and also returned AT fire destroying two Marder III’s and a StuGIIIg. Soviet reinforcements arrived on schedule on Turn 6, while the German ones were delayed. During that time, the Germans were very vulnerable to Soviet armor, which was there in force, but the accompanying foot units were hampered by Axis artillery and ground fire, stalling the advance on the north and center German lines. Other Soviet units then turned the south flank of the German line and proceeded north toward the town on Map 37. At the end of Turn 10, the halfway point in the scenario, the Soviets had control of the road on Map 36 and held the majority of the hill & town hexes on Maps 38 & 39; thus two objectives were well within reach. Step losses at that point were 30 for the Soviets compared to 17 for the Germans. The elimination of three more German steps would result in a third objective (at least 20 German steps lost) attained for the Soviets and a minor victory. By the time the German reinforcements arrived on Turn 15 (!), the Soviets had taken 22 German steps and were still trying to remove some stubborn German units from the town and hill on the north of Map 39. The German reinforcements came in force along both east/west roads. They reinforced the town on Map 39 quickly enough to hold it until the end of the game. They also pushed the Soviets on the road on Map 36 to the breaking point, as a single Soviet SMG remained undemoralized in an assault on a half hex on the map edge between Maps 36 & 38. The scenario became vicious after the German reinforcements arrived with the final step loss count being 93 for the Soviets against 53 lost for the Germans. In the final analysis, the Germans won a minor victory by maintaining control of the towns on Maps 37 & 39, although only one of the two towns on the latter map was controlled. The scenario has good balance, although it might have been a bit easier for the Germans if they had not had that 9-turn gap in reinforcement arrival. |
||||||||||||
| 0 Comments |