
|
Down to the Waterline Grossdeutschland 1946 #6 |
||
|---|---|---|
| (Attacker) Germany | vs | Soviet Union (Defender) |
| Formations Involved | ||
|---|---|---|
| Germany |  |
Grossdeutschland Division |
| Soviet Union |  |
82nd Rifle Division |

| Total | |
|---|---|
| Side 1 | 2 |
| Draw | 0 |
| Side 2 | 0 |


| Overall Rating, 2 votes |
|---|
|
2.5
|
| Scenario Rank: --- of 913 |
| Parent Game | Grossdeutschland 1946 |
|---|---|
| Historicity | Alt-History |
| Date | 1946-05-01 |
| Start Time | 06:00 |
| Turn Count | 30 |
| Visibility | Day |
| Counters | 235 |
| Net Morale | 1 |
| Net Initiative | 3 |
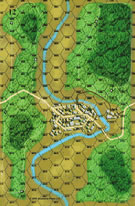
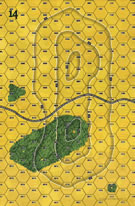
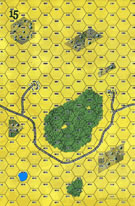
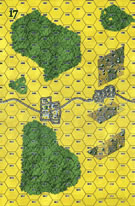
| Maps | 6: 12, 14, 15, 17, 18, 20 |
| Layout Dimensions | 86 x 84 cm 34 x 33 in |
| Play Bounty | 235 |
| AAR Bounty | 165 |
| Total Plays | 2 |
| Total AARs | 2 |
| Battle Types |
|---|
| Bridge Control |
| Road Control |
| Urban Assault |
| Conditions |
|---|
| Off-board Artillery |
| Scenario Requirements & Playability | |
|---|---|
| Battle of the Bulge | Maps |
| Eastern Front | Counters |
| Grossdeutschland 1946 | Base Game |
| Road to Berlin | Maps + Counters |
| Introduction |
|---|
|
Throughout the Second World War, river lines made formidable barriers — as long as the defenders had enough troops to cover them. The helicopter promised to allow rapid movement across all types of terrain, making the defenders' mission that much harder. When added to an elite formation with powerful weapons, the combination looked to be unstoppable. On paper, at least. |
| Conclusion |
|---|
|
The helicopter held enormous promise, but proved extremely vulnerable to enemy ground fire. For example, of the 11,827 helicopters deployed by the United States during the Vietnam War, 5,086 were destroyed. However, they appear to have logged far more flight hours than fixed-wing aircraft — if fragile, the helicopter was also readily available for transport and support missions. But in 1946, the machines would have been even more delicate than those flying two decades later. |

|
|
|---|
| AFV Rules Pertaining to this Scenario's Order of Battle |
|---|
|
| Grossdeutschland Division |
|---|
|


| Heer |
|---|
|


| Army (RKKA) |
|---|
|


")


| 3 Errata Items | |
|---|---|

|
The morale and combat modifiers of German Sergeant #1614 should be "0", not "8". (Shad
on 2010 Dec 15)
|

|
The reduced direct fire value in Kursk: Burning Tigers is 4-4. (plloyd1010
on 2015 Jul 31)
|

|
Kommissars never get morale or combat modifiers. Ignore misprints. (Shad
on 2010 Dec 15)
|
| Chopped Down |
|---|
|
I have to admit I hesitated before trying our an airmobile scenario. It seemed as though there was just a little too much to add to the system and I was quite afraid that the helicopters would change the PG system in ways that would break it. I was quite pleased with the result. Don't get me wrong, this scenario is NOT balanced. The Soviets will be wiped out. Their only hope is to cause enough losses to keep from a Major German victory. What the helicopters could do is find the Soviets in the woods and spot for the nasty German OBA. In this way the masses of Soviet artillery can be netralized reasonably quickly giving the ground troops the opportunity to wipe up the Soviets. Also, the initial river crossing becomes almost trivial. The Soviets plethora of AA guns helps somewhat to control this (I lost one loaded helicopter and one loaded KTZN in the initial assault). Once the Germans are across the river and into both river towns the battle becomes much more natural. In my game the southern end of the board was cleared first leading to the helicopters and KTZNs picking up their charges and moving north to support the battle in the "exit" towns but before their weight could be flet the Panthers and Tigers had cleared the area with an hour and a half to spare. Some Soviet troops remained in the woods but they were surrounded and would be eliminated shortly through OBA or ground attack. This was a lot of fun to try out but not much of a competitive event. I give it a "3" for that. |
| 0 Comments |
| Soviets Slaughtered | ||||||||||||
|---|---|---|---|---|---|---|---|---|---|---|---|---|
The main objectives:German forces need to cross the river and capture all roads, bridges and towns. Time = 7.5 hours (30 turns) Opening Thoughts Soviets have 19 gun batteries, which may be a problem, but they have no OBA. Germans can cross the river with their helicopters and deposit foot troops on the east side. The remaining foot will advance along the road in APCs. BATTLE SUMMARYGermans enter in the west. Soviet artillery fires and is spotted by the helicopters and is targeted by German OBA. In the south the Germans approach the river. Soviet HMG fire eliminates a KTZN! Soviets score the first casualty and lead 3-0! Helicopters drop the German infantry in the northeast. In the south east “Artillery Hill” is attacked by German OBA and the German attack helicopters. The Soviet crews begin to flee. By the river in the south the German firepower is so high they can easily make the 45 column (resolve on 22 column for the town, which is still [i]really[/i] good!). Germans now lead 5-3. All hell is about to break loose. In the north the OBA demoralises the Soviet 85mm and the German tanks advance to the town outskirts by the bridge. In the south the helicopters rip into Artillery Hill. One is reduced by AA fire. Meanwhile by the river German direct fire across the river is devastating. (11-5) Soviet mortars score a kill on the approaching infantry who clean out the mortar nests in very quickly. (18-6) The Germans now enter the south town – They just have too much firepower! Artillery Hill is just about completely wrecked. (28-6) Playnote: Victory is no longer in doubt for the Germans, in 6 turns they’ve already managed to inflict 28 step losses! The only questions remaining are how long will it take them, and can the Soviets manage their minor victory condition of inflicting 20 steps? Over the next 30 minutes the assault in the south continues steadily. The Germans take a few losses, but are undaunted. In the north the German tanks barrage the Soviet defenders who are quickly demoralized. The German Stormtroopers quickly overrun the town. (53-8) Yup, that was a slaughter! 25 Soviet step losses in those 2 turns! Artillery Hill is now void of Soviet guns, as the Soviets have only direct fire left. The armour begins to move east. Along the river all resistance is lost. The South town is taken by the Germans to begin to move east. Only a few small pockets of Soviet resistance remain. Germans are up to 9 steps lost. The Germans press on quickly trying to see how fast they can win. They initiate some more assaults in the northwest and take a step loss. Over the following 45 minutes the last of the Soviet infantry is eliminated and only a few Soviet leaders who have fled into the woods remain on the map. The Germans had another two platoons reduced, resulting in 12 steps lost in total. GERMAN MAJOR VICTORY AftermathThis was a major slaughter. Soviet RKKA just didn’t have a chance. Upon set-up, the south town looked impossible to take without heavy casualties. But the excellent German leaders and incredible firepower of the Grossdeutschland army made it look very easy against the low morale RKKA. Although some fun is had with the German helicopters, this scenario is really too imbalanced for anything but solo play. There are much better scenarios to enjoy in this module. Scenario Rating: 2/5 – For massive imbalance. |
||||||||||||
| 4 Comments |
Please elaborate on the usage of helicopters. I haven't any modules with them in my collection. How do they affect the flow of battle? Did you lose any? The scenario conclusion points out their fragility...
The helicopter held enormous promise, but proved extremely vulnerable to enemy ground fire. For example, of the 11,827 helicopters deployed by the United States during the Vietnam War, 5,086 were destroyed.
Yes Herr General! Helicopters in this scenario are primarily used for transport. The travel up to 11 hexes and ignore terrain (obviously). They are only susceptable to direct fire, which in this scenario the Soviets only had a few AA guns and some HMGs that could really affect them. AA guns get a bonus column shift, all other direct fire has a negative column shift. The Helicopters wreck havoc on artillery and mortars as they can move adjacent and then direct fire. Like train guns and river guns, they may fire at the end of their move. So its hard to defend against them. They also are protected by negative column shifts when attacked by Op Fire. (They are hard to hit as they scream passed). So, they are quite difficult to take out if they stay their distance from direct fire.
As stated, in this scenario, their main benefit was to transport about half the German infantry over the river. Then they would prey on whatever mortars and artillery they could find. In this scenario the Germans only lost one helicopter step due to AA direct fire. If they keep their distance they are quite hard to take out. (They also ignore disrupted result, so with 8 morale, they need to roll an 11 or 12 on an M check to get demoralized. They ignore morale failure by 1 or 2).
I lost a lot more helicopters in Scenario 4 where I was a lot more aggressive with them attacking the Soviet trucks and trying to disrupt their advance.
Interesting! But now I have more questions!
Do they "land" at the end of their movement or can you leave them "hovering" someplace iffy such as over a river hex? Are they able to land in any terrain? Can they enter enemy occupied hexes but not as an assault? Can they overfly enemy hexes? Are loading and unloading the same as for regular transports in terms of time, cost, and quantity?
They are always assumed hovering. They can touchdown to unload, but not in enemy/assault hexes. From the rules "Helicopters can move into or through hexes containing friendly and/or enemy units without restriction."
Transport is the same as other transport (5.6) with the above exception. Also, as they have 2 steps, if they take an X, the transported platoon is also reduced, not eliminated (I think that makes sense).