
|
High Water Mark First Axis #14 |
||
|---|---|---|
| (Attacker) Slovak Republic | vs | Soviet Union (Defender) |
| Formations Involved | ||
|---|---|---|
| Slovak Republic |  |
1st "Janošík" Infantry Division |
| Soviet Union |  |
395th Rifle Division |

| Total | |
|---|---|
| Side 1 | 1 |
| Draw | 0 |
| Side 2 | 0 |


| Overall Rating, 1 vote |
|---|
|
4
|
| Scenario Rank: --- of 913 |
| Parent Game | First Axis |
|---|---|
| Historicity | Historical |
| Date | 1942-09-15 |
| Start Time | 08:00 |
| Turn Count | 30 |
| Visibility | Day |
| Counters | 124 |
| Net Morale | 0 |
| Net Initiative | 0 |
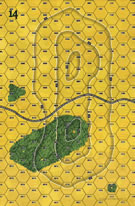
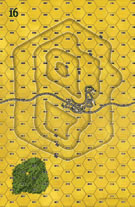
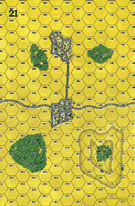
| Maps | 3: 14, 16, 21 |
| Layout Dimensions | 84 x 43 cm 33 x 17 in |
| Play Bounty | 171 |
| AAR Bounty | 171 |
| Total Plays | 1 |
| Total AARs | 1 |
| Battle Types |
|---|
| Road Control |
| Urban Assault |
| Conditions |
|---|
| Off-board Artillery |
| Scenario Requirements & Playability | |
|---|---|
| Eastern Front | Counters |
| First Axis | Base Game |
| Road to Berlin | Maps + Counters |
| Introduction |
|---|
|
the Slovaks saw little fighting during the Axis advance into the Caucasus, as German and Romanian divisions did the dirty work and the Mobile Division breezed along in their wake. With the Soviet 56th Army fighting with berserk fury to hold the approaches to the port of Tuapse on the Black Sea, 57th Panzer Corps finally committed the Slovaks to a major attack. If the Axis could break through to Tuapse, the Soviet defenses along the Black Sea coast would be cut in two. |
| Conclusion |
|---|
|
Though the capture of Tuapse was vital to the German campaign plan in the Caucasus, neither of 57th Panzer Corps mercenary divisions (the other was the 5th SS "Viking" Division) were up to the task. On the Soviet side, North Caucasus Front had asked for thousands of Communist Party members and additional political officers, and these men and women helped keep fighting spirit at a fanatic level. The Red Army held with its back to the sea, setting the stage for an eventual massive victory. The Slovaks, badly damaged in the effort, were pulled back out of the front lines. |

|
|
|---|
| AFV Rules Pertaining to this Scenario's Order of Battle |
|---|
|
| Slovenská Armáda |
|---|
|


| Army (RKKA) |
|---|
|


| 2 Errata Items | |
|---|---|

|
The reduced direct fire value in Kursk: Burning Tigers is 4-4. (plloyd1010
on 2015 Jul 31)
|

|
Kommissars never get morale or combat modifiers. Ignore misprints. (Shad
on 2010 Dec 15)
|
| Brilliant Plan, sir. Who can execute it? | ||||||||||||
|---|---|---|---|---|---|---|---|---|---|---|---|---|
Before I dove into PG my main focus for wargaming was the American Civil War. It's kind of an occupational hazard for those who live in Richmond, Virginia. As a Civil War gamer, I was required to read through and understand the campaigns of RE Lee. If you do you become aware that Lee's first campaign, in the hill country of West Virginia was marvelous... on paper. Unfortunately it was spectacularly bungled as its intricate nature was beyond the ability of his subordinates to control. I now know truly how it feels. If one doesn't look at the terrain this one appears pretty easy for the Slovaks. They have nearly double the force of the Soviets and they only have to clear a road. In the end, however, their ability to do so is highly limited by two factors; their 7/6 morale and the intensely hilly terrain (this is after all in the mountains near the Black Sea). The Soviet commander accurately noted that this would lead the Slovaks to have to assault in large numbers each time they met up with Soviet troops. So rather than a single large position in the center of the board with smaller forces near the rear the Soviets set up in company sized delaying posts as follows; 1 in the town on the first board, 2 in the hill top town on the second board and one in the forest on the third board. If you are counting along you have hit four and the Soviets have five companies. The last, my piece de resistance, held a flank position to the west with the idea that it would become a Hail Mary attempt to control the road if the second town was taken by the Slovaks. If nothing else, the flankers would have to be either attacked or shadowed by a substantial Slovak force, thus denying their use in any final actions. This strategy was based on watching the Slovaks become totally disorganized time and again when they had to attack any fixed position. By forcing them to do so multiple times the Soviet commander expected to benefit from this Slovak tendency and the need to take TIME to recover. The strategy, then was to delay and disorganize, not to defeat the Slovaks. A brilliant plan with carefully considered positioning... and not a single morale modifier amongst the Soviet leaders, not one. The Slovaks had four, including one Porocik with a "2". The Slovaks required 9 turns to dispatch the defenders of the first town, most of whom perished in double demoralizations when they could not recover from an M2 demoralization in assault combat. Still almost a third of the way into the battle it would seem that the Slovaks were behind schedule. There was still 4/5 of the Soviet force on the board and a very strong position in the center board that would have to be rooted out. Here, however, the vast numbers of Slovaks (probably the only time in PG history anyone will ever mention "vast numbers of Slovaks") permitted them to send substantial forces beyond the current battle to invest and begin DF and artillery combat with the next defended position. So even while the final Soviets were running away from the first town the Slovaks were already demoralizing and disrupting Soviets in the second town. By the time the Slovak HMGs and engineers arrived to do the dirty work of assaulting, many of the defending troops had already run away. The second town fell by turn 22. Time for the Hail Mary pass by the Soviets. The Slovak cyclists had become entangled with the final Soviet position on the reverse slope of the final hill so the Soviets had to consider that the Slovak spearhead might actually reach the end of the road and clear them off. The flanker company moved briskly towards the town on the first board. The Slovaks had seemed to rush right by during their assault but suddenly seemed to have quite a number of troops available to blunt this thrust. You see, the Slovaks knew that they would have plenty of disrupted and demoralized troops as a result of their assaults and Soviet artillery fire on advancing troops. They placed two leaders with morale modifiers to the rear of their advance who scooped up the stragglers, placed them into good order one at a time and ordered them into a central reserve. When the Hail Mary movement began the Soviets were confronted by nearly twice their number of Slovaks. Then, when spotted by the Slovaks in a forest, the Soviets were hit by artillery and their lone leader double demoralized and, leaderless, the company became toothless as well. Meanwhile in the main battle, the Slovak spearhead was dealing with Soviet stragglers from the hill town on their way up the final slope and the Soviets were assaulting the Slovak cyclists who had made it to the reverse slope. A disastrous assault on the cyclists and a spirited counterattack by those peddling fiends resulted in the destruction of the Soviet reserves and when a DF attack eliminated the stragglers on the front slope the Soviets were no longer able to threaten the road. Lest one think that the Soviet strategy was doomed from the start one need only hear that the ultimate action happened on turn 28 of 30. The Slovaks had taken few losses but had a string of recovering troops along the road as once the Hail Mary went forward the leaders who had been assisting recoveries had to turn over to organizing a defense. If the Soviets had only had one leader worth any consideration a victory would have been within reach. Great terrain, interesting forces, good suspense. What more could you want? I give it a 4. |
||||||||||||
| 0 Comments |