
|
Ignorant Armies First Axis #3 |
||
|---|---|---|
| (Defender) Slovak Republic | vs | Hungary (Attacker) |
| Formations Involved | ||
|---|---|---|
| Hungary |  |
23rd Infantry Brigade |
| Slovak Republic |  |
Stakcin Group |

| Total | |
|---|---|
| Side 1 | 6 |
| Draw | 1 |
| Side 2 | 10 |


| Overall Rating, 14 votes |
|---|
|
3.5
|
| Scenario Rank: 394 of 913 |
| Parent Game | First Axis |
|---|---|
| Historicity | Historical |
| Date | 1939-03-23 |
| Start Time | 06:00 |
| Turn Count | 24 |
| Visibility | Day |
| Counters | 56 |
| Net Morale | 0 |
| Net Initiative | 0 |
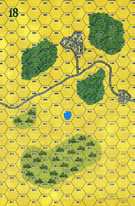
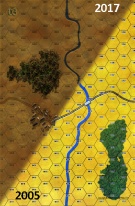
| Maps | 2: 18, 3 |
| Layout Dimensions | 56 x 43 cm 22 x 17 in |
| Play Bounty | 132 |
| AAR Bounty | 129 |
| Total Plays | 17 |
| Total AARs | 8 |
| Battle Types |
|---|
| Bridge Control |
| Road Control |
| Urban Assault |
| Conditions |
|---|
| Off-board Artillery |
| Scenario Requirements & Playability | |
|---|---|
| Eastern Front | Maps |
| First Axis | Base Game |
| Road to Berlin | Maps + Counters |
| Introduction |
|---|
|
Hungary's first tank attack came on the initial morning of their invasion of Slovakia. The Slovaks remained disorganized thanks to the loss of so many Czech officers and specialists, but they had often trained with tanks and had at least some idea of what to expect. The Hungarians advanced four kilometers into Slovak territory, and waited for daylight before assaulting the main Slovak line of resistance near the town of Sobrance. |
| Conclusion |
|---|
|
Though outnumbered, the Slovaks held their ground and stopped the Hungarian advance - surprising their own command almost as much as the Hungarian leadership. Slovak reinforcements hurried to the scene, while the Hungarians milled about uncertain of their next step. A real shooting war had not been included in the mission briefing. |

|
|
|---|
| AFV Rules Pertaining to this Scenario's Order of Battle |
|---|
|
| Army |
|---|
|


| Slovenská Armáda |
|---|
|


| Down to the wire |
|---|
|
I had read several other AARs which promised a fun scenario here, and it did not disappoint. As the Slovaks, I concentrated a lot of my defense around the bridge, with supporting forces in the woods and opposing the river crossing in the south. One of the 37mm AT guns stayed farther to the back to prevent any deep penetration. Early on, the dug-in Slovaks took a heavy toll on the Hungarians attempting to cross the river, killing several steps, and sending quite a few others back demoralized. These are 7/5 troops, so the demoralized and reduced troops had to roll a 2 or 3 to recover. There were a couple of units that stayed demoralized for the majority of the game. Hungarian attempts to assault the bridge were unsuccessful, as even when they were able to disrupt some of the Slovak defenders, the Slovaks rolled well on their first fire. At one point the Slovaks had inflicted about 10 casualties while suffering 2. However, there was an issue. A couple of Slovak leaders were lost from either compound demoralization or straight-up casualty rolls. The Slovaks didn't have a lot of leaders with which to start the scenario, and bringing demoralized troops back to good order and then back to the front line was getting difficult. The Hungarians lost several WW1-era tank steps to a disrupted 37mm AT gun as they crossed the river to the north, however the AT gun I set farther back was unable to achieve the same success against the tanks crossing to the south. And the Hungarians had the numbers to keep pouring across the river, and with their leadership issues the Slovaks could not keep plugging gaps. Eventually, the Hungarians pulled out of the bridge assault, suffering more casualties, and surrounded the bridge with as much firepower as possible and blasted out the Slovak defenders. With no fresh troops and leaders to send them to the bridge, it eventually fell. The Slovaks then started sending troops to the rear as fast as possible, leaving a couple roadblocks to slow down the advancing Hungarians, hoping to retain control of the road and the lead in casualties. However, with 2 turns to go, a boxcars on an OBA strike on the 2nd Slovak AT gun took it out when it was sitting 2 hexes away from Hungarian armor which it might have taken out on its next shot. This was effectively a 3 step swing in the final results. A final push on the last turn saw the Hungarians eliminate a 14th Slovak step after suffering 13 step losses themselves. However, one of the fleeing Slovaks (good order) still occupied a town hex on the east-west road, so both sides got a minor victory, which made it an overall draw. A lot of fun, and it did live up to the hype. |
| 0 Comments |
| So, what do YOU want to do while we wait for them to recover their morale | ||||||||||||
|---|---|---|---|---|---|---|---|---|---|---|---|---|
Two moderately sized green units run into each other and at the first fire nearly everyone loses their heads and goes to ground. The officers cannot get their charges to raise back up to the task at hand. Then the artillery begins causing losses. Again, I am impressed with the ability of 16 pages of rules and some simple concepts to accurately depict a real conflict. To those who haven't fought (as the Slovaks and Hungarians in this scenario) battle is an intensely terrifying event. Rational men would hide as both the Hungarians and Slovaks did. The Hungarians did actually advance into contact but quickly became disoriented in the woods north of the bridge. Once their momentum was shot they were prime candidates for a counterstroke but the experience of throwing the Hungarians back was just as disorienting to the Slovaks. Both sides then began hammering the demoralized troops with artillery to keep their heads down (and in some cases out). The Hungarian armor (tin foil?) was easily dealt with by assaults and the final tally was pretty disheartening for anyone considering attacking with green troops. |
||||||||||||
| 0 Comments |
| Hungarian Steamroller |
|---|
|
This was an exciting scenario, although i feel like I may have misplayed the Slovaks. The strategy I took with the Slovaks was to make the clearing of the road (the Hungarian major victory condition) as slow as possible rather than tenaciously defending the bridge. My reasoning was that 24 turns may not be enough time for a low morale, weakly-led Hungarian force to clear the road and adjacent hexes across two boards. By placing multiple Slovak company-strength forces in woods and towns along the length of the road, I'd force the Hungarians into multiple approach-and-assault battles that would be difficult to sustain with such low morale. In practice, both forces had low morale and weak leadership, but the Hungarians rolled better. Advancing in two bodies, the northernmost routed the Slovak platoons holding the bridge, although the Hungarians actually crossed the river north of there and approached the first forest holding a Slovak infantry and AT force. The southern force crossed the river below the bridge and leap-frogged ahead to get at the second Slovak delaying position in woods farther back. Both battles developed and played out in parallel, with the Slovaks suffering significant morale failures and disintegration of their forces. The Hungarians were better at keeping their morale up and recoveries were more common. The key to their strategy was to relentlessly advance with company-sized forces even while still mopping up resistance behind them. Once the first two Slovak positions had collapsed, the Hungarian steamroller really let go and rolled up the remaining three Slovak positions with ease. After 22 turns, the Slovaks had lost control of the entire length of the road and could muster no effective fighting force. A company of scattered, leaderless infantry hiding in the woods was all that remained of their original reinforced battalion. Hungarian losses totaled one platoon. Major Hungarian victory. I've been going over the Slovak plan in my head and I still think it might have worked. I was genuinely surprised at how well the Hungarians did. Perhaps it would make more sense to have tried to hold the bridge, but I felt that the terrain there was too open for a good defense. Maybe by relying on a larger forward defense that fell back ahead of the Hungarians, rather than smaller static forces, I could have successfully stalled the advance. I just don't like moving low morale forces in the face of the enemy, op fire is just too disruptive. And yet the Hungarians did quite well doing just that. |
| 0 Comments |
| Its All About The Bridge | ||||||||||||||
|---|---|---|---|---|---|---|---|---|---|---|---|---|---|---|
This game was played with Daniel (Hugmenot) on Skype in our first ever encounter over two sessions. Before I go any further, it is worth mentioning what an excitingly close tussle this was and certainly had a changeable ebb and flow to it both ways. The history of how we came to play this particular scenario is humourous too. A few months back, Daniel was experimenting with set-ups and showed a photo-AAR of this scenario where the Slovak defenders were easily overrun. Some forum-ites suggested various defences, including me where I suggested that the Slovaks should worry ONLY about holding the bridge at the expense of all else. If they do that successfully, then the Hungarian VC's do not allow for a Hungarian victory. After which Daniel wrote something to the effect of "Well show us the money". Given that the Slovaks had suffered a Major Loss in the AAR shown before, anything from a Minor Loss, Draw or any kind of win would all be an improvement. Therefore, I set up as I suggested I would and here is the AAR of our encounter. The Hungarians were committed to capturing the bridge toward Sobrance as well as where possible securing the main road. At 0600 hours they advanced in three groups from the east. One straight at the bridge to Sobrance. Then one either side of the bridge’s flanks. The Slovaks, ordered to inflict as many losses on the aggressors as they could and if possible, hold the road and bridge, dug-in all their machine guns on that bridge and then instantly sent forward two platoons of infantry either side of the bridge to hunker down on the river bank both sides of it. The rest of the Slovaks were concentrated behind the bridge, dug-in and ready to react and reinforce where needed. The Hungarians made sure their two flanking forces crossed the river in large numbers, whilst the centre group kept the bridge engaged, albeit with little result from the action there. The first casualties came at 0815 hours when one of the two Slovak AT units ran off under bombardment abandoning their guns. The Slovaks responded by eliminating a step of Hungarian infantry. The Hungarian advance had effectively hemmed in the Slovak defenders and before long, the attackers closed toward the Slovak positions. In the main, the advance had been successful though another platoon was lost to Slovak fire. At the western most point of the Slovak defence, a company of Magyar infantry were repulsed and virtually eliminated as they attempted to overrun a dug-in AT crew and infantry platoon. A counter-attacking bayonet charge led by the commanding Slovak Major proved decisive at this point in violently removing the threat. More Hungarian casualties followed as the first three and half hours of battle went little in their favour. The Slovak AT batteries had failed to knock out any of the Hungarian tanks when they presented themselves as targets and these missed opportunities would place more pressure on the defence later. Despite the early set-backs, the Hungarians had closed in all along the positions occupied by the Slovaks by 0945 hours as assaults cropped up everywhere. The battle had become a little disorganized as the assaults took over. Much of the Hungarian force tenaciously attacked the fox-holes, whilst surviving comrades from other platoons drifted away from the battle demoralized. Slovak casualties were now mounting as a result of the continuous and now successful attacks. From 1015 hours the melee accounted for nearly five Slovak platoons ceasing to exist as Hungarian aggression paid finally dividends. But as the Slovak line dwindled, they too managed to inflict damage but were now struggling as light Hungarian armour, immune from any AP threat took advantage to join the attack. Only the desperate shuffling of Slovak forces kept the thinning defence going with any effectiveness and this was forcing the Hungarians to use their final reserves of relatively fresh troops. But it was the bridge the Hungarians needed and with time running out, the whole battle was completely in the balance. The Hungarian commander launched a final company sized attack on the stubborn defenders of the desired feature. Brave though the attack may have been, casualties were taken. Seeing yet more of their comrades cut down, the whole company threw in the towel on the attack, and demoralized beyond recall, gave up once and for all. Their repulse signaled the end of the cliff-hanger struggle with the Slovaks taking a very close and hard-earned victory. Casualties were quite high. The Slovaks lost 11 FOOT steps, 2 officers and 2 ordnance. The Hungarian losses were 15 FOOT steps and 2 officers. So the Slovaks run out Major winners this time but it was most certainly close. As turn 23 (of 24 begun, there were four of the five results still possible, meaning a draw and both sides still able to win. But as the title suggests. For the Slovaks, it is ALL about the bridge. Keep possession of that and as per VC's, you can not lose. The final assault on the bridge that failed for the Hungarians finally clinched it for the defenders. Despite some previous AAR writers claiming that one side or an other has no chance of winning this scenario, I believe the 6:5 result spread may suggest it is in fact well-balanced scenario and worthy as a competition candidate should such a thing ever happen. Our game had the Hungarians with the better leaders. They did quite well from their selection pool with the Slovaks only getting two with a rating. Hungarians have the numbers and OBA, Slovaks have the dug-in positions and hold the objectives. A classic attack/defence situation. I rate this a '4'. This is because I enjoyed using low moraled Hungarians and Slovaks, the battle was a tight one, Daniel as a new opponent, the scenario situation and because I won a close-call game |
||||||||||||||
| 0 Comments |
| Close but no Bridge | ||||||||||||||
|---|---|---|---|---|---|---|---|---|---|---|---|---|---|---|
Played with Vince Hughes on Skype in two sessions (9-10 hours total). Vince set up all his units near the bridge, exactly as he suggested last Summer. This made me happy because it guaranteed the scenario would play entirely differently than when I played it solo. I divided my Hungarians into three groups: one infantry-only group crossing the river to the north, another infantry-only group crossing to the south, and a combined arms group setting up in and near the eastern town to keep an eye on the bridge. My strategy was to surround the town on three sides, leaving either the south or the western side open for Slovaks to flee away from their main position. My groups moved into position and we started exchanging artillery bombardment. I moved a company within assault range as soon as the infantry platoon defensing an AT gun was disrupted. Unfortunately, the platoon recovered before I assaulted and thus we assaulted at only slightly better odds. My troops failed badly and were badly shaken. So shaken in fact that Vince took the opportunity to counter-attack and I took heavy losses. But at least I had a bit of luck and the other AT gun was eliminated when its crew decided it was time to high-tail it. After a few more turns of artillery exchanges, my infantry moved into assault position on the whole north, north-west flank. Although I did not win the assault outright, we made enough progress that Vince had to reinforce the assaults or fear losing the assaults in a few turns. That’s when I committed all my reserves and the battle very chaotic. I had no clue who was winning from turn 18 to turn 22 as it was too close to call. But disaster struck late in turn 22 when another favorable odds assault ended up in a disaster. I still had a small chance to win on turn 23 but the assault on the bridge was another disaster and I surrendered. Slovak major victory! Vince’s defensive setup was certainly much better than the one I used when I played the scenario solo. The question to where to put the AT guns is a difficult one for the Slovaks. Vince put them on the west side of his box as he wanted to (and used) the center as a junction point to move troops to areas under attack. This left the guns more vulnerable to my infantry. He could have placed them in the center but this would have lost him the junction point as I would have bombarded them every turn. All of this to say I don’t think there is a right or wrong answer here; just choices, each with pluses and minuses. I gave this scenario a “4” because it is an intense, well-balance scenario. It was fun to finally play a scenario against Vince and I learned something about how he uses the center of his defensive box to shift units around. |
||||||||||||||
| 1 Comment |
Hugmenot,
I'll also add something about the AT guns deployment. There is an early temptation to have them in the woods, out of sight until you are right on them and hopefully getting them a first shot against any armour advances.
However, on thinking about it, I chose to dig them in in the open because once spotted, the woods offers no protection. This would mean, with their +1 column to bombardment, they'd be fired on the 30col. A highly dangerous column with low morale troops taking it and not many AND poor leaders available. It seemed better to have them dug-in and in the open and only suffer 21col attacks from OBA, near to modifying officers. I think in our game this made them more resillient overall. Mainly because enemy OBA was limited to just 23 points.
But you know what ? A damaging dice roll can put paid to any plan, no matter how logical it seemed at the time. :-) I'll remember this scenario for a very long-time.
| Not as hard as I would have thought! | ||||||||||||
|---|---|---|---|---|---|---|---|---|---|---|---|---|
After setting in a nice defense along the river with the MG plts on either side of the bridge and a good set defense on the bridge, I had thought it would hold for a while. The Hungarians went for the middle of the bridge and took it out by mid game along with the flanking positions. Once that was gone, it was but a mop up for the Hungarians. Just goes to show ya! |
||||||||||||
| 0 Comments |
| Taking Their Time |
|---|
|
Scenario #3, Ignorant Armies, has Slovaks fighting Hungarians, something you don't see every day in the PG world. This is a clear-cut situation centered on a fight for a bridge. The Hungarians have to take the bridge for a minor victory, and while the Slovaks can win by making the capture bloody and costly. The Slovaks set up first, and build a strong defense around the bridge, including some dug-in stacks behind it to feed reinforcements into any melee. Not surprisingly, their leader draw is miserable. They get five, and only one of them has a positive morale modifier. The Slovaks do have two AT guns, which with a factor of 2 against the think-skinned Hungarian tanks (armor of 0) have a good chance of scoring a hit. Hungarian tank steps count double for losses. The Hungarians start by winning initiative by two. They send two stacks of tanks to the town just east of the bridge to set up direct fire and deny a sneak infiltration by Slovak infantry. Neither AT gun has a LOS into the limiting terrain, so they can't fire until the tanks fire and become spotted. Some artillery fire by both sides is ineffectual, and the Hungarians finish entering the map with their forces headed for the town, and for the woods southeast of the bridge. By turn 10, the Hungarians have methodically built up some fire-groups to take out the bridge hex defenders and the southern AT gun position. The key move came when their lone leader with a combat modifier advanced with 2 stacks, creating a 16-FP attack that demoralized the bridge defenders and sent them fleeing. The Slovak AT gunners also fled, leaving their guns abandoned and out of the game. The two faster Hungarian tanks (MP of 7) swung south to take advantage of the opening in the Slovak AT defenses. Every scenario I play seems to highlight a different aspect of PG. In this one, it was the importance of that combat modifier and the ability to coordinate fire on a position. Another thing that comes through in this one is the poor range of both sides' infantry (2), and the limits that imposes on both offense and defense. I finally ended the scenario at the start of turn 15 -- the only thing left to decide was whether the Hungarians would get a minor or major victory. With all the advantages and plenty of time, the Hungarian player can slowly pick apart the Slovak defenses while not exposing himself to step losses (which Slovak victory depend upon). I'm not sure it would be fun playing this one as the Slovaks. They don't have many options. I'd say it is a good learning scenario for how to set up an attack as the Hungarians, but I imagine by the time someone buys a module such as First Axis they already know the system. I would make this more of a challenge for the Hungarians by reducing turns from 24 to 14 or 16. So the scenario gets a 2. |
| 0 Comments |
| Hungarians Make Goulash Of The Slovaks |
|---|
|
Slovaks set up dug-in on bridge and in two hexes along river while balance of units were spread out between woods and town hexes. Hungarian tanks entered and approached bridge. They lost two steps of tanks to 37mm AT fire before destroying the AT unit. Hungarian infantry then approached and destroyed remaining units in bridge hex. Slovaks held out in two assaults in two dug-in river hexes for 10+ turns but were eventually eliminated. Hungarians then mopped up other units in area before approaching town. At that point Hungarians had large advantage and had won an overwhelming victory. This is a scenario that seems like it would be very difficut for the Slovaks to win. They have few units and have to defend a large area. The Hungarians enter from offboard and can concentrate their forces on weak points and overwhelm them. It's probably worth playing as a solitaire scenario, but may not be very good as a two player scenario. |
| 0 Comments |