
|
Iron Fist Fall of France 1 #42 |
||
|---|---|---|
| (Defender) Germany | vs | France (Attacker) |
| Formations Involved | ||
|---|---|---|
| France |  |
4e Division Cuirassée de Réserve |
| Germany |  |
179th Infantry Regiment |
| Germany |  |
217th Infantry Regiment |

| Total | |
|---|---|
| Side 1 | 3 |
| Draw | 3 |
| Side 2 | 1 |


| Overall Rating, 8 votes |
|---|
|
3.5
|
| Scenario Rank: 408 of 913 |
| Parent Game | Fall of France 1 |
|---|---|
| Historicity | Historical |
| Date | 1940-05-29 |
| Start Time | 05:00 |
| Turn Count | 30 |
| Visibility | Day |
| Counters | 77 |
| Net Morale | 0 |
| Net Initiative | 2 |
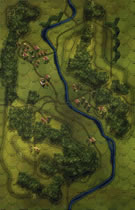
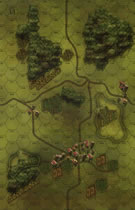
| Maps | 2: 29, 31 |
| Layout Dimensions | 56 x 43 cm 22 x 17 in |
| Play Bounty | 112 |
| AAR Bounty | 171 |
| Total Plays | 7 |
| Total AARs | 1 |
| Battle Types |
|---|
| Rural Assault |
| Conditions |
|---|
| Entrenchments |
| Minefields |
| Off-board Artillery |
| Terrain Mods |
| Scenario Requirements & Playability | |
|---|---|
| Fall of France 1 | Base Game |
| Introduction |
|---|
|
A successful Blitzkrieg in France required motorized divisions to screen the flanks of the panzer divisions forcing their way westward, followed by infantry to secure the flanks and rear area. The latter would generally establish defensive positions behind rivers, and the River Somme was certainly a good choice. At Abbevile, however, the German 57th Infantry Division (an undistinguished reservist unit) had pushed beyond the Somme to establish a bridgehead in preparation for further attacks. Groupement A of French 7th Army issued orders to erase the German bridgehead and retake Abbeville, and gave the job to DeGaulle's 4th Division Cuirasse. he attacked on May 28 and retook Huppy after a fierce battle, intending to wipe out the rest of the bridgehead on the following day. |
| Conclusion |
|---|
|
The Germans deployed two 88mm guns named Cesar and Dora on the main road near Villers-sur-Mareuil, and another two named Anton and Berta on Mont Caubert (a long flat hill shaped like a whale running along the river). DeGaulle countered all the firepower with superior tactics, his tanks out maneuvering and destroying Dora while forcing Cesar to flee. The B1-bis tanks reached Villers ahead of reservist infantry, which was advancing slowly from the south behind a formation of Renault 35 tanks. German machineguns wreaked havoc on the reservists and broke their morale, but then some overzealous German infantry charged the B1-bis tanks and were cut to pieces. That sowed panic in the German ranks, and many German soldiers fled the field abandoning both weapons and comrades. By noon the German bridgehead had been reduced by half, and the only substantial German strongpoint remaining was at an ancient Celtic fortification on Mont Caubert. Unfortunately, exhaustion, casualties and dwindling fuel kept the French from pressing their advantage to reconquer Abbeville. The Germans would get the chance to regroup and prepare for a counterattack. |

|
|
|---|
| AFV Rules Pertaining to this Scenario's Order of Battle |
|---|
|
| Armée de Terre |
|---|
|


| Heer |
|---|
|


| Luftwaffe |
|---|
|

| 4 Errata Items | |
|---|---|

|
Two 105mms (ID#s 1204, 1205) have "16-31" fire values in black (direct fire), when they should be in white (indirect fire). (Shad
on 2010 Dec 15)
|

|
The reduced direct fire value of the Heer HMG became 5-5 starting with Fall of France. (plloyd1010
on 2015 Jul 31)
|

|
The morale and combat modifiers of German Sergeant #1614 should be "0", not "8". (Shad
on 2010 Dec 15)
|

|
The movement allowance on the counters in Airborne is misprinted. It should be "3." (rerathbun
on 2012 Jan 30)
|
| ATTRITION |
|---|
|
This scenario is almost a 180-degree reversal from my other recent FoF plays: There's a major river, but it's already crossed and has bridges The French are on the attack (trying to crush a German bridgehead) The Germans have no tabks while the French have bucketloads Both sides have the same morale (7/6.) The Germans set up with units in all town hexes of Board 31, including one of the 88's in hex 1207, with a nice field of fire to the center of the board. (The other 88 set up in the entrenchment on Board 29, hex 0412.) They also had units in the majority of the towns on Board 29 - though not all, since they didn't have enough units - and the 105's set up in the town north of the river. The 37mm ATG's were on the flanks of the front line on Board 31, hoping to take advantage of crossfire, and the minefields were on the flanks of the German front, to channel the French attack towards the generally open terrain at center. The French approached in two main infantry groups, the stronger on the right (to begin clearing the six-hex town)and a smaller but still strong infantry group to take out the 37mm in the woods on the German right. Both ATG's fell early, while visibility was still limited by darkness. But the right-flank ATG had a leader with it that was able to call down artillery on its attackers, and by the time the sun was fully up, most of the French units on that flank were demoralized, with some losses. It took much of the game for that flank to get moving forward again. In the center, two pairs of B1-b1s platoons moved within three hexes of the town where the 88 was positioned, intending to - with initiative - blast it with DF once visibility improved past 2 hexes (had they approached to two-hex range, the 88 would have hit them with opportunity fire.) But when visibility improved, their shots had no effect, and the 88 quickly took out a step of the French heavies, causing the rest to duck behind the hill nearby - from where they moved on to aid in reducing the big town. However, a lone French leader worked his way into a field where he could not be seen, but could see the 88 when it first fired. He began calling down the French OBA on the spot. With no armor to shoot at and threatened by 32 OBA every 15 minutes, the 88 limbered up and fell back to the town north of the river - its prime mover surviving a brief gauntlet of AT fire from two R35 units that had moved into interdiction position when the feared guns hooked up to flee. The other 88, finding no targets in its entrenchement hex on the hill, also fell back to the northern town. For the balance of the game, both 88's joined the 105's in Bombardment (while waiting for the French armor to come into view as the Board 29 towns became French targets.) By Turn 9 several tank units moved up adjacent to town hex 31-1208, where a tough 9-1-2 Captain commanded an INF and HMG, and began blastng away. As the reduction of the six-hex town progressed, a couple of other tanks were freed up to join in the hail of metal. Once the INF was demoralized and fled out of the town, the French armor moved to the assault; no French infantry was available, all either recovering on the left or clearing the six-hex town on the right. The center town was finally cleared on Turn 22, four turns after the large town was under German control. (In the process of taking the big town, some tanks rolled into a hex where the German OC - a 9-1-1 major - had been left alone by combat losses - and he did not survive his "lone leader" roll.) So by the end of Turn 22 the towns on Board 31 were cleared, and much of the laggard troops on the left had recovered. But it had been at a fearful cost for the French RES troops, with 17 of 22 steps eliminated (plus a couple of tank steps.) With much of the remaining infantry able only to advance slowly (including 2 of the 3 HMG units, the other one STILL unrecovered on the left) it fell to unsupported armor to spearhead the drive onto Board 29. Fortunately, the Germans had also lost heavily by this point - 8 INF and 6 HMG steps, plus both 37mm ATG's, gone. The menacing presence of the 88's forced the French armor to move through the woods and attack the towns from the south, so that they would not be shot to pieces on the approach. The 5-hex town was at least partially blocked from the 88's by a 1-hex town closer to the center, so the German attack began on the larger town. It took them the rest of the game to clear one hex in that town, though - only after a leader and a RES unit joined the tanks was the combined-arms able to clear it, on the final turn of the game. Meanwhile, with no infantry to target, and with the armor all out of LOS of 88's, German artillery - 88's, 105's and OBA - made Bombardment attacks on tanks that were out of LOS but in view of German leaders. They were able to get enough "fringe" dice rolls that the French armor often found itself demoralized, while other French armor had up-and-down success in a one-town hex in the center of Board 29. (This hex was a constant assault for the last 4-5 turns, though it was in LOS of the 88's - I forgot that they could fire AT into the assault since there were no friendly vehicles. D-OHHH!) By the end of Turn 30 - the end of the game - the French had put a huge dent into the German bridgehead, but it was not enough. At game's end the French held nine town hexes south of the river (3 VP each), the Germans seven (2 VP each) including one hex with an ongoing assault. The Germans held all three town hexes north of the river (3 VP each.) So for terrain control, the French led the Germans 27-23. But then we get to losses, which were high on both sides. The French lost 19 of 22 RES steps, 3 of 12 R35, and 2 of 12 B1-bis. Plus one leader. The Germans lost both 37mm ATG, 14 of 28 INF, and 6 of 10 HMG - plus 4 leaders, including their OC. So on losses the Germans led the VP race 29-22, since tank steps count double. The overall result was Germans 52, French 49 - a draw. Had I remembered that the 88's could shoot into the visible assault hex, perhaps two more tank steps might have been lost before the French got the hell back into the woods, which would still not have been enough to get to the +10 needed for victory. It was an action-packed, tough combat - seemed to be reasonably balanced - and had both B1-bis units and 88's among a nice mix of units. I found it to be an excellent scenario... |
| 0 Comments |