
|
Sacred Mountains Edelweiss: Expanded #32 |
||
|---|---|---|
| (Attacker) Soviet Union | vs | Germany (Defender) |
| Formations Involved | ||
|---|---|---|
| Germany |  |
3rd Gebirgs Division |
| Soviet Union |  |
8th Rifle Division |

| Total | |
|---|---|
| Side 1 | 0 |
| Draw | 1 |
| Side 2 | 0 |


| Overall Rating, 1 vote |
|---|
|
5
|
| Scenario Rank: --- of 913 |
| Parent Game | Edelweiss: Expanded |
|---|---|
| Historicity | Historical |
| Date | 1945-02-14 |
| Start Time | 07:30 |
| Turn Count | 36 |
| Visibility | Day |
| Counters | 185 |
| Net Morale | 1 |
| Net Initiative | 0 |
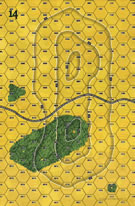
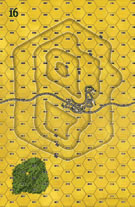
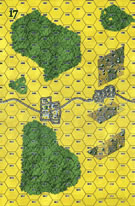
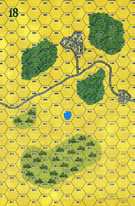
| Maps | 4: 14, 16, 17, 18 |
| Layout Dimensions | 112 x 43 cm 44 x 17 in |
| Play Bounty | 199 |
| AAR Bounty | 171 |
| Total Plays | 1 |
| Total AARs | 1 |
| Battle Types |
|---|
| Road Control |
| Urban Assault |
| Scenario Requirements & Playability | |
|---|---|
| Edelweiss: Expanded | Base Game |
| Eastern Front | Counters |
| Road to Berlin | Maps + Counters |
| Introduction |
|---|
|
The Soviet offensive that opened with the new year quickly swept across Poland and into western Slovakia. Around the town of Ruzemberok in the high valley of the Biely Vah river, just below the height of the Tatra mountains, the 3rd Mountain Division faced repeated assaults. The Soviet 18th Army sought to break through into the Slovak plain and to liberate the Tatras, a powerful symbol to the Slovak people. |
| Conclusion |
|---|
|
The jägers fought off repeated waves of attackers, and according to the German Army's order of the day, "yielded not one meter." The Soviets could tell the Reich's end was near and fought to keep their offensive going, but now that the mountain divisions fought in familiar terrain they proved impossible to dislodge. |

|
|
|---|
| AFV Rules Pertaining to this Scenario's Order of Battle |
|---|
|
| Heer |
|---|
|


| Army (RKKA) |
|---|
|


| 3 Errata Items | |
|---|---|

|
The movement allowance on the counters in Airborne is misprinted. It should be "3." (rerathbun
on 2012 Jan 30)
|

|
The reduced direct fire value in Kursk: Burning Tigers is 4-4. (plloyd1010
on 2015 Jul 31)
|

|
Kommissars never get morale or combat modifiers. Ignore misprints. (Shad
on 2010 Dec 15)
|
| Sacred Mountains | ||||||||||||
|---|---|---|---|---|---|---|---|---|---|---|---|---|
My involvement with this scenario is an interesting tale. Vince and I looked at it for a FtF game, we both looked at and came to the conclusion the most likely result would be a draw so discarded this scenario for another one. However I liked the look of it it ticks some of my boxes it's big in counters but not large in scale (only 4 maps 2 of which are not used much) Eastern Front and fairly easy to understand VC. I thought it was to good to discard so I decided to play it solo. In fact I have a confession to make I've played it twice solo. The first time I got as far as writing my AAr when I realised the Soviets had attacked from the wrong side of the boards. DOH!! Two wargaming session wasted. So I started again. In this scenario elite mountain troops defend in hilly terrain against 3 waves of Soviet troops arriving roughly 12 turns apart. The Russians have to break through and clear the town and hills of all German unit(very unlikely) for a victory the Germans have to stop Soviet unit getting onto the two Westernmost boards (slightly unlikely), so as you can see a draw is still the most likely result. The first wave of Soviets comprise 18 Inf with MG ENG ATR and two SU76 platoons. My own view is that the Red Army should just probe the German defenses, looking for ATGs and any weak points. Keep the SU76's safe they are for the end game besides they are very fragile against the German A/T guns. When the second wave arrives after you have thrown 5 or 6 on GT 12. You need to throw a 5/6 as fast as you can, the main reason is that the third wave with it's T34's come on 12 turns after the second wave so every turn's delay of reinforcements is a double whammy. When the second wave come on now is the time to put the pressure on those Mountain troops, meanwhile the German player is looking to shore up various defense lines and stop any flanking moves. Remember to stop a German win the Soviets have to get a unit onto those western boards. This middle game is very exciting with the German player having to judge when to hold,fall back or even counter attack and his opponent hammering away at a very tough nut indeed. With the third wave comes 6 T34's more Inf and some SMG. Although not in the special rule's I think the SMG should have been made into tank riders. Anyway now it is decision time can the Russian horde take every German position on board 16 or go for the draw by by-passing the main line of resistance and moving a unit onto board 14 and claim a draw. In my game with 3 turns left I pointed the T34's west and rode off into the sun to get the draw. This is a big exciting scenario and I can only say give it a go! |
||||||||||||
| 0 Comments |