
|
Shadow of Olympus Edelweiss: Expanded #1 |
||
|---|---|---|
| (Defender) Australia | vs | Germany (Attacker) |
| Formations Involved | ||
|---|---|---|
| Australia |  |
16th Infantry Brigade |
| Germany |  |
143rd Gebirgs Regiment |
| Germany |  |
6th Gebirgs Division |

| Total | |
|---|---|
| Side 1 | 0 |
| Draw | 0 |
| Side 2 | 5 |


| Overall Rating, 6 votes |
|---|
|
3.17
|
| Scenario Rank: 631 of 913 |
| Parent Game | Edelweiss: Expanded |
|---|---|
| Historicity | Historical |
| Date | 1941-04-18 |
| Start Time | 09:00 |
| Turn Count | 30 |
| Visibility | Day |
| Counters | 79 |
| Net Morale | 0 |
| Net Initiative | 1 |
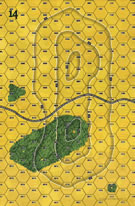
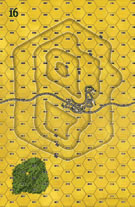
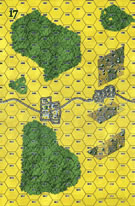
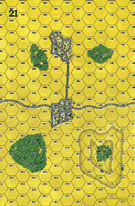
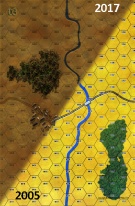
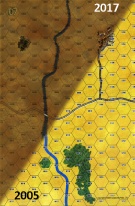
| Maps | 6: 14, 16, 17, 21, 3, 7 |
| Layout Dimensions | 86 x 84 cm 34 x 33 in |
| Play Bounty | 176 |
| AAR Bounty | 153 |
| Total Plays | 5 |
| Total AARs | 4 |
| Battle Types |
|---|
| River Crossing |
| Rural Assault |
| Conditions |
|---|
| Off-board Artillery |
| Reinforcements |
| Terrain Mods |
| Scenario Requirements & Playability | |
|---|---|
| Afrika Korps | Counters |
| Edelweiss: Expanded | Base Game |
| Eastern Front | Maps + Counters |
| Road to Berlin | Maps |
| Introduction |
|---|
|
Having driven through the Greek Second Army with little trouble, the Germans found a different proposition once they ran into the ANZAC Corps digging in just west of Mount Olympus. Gen. Ferdinand Schorner of 6th Mountain Division ordered his officers to "act with the utmost severity" to encourage the troops through difficult terrain - showing why he would become justly famed as the most hated commander in the German Army. After picking their way across "impassable" ridges, the jägers found a mixed Australian-New Zealand force dug in behind the Pinios River. the immediately moved to attack. |
| Conclusion |
|---|
|
The German 143rd Mountain Regiment feinted with one battalion while striking across the river with another, penetrating the Australian's right flank and rolling up their position. The Diggers had been shocked enough to find the mountaineers arriving so quickly, but it soon became apparent that they had dragged along a battalion of mountain artillery as well. The Australian 2/2 Infantry Battalion was overrun and destroyed and the Allied position badly broken as the entire corps pulled back. |

|
|
|---|
| Army |
|---|
|


| Heer |
|---|
|


| 1 Errata Item | |
|---|---|

|
The movement allowance on the counters in Airborne is misprinted. It should be "3." (rerathbun
on 2012 Jan 30)
|
| Tenacious Australians |
|---|
|
In this scenario I chose to delay the river crossing attempt of the northern German mountain battalion until after the reinforcing battalion had arrived on the east flank, south of the river, and had rolled up part of the Australian defensive line. Once the German reinforcements arrived, the Australians attempted to hold them in the eastern foothills, but they were overrun everywhere but in the high village where a company of Australians held out against a company of Germans. The remaining Germans poured northwest to take from behind the Australians defending against a river crossing. This was the signal for the German crossing battalion to pour from cover and make for the river. Heavy Australian artillery fire left the open ground along the river strewn with disrupted mountaineers, but a slow trickle of them began to cross, while the flanking force of Germans assaulted the Australian town that was the backbone of their defensive position. Pockets of Australian resistance were remarkably resilient and held out to the end of the scenario, but having achieved three of their four victory conditions the Germans are credited with a minor victory. Australian artillery was their most valuable weapon, with their infantry direct fire achieving little against the Germans. The artillery slowed the river crossing to a crawl due to engineer disruptions. German fire and assaults were a mixed bag, with one or two successful assaults but a greater number of poor-rolling stalemates. The thin Australian defensive line proved resilient and flexible, but just not strong enough to throw back the assault. Fun game, interesting challenge for the Australians, and by no means a cakewalk for the Germans. |
| 0 Comments |
| Shadow Of Olympus - Edelweiss Scenario 1 | ||||||||||||||
|---|---|---|---|---|---|---|---|---|---|---|---|---|---|---|
Mount Olympus 18th April 1941 Scenario played : 16th July 2009 Having driven through the Greek 2nd Army with little trouble, the Germans found a different proposition once they ran into the ANZAC Corps digging in just west of Mount Olympus. Gen.Ferdinand Schorner of 6th Mountain Division ordered his officers to “act with the utmost severity” to encourage troops through the difficult terrain – showing why he would be become justly famed as the most hated commander of the German Army. After picking their way across ‘impassable’ ridges, the jager found a mixed Australian-New Zealand force dug-in behind the Pinios River. They immediately moved to attack. The Jagers first obstacle proved to be the Pinios River itself. Men of the 6th Mountain Div had to cross whilst enemy artillery bombarded the crossing points chosen. These points were east of the main Australian positions and despite the bombardment, they met little on the ground resistance. Still, unwanted casualties were sustained, and this became more a problem when expected reinforcements failed to arrive in the east on the south-side of the river. In a drip-drip deployment from the crossing, the Jager were slowly able to fan out a fighting line toward the enemy. The Australians fought a canny holding battle preventing any fast forward movements from the now deploying 6th Mtn Div. Balance was tipped more towards the Germans when the reinforcements, 143rd Mountain Regiment arrived two and half hours into the struggle. By this time, the 6th had sustained around a 100 casualties already, but now, the Aussies could be forced back under a more withering fire, so much so that Australian MG support was unable to deploy and fire. Unlike the Australians, the German fire had to consist totally of small arms as no artillery back-up was available. A contest developed around a large forest area, and this became the Germans chance to trap some of the enemy within it. By using their superior numbers, they were able to encircle 2 coys of Australians there. The ensuing gun battle and close in fighting left around 200 Australians as casualties though total German losses were around the same too. As the Germans pushed through the wood, the Aussies began to strengthen their numbers in the adjacent town. Meanwhile, their AT gun platoons, not needed in this infantry battle began their retirement from the town westwards with an infantry escort. At this point, the battle now concentrated around the small town. The Germans had numbers to commit, but the approach would need to be sensible in order to minimise losses. Another two companies of Gebirgsjager, flanking the main battle, went after the retreating guns. The gun battle around the town was furious with both sides off loading plenty of firepower at each other. Australian OBA also fell amongst some of the remaining close assault battles continuing in the forest. Slowly the mountain troops edged their way to the perimeter of the town and then, finally, with one last rush just as the Australians were engaging other targets, the Jagers broke into the town itself. The outnumbered Australians fought back furiously as the battle was all now focussed on house-to-house fighting. Australian officers called in artillery modules in order to disrupt the German intruders, but one module fell amongst their own men causing some casualties. The Germans slowly gained the advantage, and now Australian losses mounted horribly as they tried to cling on to their dwindling positions. The Australians had lost some 500 soldiers and German casualties around 240. As the battle subsided, a few more barrages were lobbed at the German troops but without effect. The late arriving reinforcements had eventually swung the advantage the German way, but only in the nick of time. The loss ratio and amount of Germans that had crossed the Pinios meant that they would claim victory, but it had been a tight affair right to the very end. |
||||||||||||||
| 0 Comments |
| Aussie's crumble against elite mountain troops | ||||||||||||||
|---|---|---|---|---|---|---|---|---|---|---|---|---|---|---|
Set in Greece this intresting scenario is well worth a look. The Germans have to cross a river in the face of Commonwealth artillery once across though the superior morale and fire power of the mountain troops should be enough to clinch victory. I do remember this scenario taught me that the threat of opp fire can be enough. In the final stages of the game I fired at the first target I saw and used all my opp fire up only to get overwhelmed by the German forces and they swarmed around my unit. |
||||||||||||||
| 0 Comments |
| Close battle, but the endgame was not exciting | ||||||||||||||
|---|---|---|---|---|---|---|---|---|---|---|---|---|---|---|
This scenario has a huge map for the relatively limited amount of forces involved. An Australian force is defending against two German forces, each smaller than the Aussies, but combined the Germans heavily outnumber the Australian defenders. One German wing is trying to force a river crossing where there are no bridges, while the other wing enters as a reinforcement that has already crossed downstream and hits the flank. The Australians have excellent OBA support, whereas the Germans have none. There are four victory conditions for the Germans, who need three for a minor or all four for a major victory. The Australians get a minor if the Germans only achieve two, and a major if they only achieve one. VCs include having more steps south of the river, inflicting double casualty rate, suffering no more than ten steps, and clearing the river boards. The Germans are all on foot, with the exception of basically worthless field guns on wagons. I say worthless because with the Aussie OBA and given VCs it’s dangerous to use them. I did use them as bait at one point, and the fact they survived some of the worst Australian OBA rolls of the game was lucky for me. My north wing made a slow approach under maximum cover towards the west end of the river, as the Australians had a spotter on a mountain that could bring OBA hell down on the entire east portion north of the river. I brought massive firepower to bare on the four platoons holding the woods just south of the river, but to no avail whatsoever. My rolls were abysmal, and I could not get a combat effect against the defenders, leaving the entire wing held up for a substantial time. My eastern wing came in on turn eight, and I figured I could begin to push against the Australian flank. I maneuvered to maximize my approach on the defenders in the east woods, and finally went in for the assaults. My rolls continued to be abysmal as despite the assaults being in my favor, my opponent rolled 5s and 6s while I could not get a roll above a 3 on any assaults through turn 15. On turn 16 I managed to inflict my first step loss on the Australians when my opponent counterassaulted me, but the casualty count at that point was five to one. By turn 20 I finally managed to bring that up to five to five, but things were looking real bad for the Germans. My north wing gave up trying to shake the defenders in the woods and sent the engineers forward to cross the river. Most of the wing (less the guns) managed to cross, but I did lose a full platoon to an OBA shot. The wing managed to pressure the woods defenders and finally begin degrading them (as well as assisting the hunting down of a 2lber), but that was the extent of their penetration. My eastern force finally began to tell, especially since they took down the Australian guns and mortars. Weak concentrations of Australian defenders in assault hexes wore down and died. Eventually, as the scenario came to an end, they managed the two to one ratio (almost prevented from the two step loss), to score 14 to 7. Barely managing three conditions the Germans scraped a minor victory from a near disaster. We thought this was a weak 3 for a rating. The scenario was reasonably balanced, but the slow movement for the Germans over such a large board combined with little for the Australian player to do towards the end had both of us anxious to get this scenario finished by turn 25. The last five turns were far from exciting despite being critical in garnering four of the step losses the Germans needed to win. It was a good scenario, but not an exciting one. |
||||||||||||||
| 0 Comments |