| Author |
thomaso827
|
| Method |
Solo |
| Victor |
Draw |
| Play Date |
2015-04-04 |
| Language |
English |
| Scenario |
EdIV009
|
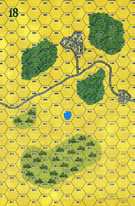
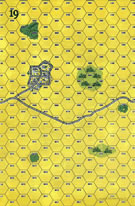
After seeing a Youtube video of a modern version of the Maori do their wardance as they prepare to leave a tour in Afghanistan, I wanted to get them on the table in a game. This one is a good mix of Australian, New Zealand and Maori troops vs German mountain troops. ANZAC (as I will refer to the combined Australizn/New Zealand/Maori force) set up along the north-south road in 3 groups that can link together to form a line, but there is nothing dug in for this one. Instead, the Australians and New Zealanders get a bonus column in assault, and the Maoris get 2, and since they are all stacked with a leader, that means 2 and 3 column bonuses for their assaults. Maoris even maintain their 8 morale when reduced. Leader draw was very good for the ANZACs, but the leader draw for the Germans was just that much better. Germans enter the board from the west, and ANZACs are to charge into assault as soon as possible. The one area that could use a little clarification is that the ANZACs elements can each fire once during the game due to ammo shortage, but their requiremenet to charge and engage in assault doesnt leave a good place to do this. I chose to charge immediatel as the Germans entered the board and visibility range, but in hindsight, following the story line and letting the Germans advance for a bit, then taking one turn of fire before charging seems to be a better way. As it was, the ANZACs in my game never fired their limited ammo. The assaults started quickly as the two forces moved towards each other. I split the Germans into 3 groups, trying to advance on each flank to try to take town hexes, one of the German victory conditions, while a large central group advanced to try to tie up as many enemy troops as possible. With the ANZAC requirement to charge the nearest enemy, all 3 forces became engaged early on and the Germans never came close to any of the 3 towns. Germans have 4 16factor OBA per turn plus the 2 mortars and 1 or 2 aircraft attacks each turn - they change the number back and forth each turn between 1 and 2. All this firepower didnt help much for the first few turns, and then so much of the German force was engaged in assault that friendly fire was too high a risk for several turns. Body counts rose quickly, and both German flank forces were eliminated, even to the German Oberstleutnant in the northern group fleeing nearly off the table, stopping right on the ege and slowly regaining his confidence. The southern force died to a man, and the central force was down to 2 reduced and one full strenght infantry unit and the two mortars, while the ANZACs were able to focus their attention on the center. German arty and airpower slowly took a toll but early on, at the end of only 7 turns, it was down to a game of inflicting a morale loss and regaining morale back and forth, with losses just one step difference between the two sides and no chance for the Germans to break through and take a town hex. Thinking that no commander would subject his force to continued punishment with no chance for a win, I called it a draw at the end of turn 7. This game could go on much longer toward the 20 turns allowed if the ANZAC force holds it's line until they take a range 2 or 3 shot and then charge, the way the story shows. Still, a very good game.
|