
|
Open Sights Edelweiss IV #6 |
||
|---|---|---|
|
(Defender)
Australia
(Defender) Britain (Defender) New Zealand |
vs | Germany (Attacker) |
| Formations Involved | ||
|---|---|---|
| Australia |  |
16th Infantry Brigade |
| Germany |  |
2nd "Vienna" Panzer Division |
| Germany |  |
6th Gebirgs Division |
| New Zealand |  |
6th Infantry Brigade |

| Total | |
|---|---|
| Side 1 | 0 |
| Draw | 0 |
| Side 2 | 1 |


| Overall Rating, 1 vote |
|---|
|
5
|
| Scenario Rank: --- of 913 |
| Parent Game | Edelweiss IV |
|---|---|
| Historicity | Historical |
| Date | 1941-04-18 |
| Start Time | 14:30 |
| Turn Count | 24 |
| Visibility | Day |
| Counters | 81 |
| Net Morale | 1 |
| Net Initiative | 3 |
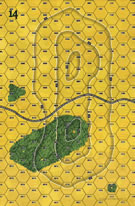
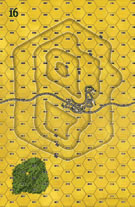
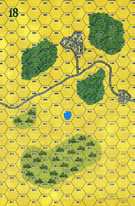
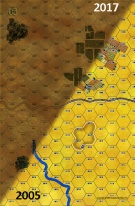
| Maps | 4: 14, 16, 18, 5 |
| Layout Dimensions | 112 x 43 cm 44 x 17 in |
| Play Bounty | 187 |
| AAR Bounty | 171 |
| Total Plays | 1 |
| Total AARs | 1 |
| Battle Types |
|---|
| Delaying Action |
| Exit the Battle Area |
| Inflict Enemy Casualties |
| Rear Guard |
| Rural Assault |
| Scenario Requirements & Playability | |
|---|---|
| Afrika Korps | Counters |
| Desert Rats | Counters |
| Edelweiss IV | Base Game |
| Eastern Front | Maps |
| Road to Berlin | Maps |
| Introduction |
|---|
|
Having forced the Pinios River, 6th Mountain Division pressed the retreating ANZACs along with 2nd "Vienna" Panzer Division. Chaos followed, with he Australian and New Zealand units becoming tangled and contradictory orders flowing from brigade, division, corps and expedition headquarters. Near the town of Larissa, the 4th New Zealand Field Regiment ─ without orders ─ turned to offer battle and cover the retreat with its 25-pounders. |
| Conclusion |
|---|
|
Maj. R.H. Dyson's Kiwi gunners conducted a fighting retreat, leapfrogging their batteries steadily backwards while the infantry made their panic-stricken way to safety and shamed anti-tank crews added their firepower to the gun line. "The officer stood out in the open directing the fire, the crews crouched behind the shields and fed and fired the guns while everything the enemy had was being pelted at them," an Australian infantryman recalled later. "They looked like a drawing by someone who had never been to a war, but the whole thing was unreal." |

|
|
|---|
| AFV Rules Pertaining to this Scenario's Order of Battle |
|---|
|
| Army |
|---|
|


| Army |
|---|
|

| Heer |
|---|
|


| New Zealand Army |
|---|
|


| 2 Errata Items | |
|---|---|

|
Ignore the direct fire values. (Shad
on 2010 Dec 15)
|

|
The Pz IVe appearing in the original Panzer Grenadier game had an Anti tank value of 4-7. As of Afrika Korps (2002), continuing onward through the 3rd and 4th edition games, the anti tank value has been 4-4. (plloyd1010
on 2016 Jul 25)
|
| Open Sights | ||||||||||||
|---|---|---|---|---|---|---|---|---|---|---|---|---|
Greece! When you dig deep into the PG scenarios, you can find some interesting locations you didn’t think PG had and some unique situations that are not the normal scenario and this is one of them! I always wanted to play a PG scenario in Greece 1940-41 and this one takes us back to April 18th 1941. The German 6th Mountain Division and the 2nd Panzer Division with a morale of 8/7 are advancing and with air-support while Elements of the 6th New Zealand Brigade and the 16th Australian Brigade with a morale of 7/5 are in a disordered retreat only held together by the 4th new Zealand Field Regiment of 25-pounder artillery units with a morale of 9/8. Both the ANZAC (Allies) setup on mostly on the two eastern maps out of four maps, with four dice rolled to determine how many ANZACs started in a disrupted state and both sides taking turning choosing which ANZAC units start disrupted. Both sides are rushing to exit off the western edge of the four maps, with points received for each step exited. The ANZAC retreating off the far map and the Germans advancing off the same far map! Both sides also receive points for eliminated steps and the New Zealand 25-pounders and the German Armor steps counting double. Also some scenario in PG have point losses for Leaders and Trucks, in this one the Truck steps do count and for victory points as well, which is always interesting in changing the mindset for this scenario about trucks. The Germans also have a heavy air presence with aircraft showing up every turn. The randomness of this scenario as far as setup and how many units start disrupted makes this scenario a great one for replays. The Allies can only have one unit per hex in the initial setup. Lastly, the Germans enter from the eastern side of the map. The Allies had to setup at least 10 units on maps 14 & 5 and after the disrupting dice rolls and back and forth decisions on which units start in this state, about half were on both maps, with one of those units being a leader counter. The Germans Rolled on the map number 14 and until now, I didn’t realize the German MTN HMGs have the same movement factor of 3 as the infantry. The Allies are trying to rally all the disrupted troops, setup a blocking force and decide which troops to continue retreating and when. Two of the 25-pounders setup in forward positions to buy their other units more time, to either rally, setup defensive positions or retreat. The third 25-pounder unit is allowed to setup on map 16, three maps back. Remembering that disrupted units adjacent to the 25-pounders rally automatically and the 25-pounders and their trucks and leaders have a morale of 9/8 compared to their Infantry, HMGs, AT-Guns, Mortars and other Leaders, which have that 7/5 morale. The forward positioned 2-pounder AT-Guns setup to block the German Pz IIs, Pz IIIFs and Pz IVE are pretty useless, as they started disrupted, so the German Infantry follows right in behind them. As the turns progress, the treating allied units and the advancing Germans units start to get mixed in with each other down or along the main road and some other areas as well. With some Allied units disrupted and stalled on the main road, some retreating, and some making last stands in combat, it got really interesting. The Germans kept pushing some infantry and armor forward but at the same time having to keep some back to deal with all the diehard ANZAC units. The Germans also kept the pressure on the far end retreating Allied units in the form of airpower. The New Zealand & Australian units were really starting to mingle in the same stacks along the road heading west. The 25-pounders & 2-pounders got a few good shots in but it was not nearly enough to stop the German advance and the opportunity to strike all those disrupted and spread out Allied units with direct fire, and few assaults as well. One leader even got overrun. In the end both sides exited a little more than half their units but the Germans eliminated far more steps then the Allies, resulting in a major German victory! The ANZAC were not routed but pretty close! Keep in mind, just because it was a major German victory doesn’t mean it’s not a good scenario, as the random setup, entry, exit and disruption draw, not to mention the different strategies, of staying to fight, retreat, advance or a mix of the mentions will most likely make this play-out differently. Fun scenario to try and how offend do you get to play one in the Greece Theater? Edelweiss has three scenarios in this campaign, hopefully there will be more someday in PG land! |
||||||||||||
| 0 Comments |