
|
1940: Fall of France Scenario 22: Furia Francese! Division Marocaine #3 |
||
|---|---|---|
| (Attacker) Germany | vs |
France
(Defender)
Morocco (Defender) |
| Formations Involved | ||
|---|---|---|
| France |  |
110e Régiment d'Infanterie |
| France |  |
1re Division Marocaine |
| France |  |
2e Régiment de Tirailleurs Marocains |
| France |  |
7e Régiment de Tirailleurs Marocains |
| Germany |  |
3rd Panzer Division |

| Total | |
|---|---|
| Side 1 | 0 |
| Draw | 2 |
| Side 2 | 1 |


| Overall Rating, 3 votes |
|---|
|
4
|
| Scenario Rank: --- of 913 |
| Parent Game | Division Marocaine |
|---|---|
| Historicity | Historical |
| Date | 1940-05-15 |
| Start Time | 17:30 |
| Turn Count | 16 |
| Visibility | Day |
| Counters | 133 |
| Net Morale | 0 |
| Net Initiative | 1 |
| Maps | 2: 31, 32 |
| Layout Dimensions | 86 x 28 cm 34 x 11 in |
| Play Bounty | 189 |
| AAR Bounty | 159 |
| Total Plays | 3 |
| Total AARs | 3 |
| Battle Types |
|---|
| Rural Assault |
| Conditions |
|---|
| Minefields |
| Off-board Artillery |
| Randomly-drawn Aircraft |
| Reinforcements |
| Terrain Mods |
| Scenario Requirements & Playability | |
|---|---|
| Division Marocaine | Base Game |
| Fall of France 1 | Maps + Counters |
| Introduction |
|---|
|
The French line had repulsed nearly all assaults, but Ernage was a soft spot. German forays had bypassed the small village and pushed onto Cortil Noirmont, where they stopped at 1730. After some moments of near-panic, the Moroccans rallied after their divisional commander General Mellier took the field himself to lead the counterattack that had been planned since 1130 that morning. |
| Conclusion |
|---|
|
General Mellier committed his entire reserve to the counterattack, with the objective of retaking the railway line. The forces moved out early in the afternoon but were slowed by Stuka attacks and German artillery fire. Then as they neared the scene of the action, all their Renault 35 tanks were abruptly rerouted to Gembloux. That left their infantry no armor support, but nonetheless the arrival of reinforcements stiffened the resolve of the French units holding the line. Around 2030 in Cortil-Couvent and Cortil-Noirmont, French antitank guns destroyed five panzers in the space of just a few minutes. Then the Moroccans at the front stood up and charged the Germans and forced them to fall back behind the railway. The day ended with a clear French victory, even though both sides had nearly been bled dry. The Gembloux battle was the lone example during the France 1940 campaign of infantry division successfully blocking the armored advance. |
| Additional Notes |
|---|
|
The Division Marocaine counterset replaces the French INF with Moroccan ESC. The Moroccan Division was at the peak of its fighting prowess. The scenario book suggests that the reinforcement are from from unit other than the Marocain Division. I have adjusted the OOB on this page accordingly. (Special note: Marocain HMG units have a Movement factor of 2.) |

|
|
|---|
| AFV Rules Pertaining to this Scenario's Order of Battle |
|---|
|
| Armée de Terre |
|---|
|


| Moroccan Ground Forces |
|---|
|


| Heer |
|---|
|


| Luftwaffe |
|---|
|

| 4 Errata Items | |
|---|---|

|
In 1940: Fall of France, the units show Direct Fire. All units are Indirect Fire. (rerathbun
on 2015 Jun 06)
|

|
The unit label on the counter is 25mm, but should be 20mm. No effect on play. (plloyd1010
on 2016 Apr 01)
|

|
The reduced direct fire value of the Heer HMG became 5-5 starting with Fall of France. (plloyd1010
on 2015 Jul 31)
|

|
The morale and combat modifiers of German Sergeant #1614 should be "0", not "8". (Shad
on 2010 Dec 15)
|
| Tiralleurs Hold the Line | ||||||||||||
|---|---|---|---|---|---|---|---|---|---|---|---|---|
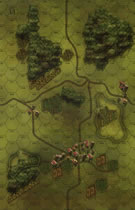
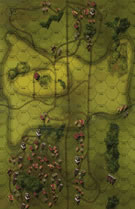
Late in the afternoon of May 15, 1940, the fighting continued between Perbais and Gembloux, Belgium. Units from the French 110th Infantry Regiment were situated in the north central woods and the town in the south, while troops from the 2nd and 7th Regiments des Tiralleurs advanced eastward across the western front from north to south avoiding the open kill zone in the west central region. Elements of the 3rd Panzer Division formed a line along the railroad tracks creating a north-south Axis front line. Axis artillery fire began at 1730 hours, followed by two panzer platoons moving west along the road and an infantry push in the south. Heavy OBA continued to cause disruption and casualties on both sides, but by 1815 hours, the Germans had advanced to the east side of both wooded areas. From then on, the fighting was furious with repeated assaults, but the Allied units held and eventually repelled the Germans. Both sides received reinforcements at 1930 hours, and the French moved quickly to retake the central town. Fortunes then turned worse for the German forces, with an engineer platoon eliminated while trying to clear a mine field, and a deadly accurate French 20mm AA platoon causing casualties in two separate panzer units. The French/Moroccan line held strong, but did not actively pursue the harried German forces. Night came over the battlefield, and the French had vanquished the Axis, but the loss of Allied troops resulted in a draw. This scenario is played over the halves of two maps, making for a small battlefield with plenty of engagement. Red Division Marocaine units from AP were used for all Moroccan forces, with French units for others.The objectives involve a combination of step loss and hex control (both town and woods) of 14 individual hexes west of the railroad line. Both sides start in strong defensive positions, but the location of most of the victory hexes lie in Allied territory, so the Germans have two options. They could hold back and try to hold the one town hex that they can place units in at the start of the game. However, the French have an OBA edge, a stronger mortar barrage group and aircraft on their first two turns, so trying to hold that hex for a draw is against the long-term odds. The other option is for the Germans to move forward, hoping not to incur greater than a 10-step loss (a minor French victory) and hold more objective hexes while eliminating more French units than they lose. The latter approach was used here, but the Germans ended up losing 29 steps to 19 for the French, and the French still controlled 9 hexes to the Axis total of 4, with one still contested. The French met the conditions for a “major” victory, and the Germans met them for a “minor” victory, so the battle ended in a draw. |
||||||||||||
| 0 Comments |
| Stop us if you can | ||||||||||||||
|---|---|---|---|---|---|---|---|---|---|---|---|---|---|---|
This was an epic 6-session play-through with the formidable, Wayne Baumber playing the French/Moroccan Commander. We used the optional smoke, consolidation and excess initiative rules and dispensed with the defense-favoring Fog of War rule -- much to the annoyance of my worthy opponent. Displaying more of his playful side than usual, my opponent called me all sorts of names even while we were setting up, and surprised us both by selecting the attacking French side on the basis of a die roll. I say attacking, since the Germans seized the initiative at the outset and aggressively advanced both left and right flanks of the weaker German force past the north-south railroad and onto the western portion of the map. This allowed the rapid occupation of all the town hexes west of the railroad line on both maps 31 and 32, and created a small maneuver area, and kill zone, in the center of the combined map boards. Some noisy feints by the German’s light panzer company, helped lure the single French 47mm APX, AT gun and a strong ESC platoon to deploy too far forward, where they were both subsequently destroyed by accurate German OBA and HMG fire. By the end of the second game turn there were already 4 French step loses. This was barely accomplished before the French right (southern) flank advanced en masse to give the Germans a scenario-long costly lesson in cold steel close assault tactics in the vicinity of the southern town. During the second session, the French expanded their close assaults to the center of the battlefront, while the Germans mounted a 2-company probe on the north margin of the northernmost hill in the NW corner of the map. This action attracted the majority of my wily opponent’s available reserves during our 3rd session (game turns 4-7). After the quite a bit of fumbling, the Germans slightly improved their odds in the two southern most assault hexes (Hexes 32-0406 town and 32-0507 adjacent woods) as they were able to support their sparse force with some light armor. Nevertheless, French/Moroccan elan was such that they pushed the German right flank hard, and in game turn 4 – and again in turn 10 – added an opportunistic probing attack in the center of the map trying to both take a town (Hex 0604) and get within spotting range of the north-south sunken railroad segment adjacent to the town. Fierce fighting ensued in this vicinity and both French probes were driven back. In game turn 7, a new center sector threat emerged as the French launched a central thrust with a reinforced company that waltzed across what turned out to be a decoy minefield and aimed their attack at the center town on the battle map (Hexes 32-0501 and 32-0601). This attack was beaten back by HMG and accurate German OBA fire. The final French AT gun was dispatched at the end of the 9th game turn, and their reinforcements were delayed two turns. Eventually, the French came close to taking the sunken railway where the Germans had been taking advantage of their central position and the available roads to shuttle tanks and other units to threatened sectors and to reinforce their effort to hold the southern town (Hex 32-0406). Both sides threw seven, 7-die combat rolls in the 2nd session and the Germans threw eight 7-die combat rolls in the subsequent session. During our final session, the Germans again threw seven 7-die combat rolls, to only 2 for the French side. As a result German OBA fire and adjacent-hes DF was notably inaccurate in game turns 13-15. As the play-through wore on, French close assaults slowly collapsed in the north, in the face of reinforcing Axis armor and HMG units. However, the French made slow but steady progress in the south, and periodically threatened the center sector. By the end of our 4th session (game turns 8-10), French step losses were 21, and German were 13, hence the Germans had already eliminated sufficient French steps for a minor victory and had reclaimed several woods and hill hexes west of the railroad. German armor-heavy reinforcement did not appear on time, but showed up on game turn 8. They strengthened the existing Germans flank attack in the north margin of the battle map. In the end, elements of the German 3rd Panzer Division held slightly more town and woods hexes west of the crucial railroad right of way, resulting in a minor victory. However, the French had eliminated 23 German steps, while losing 39 of their own, and had a minor victory of their own. As the German Commander had been playing for a draw from the beginning in this rather unbalanced scenario, against a numerically superior force with fine morale and enhanced initiative – it was a pleasant surprise when the French Commander Offered a draw during the 15th game turn. As others have reported, this was a hard-fought, costly meeting engagement scenario for both sides, with many decision points and constricted room for maneuver. I give this very exciting and challenging scenario a solid 4. |
||||||||||||||
| 0 Comments |
| A worthy but bloody draw. | ||||||||||||||
|---|---|---|---|---|---|---|---|---|---|---|---|---|---|---|
Played over VASSAL in six two - three hour session this scenario has the Germans holding a sunken railway line against a horde of French colonial troops, the German have rather mediocre armour support with the French having even less armour support. The VC's favour the French in as much as they gain a major victory by eliminating German steps, the Germans have to gain ground west of the railway and inflict more casualties for their major victory. I had presumed that my honourable opponent would initially fight a defensive battle then counter attack when his reinforcements arrived bit I had underestimated Treadasaurusrex's thirst for glory. He launched a strong attack on my flanks which caught me on the hop, this coupled with his happy knack of rolling double 1 at the most inappropriate times had me reeling by GT6. However there came a slight lull in the German offensive as the efficient German artillery decided to concentrate on knocking out my A/T guns. This gave me the chance to regroup and counterattack launching a surprise attack through a dummy minefield, Felipe responded quickly and the attack was repulsed but at least I was finally making him react to my moves. I then attacked on both flanks and slowly pushed him back in the south while things got very bloody on the North . By GT 11 I eliminated enough steps for a major win, could I deny the Germans a major win as well by taking more town and wood hexes west of the railroad in the final few turns, further attacks in the south and centre initially gave me hope but French losses were now very heavy and these final attacks were unsupported and lacking in strength to eject the Boche from the towns they had taken in the first few turns. Solid scenario but lacking in much space for manoeuvre though, Felipe play an excellent game particularly at the start of the scenario and although he claims he was playing for a draw from the start I was very defiantly doing so in the middle stages. We fight on! |
||||||||||||||
| 0 Comments |