
|
Rough Country The Last Horse Soldier #2 |
||
|---|---|---|
| (Attacker) United States | vs | Germany (Defender) |
| Formations Involved | ||
|---|---|---|
| Germany |  |
10th Panzer Division |
| United States |  |
1st Cavalry Division |

| Total | |
|---|---|
| Side 1 | 6 |
| Draw | 1 |
| Side 2 | 0 |


| Overall Rating, 8 votes |
|---|
|
4.13
|
| Scenario Rank: 71 of 913 |
| Parent Game | The Last Horse Soldier |
|---|---|
| Historicity | Alt-History |
| Date | 1943-04-01 |
| Start Time | 07:00 |
| Turn Count | 30 |
| Visibility | Day |
| Counters | 62 |
| Net Morale | 0 |
| Net Initiative | 0 |
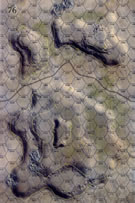
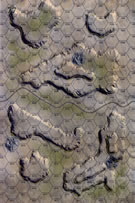
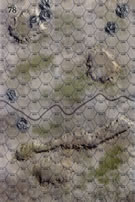
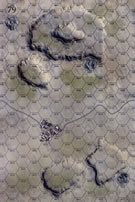
| Maps | 4: 76, 77, 78, 79 |
| Layout Dimensions | 112 x 43 cm 44 x 17 in |
| Play Bounty | 178 |
| AAR Bounty | 165 |
| Total Plays | 7 |
| Total AARs | 2 |
| Battle Types |
|---|
| Hill Control |
| Inflict Enemy Casualties |
| Road Control |
| Conditions |
|---|
| Off-board Artillery |
| Smoke |
| Scenario Requirements & Playability | |
|---|---|
| An Army at Dawn | Maps + Counters |
| The Last Horse Soldier | Base Game |
| Introduction |
|---|
|
The case for the mounted cavalry: wars flow over all kinds of terrain, in all kinds of weather, and an alert enemy will try to fight in the kind best suited to his resources. - Maj. Gen. John K. Herr Tunisia would have been the perfect laboratory for testing Herr's theories: the rugged ground often defied mechanized vehicles, the climate ranged from intense heat to raging rainstorms and even bitter cold, and the Axis obligingly sent some highly-experienced and well-equipped troops to face the Allies. But an experiment with human and equine lives at stake is more than an academic exercise, one that Army Chief of Staff George C. Marshall ultimately chose not to conduct. |
| Conclusion |
|---|
|
Could horsed cavalry have out-maneuvered the deeply-experienced recon battalions fielded by the Axis mechanized divisions? Herr believed that they could in rough terrain, and both sides certainly sought to deploy infantry units capable of operating in the mountains (Moroccan goumiers and Nepalese Gurkhas on the Allied side, German mountain troops for the Axis). If nothing else, the appearance of American troops on horseback would have surprised the Germans. |

|
|
|---|
| AFV Rules Pertaining to this Scenario's Order of Battle |
|---|
|
| Heer |
|---|
|


| Army |
|---|
|


| 2 Errata Items | |
|---|---|

|
The reduced direct fire value of the Heer HMG became 5-5 starting with Fall of France. (plloyd1010
on 2015 Jul 31)
|

|
All SPW 251s have an armor value of 0. (Shad
on 2010 Dec 15)
|
| A Fine Way to Learn How to Move in the Desert | ||||||||||||||
|---|---|---|---|---|---|---|---|---|---|---|---|---|---|---|
This was a rather long, but exciting introductory scenario that is a fine way to learn how to maneuver a regiment-sized, mobile oufit in arid terrain. To be continued . . . |
||||||||||||||
| 1 Comment |
| The Near-perfect Rough Country Division! | ||||||||||||||
|---|---|---|---|---|---|---|---|---|---|---|---|---|---|---|
This was a 3-session play-through that matches a reinforced German Recon battalion, ably led by the rapidly-improving Tankodactyl, with elements of the 1st Cavalry Division in the mountain wilds of Tunisia. I led the American side in what essentially a west-to-east movement to contact that proceeded by fits & starts to drive the defending Germans off the battle map. We used the FOW, consolidation, excess initiative, strategic movement and smoke/illum optional rules. The German leader draw was middling, while the US drew a fine set of leaders. Surprisingly, there were only 8 FOW-shortened game turns in our play-through. The US force surged forward in parallel, left (weak side) and right (strong side) flanking columns, mostly sticking to the available hilly terrain on either side of the main road. The Germans also pushed forward from the east to seize crucial positions overlooking the American advance. Mostly, the Americans advanced, nearly-continuously on either flank -- slowing down only long enough to dismount, assault the scattered German positions, and remount. The US automatic weapon strength (CMG) was daunting for the defending Germans throughout. By mid-game, it was very clear that the Americans would simply sweep the remaining Axis troops away with overwhelming direct fire in what was ultimately a decisive US victory. Final step losses were 32 for the Germans & 5 leaders, versus 10 for the Americans, plus 2 leaders. I give this one a 5 for fun-to-play, training value, lots of maneuver, and the way that this scenario showcases what a true cavalry division might have accomplished if turned loose on the Africa Korps in the desert. |
||||||||||||||
| 0 Comments |
It looks like the 1st Cavalry has done rather well in your little campaign. Now, off to Manila.