
|
Good Roads Black SS #14 |
||
|---|---|---|
| (Defender) Germany | vs | Britain (Attacker) |
| Formations Involved | ||
|---|---|---|
| Britain |  |
10th Highland Light Infantry |
| Britain |  |
2nd Gordon Highlanders |
| Britain |  |
3rd Scots Guards Armoured |
| Germany |  |
9th SS "Hohenstaufen" Panzer Division |

| Total | |
|---|---|
| Side 1 | 1 |
| Draw | 0 |
| Side 2 | 0 |


| Overall Rating, 2 votes |
|---|
|
3
|
| Scenario Rank: --- of 913 |
| Parent Game | Black SS |
|---|---|
| Historicity | Historical |
| Date | 1944-08-05 |
| Start Time | 15:45 |
| Turn Count | 16 |
| Visibility | Day |
| Counters | 97 |
| Net Morale | 0 |
| Net Initiative | 1 |
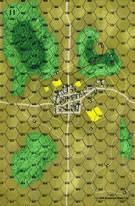
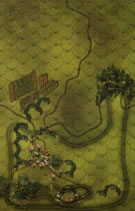
| Maps | 2: 11, 27 |
| Layout Dimensions | 56 x 43 cm 22 x 17 in |
| Play Bounty | 154 |
| AAR Bounty | 165 |
| Total Plays | 1 |
| Total AARs | 2 |
| Battle Types |
|---|
| Inflict Enemy Casualties |
| Urban Assault |
| Conditions |
|---|
| Minefields |
| Off-board Artillery |
| Terrain Mods |
| Scenario Requirements & Playability | |
|---|---|
| Battle of the Bulge | Maps |
| Beyond Normandy | Counters |
| Black SS | Base Game |
| Elsenborn Ridge | Counters |
| Fall of France 1 | Maps |
| Introduction |
|---|
|
In an area devoid of a good road network, whatever good roads may be present are of vital importance to the combatants. At the hilltop town of Estry, two of the better roads in the region crossed meaning that a battle there was inevitable. On August 5th the British sent the 227th Infantry Brigade of 15th Scottish Division to take the crossroads. |
| Conclusion |
|---|
|
The Germans also understood the importance of the area and "had turned Estry into a strongpoint... and the garrison had a call on powerful artillery farther back." The Gorden Highlanders spearheaded the attack but were stopped just short of Estry, where they dug in. The Highland Light Infantry then took over the assault but were themselves turned back with heavy casualties. |
| Additional Notes |
|---|
|
Playable without using the black SS counters. |

|
|
|---|
| AFV Rules Pertaining to this Scenario's Order of Battle |
|---|
|
| Army |
|---|
|


| Heer |
|---|
|


| Schutzstaffel |
|---|
|


")
")
")
")


| 4 Errata Items | |
|---|---|

|
The "Optional Values" for the Achilles---and by extension the Archer---given in an Avalanche Press Daily Content piece on the 17-Pdr Anti-Tank gun (and printed on a replacement counter sheet Download) are now the Official Ratings, published in games like Cassino '44, Grossdeutschland 1946, and Indian Unity. These are: 8-5 / 8-8 Full Strength and 4-5 / 8-8 Reduced Strength. (caryn
on 2012 May 03)
|

|
All Bren carriers should have a movement value of 7. (Shad
on 2010 Dec 15)
|

|
All SPW 251s have an armor value of 0. (Shad
on 2010 Dec 15)
|

|
The reduced direct fire value of the SS HMG is 5-5 in Beyond Normandy and Road to Berlin. (plloyd1010
on 2015 Jul 31)
|
| Good Roads, Bad Town | ||||||||||||||
|---|---|---|---|---|---|---|---|---|---|---|---|---|---|---|
This was a Skype play with Vince Hughes. As our usual fair the play was good and he made it quite enjoyable with his new defensive strategy. The battle has the British attacking a town Estry situated on a 40m hill and at a critical road junction. The Germans occupy this with a strong force from the 9th SS Panzer Division. The British must take the town and push the Germans out, but the German are dug-in and have the positioning on the British. The British have brought up Churchill VII tanks for the assault as well as two brigades, but they will need more than that for this well defended town. The Germans setup with a reinforced company blocking the east-west road and commanding the hill. A StugIIIG is positioned to command AT fire on the advancing British as well as the possibility of a motley crew of artillery and mortars some where hidden in the town. To the south, several groups of GREN's and SPW251's are strung out as a picket line against a southern attack. Mines protect the southern edge of the Estry. For the British, they will try to push the northern and southern flanks while trying to batter at the center roadblock on the hill. To the north a reinforced company is positioned to move around Germans and down the north south road. To the south another reinforced company is posed to do the same thing as the northern force. In the center the main force is positioned in the wheat fields and the town. To start the Germans get the jump, but wait for the British to move out. The northern and southern forces advance while in the center the WPN's units position for fire on the hill. German OBA scores first blood with a step loss on a RIF. The northern force continues to advance across the top of board 27 for several turns before its starts to get into position against the Germans, but pesky on board artillery starts to take it's toll with disruptions and demoralization's. Soon the leading Captain is double disrupted and the northern force slows down. To the south, the German pickets are forcing the British out and around the main defense. Key shots slow the British with disruptions and demoralization's. Forced to recover units the Captain is stopped and the force only moves forward piecemeal. Reinforcements are added to the southern force to get them going but German artillery keeps after them and their advance slows. In the center the WPN's teams form up to try to get a fire group on the STNBFR that is holding the lower elevations. The units nearly get together when OP fire kills the leading CAPT, forcing to go with plan B. Another LT moves forward to take command and the teams open fire on the hills with little to no effect. As time goes on the German guns, although not accurate all the time, score enough disruptions and demoralization's to keep the British off the hill. Several desperate charges are tried by the British, but the fight will be too much for them as the casualties mount and they are no closer to the town. Halfway through with many losses and tanks burning the British pull back to the start line. A very tough one for the British, as the Germans have the edge with the positions and support weapons. The British will have to traverse open ground or fields that can be observed from the higher ground. This will put them under consist fire and morale pressure, which over time will take its toll. |
||||||||||||||
| 0 Comments |
| Forward Defence On East Side Of Estry Proves Too Much For British To Crack | ||||||||||||||
|---|---|---|---|---|---|---|---|---|---|---|---|---|---|---|
Game played on Skype with Alan Sawyer. This was the seventh and final scenario in our 9th SS Hohenstaufen versus the British from the BSS book. I had struggled in some defensive situation games of late and was determined to do better this time round. Surveying the board, this one looked ripe for a decent forward defence with the plan of holding back the enemy for as many turns as possible before falling back to the town and only giving the attackers a minimum time window to take town hexes. The British would attack Estry from its east side. The 9th SS Hohenstaufen had deployed their infantry about 500 yards forward of the town on a lower level, but higher than that of the Scottish attackers. They were supported behind by their MG platoons, and the town centre was packed with a Nebelwerfer battery and five platoons of mortars. These would supply defensive fire support for the grenadiers to the fore. Also, on the east of Estry there was one platoon of StGIII’s and a battery of the feared 88’s. A number of picket platoons were deployed to the south and a ring of mines had been layed to the south-west outskirts of Estry. The main British thrust looked as if it would come from the east axis with smaller forces north and south of those. HMG platoons, Churchill tanks and numerous mortars were assigned to assist the Tommy infantrymen. At 1545 hours the attack began with a cautious advance by the British. German artillery caused early casualties upon this approach. Thereafter, the next hour was spent with the German forward line deterring a frontal assault whilst the British flanks attempted their envelopment. Few casualties occurred during this time and the Germans were pleased with the enemy’s slow progress. The British did score one success when they secured a hit to knock out one of the mortar platoons in Estry. Overall, it appeared the Scottish troops appeared to be struggling to find a way through to Estry. By 1715 hours, things were hotting up. As the British tried to probe, the casualties began to grow. Artillery, MG and small-arms fire began taking their toll. British Churchills and Achilles took hits from the 88’s and the StG’s sitting atop the hill in Estry. Artillery took out British Sappers and the MG’s finished off one rifle platoon that ventured into the open. One platoon of Scots got to the edge of the minefields around Estry, but were pretty much leaderless and unable to push further. In all, it was during this period that the British command lost its heart and decided that the attack should be called off. It may have been decided on too early (turn 9 of 16)considering how one fire activation can sometimes cause the collapse of a whole hex. Casualties were 1 German mortar step against 7 British foot steps and 2 AFV steps. The seven battle BSS Campaign between the 9th SS and the British during Op Bluecoat produced a huge disparity in casualty totals: (shown in steps). As well as yielding 6 x SS wins and a draw. German – INF 29, OFF 6, AFV 7, APC 7, GUN 7 British - INF 68, OFF 16, AFV 37, APC 27, GUN 7 This scenario gets a standard 3 from me. Unfortunately, with the early declaration of game end, I don't think I got the full experience of the game having not had to play through the final 7 turns of a 16 turn battle. Maybe my rating would have gone up or even down 1 point had I had the option to complete, but as it stood, the '3' appears fair enough on what was played. |
||||||||||||||
| 0 Comments |