
|
Guardia del fascismo Blackshirt Division #1 |
||
|---|---|---|
| (Attacker) Italy | vs | France (Defender) |
| Formations Involved | ||
|---|---|---|
| France |  |
3e Regiment de Zouaves |
| Italy |  |
Gruppo di Battaglioni Montebello |

| Total | |
|---|---|
| Side 1 | 3 |
| Draw | 1 |
| Side 2 | 0 |


| Overall Rating, 5 votes |
|---|
|
3.4
|
| Scenario Rank: 494 of 913 |
| Parent Game | Blackshirt Division |
|---|---|
| Historicity | Alt-History |
| Date | 1943-03-01 |
| Start Time | 07:00 |
| Turn Count | 20 |
| Visibility | Day |
| Counters | 57 |
| Net Morale | 1 |
| Net Initiative | 2 |
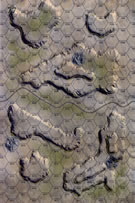
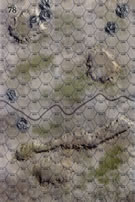
| Maps | 2: 77, 78 |
| Layout Dimensions | 56 x 43 cm 22 x 17 in |
| Play Bounty | 165 |
| AAR Bounty | 165 |
| Total Plays | 4 |
| Total AARs | 2 |
| Battle Types |
|---|
| Hill Control |
| Conditions |
|---|
| Off-board Artillery |
| Scenario Requirements & Playability | |
|---|---|
| An Army at Dawn | Maps + Counters |
| Blackshirt Division | Base Game |
| Introduction |
|---|
|
The first troops of the Blackshirt “M” Division to land in Tunisia immediately went into action in the hills near the railway junction of Sedjenane as part of the Axis offensive known as “Operation Ox Head.” There they met French troops now fighting alongside the Allies, long-service regulars recruited from French pieds noir colonists residing in Algeria and considered among the toughest French soldiers. |
| Conclusion |
|---|
|
The armored carriers would have given the M Division’s experienced infantry a tremendous advantage in combat, but the lack of real artillery support would have been felt when attacking prepared positions. Nevertheless the direct firepower would have been a very large advantage. As a mobile formation, even a weak “division” like the Blackshirt unit would have been highly prized by the Axis commanders in Tunisia. The use of such a unit in the Ox Head operation (conducted concurrently with the Kasserine attack) would have given the Allied First Army some real concern over their coastal communications. |

|
|
|---|
| AFV Rules Pertaining to this Scenario's Order of Battle |
|---|
|
| Armée de Terre |
|---|
|


| Milizia Volontaria per la Sicurezza Nazionale |
|---|
|


| 1 Errata Item | |
|---|---|

|
In 1940: Fall of France, the units show Direct Fire. All units are Indirect Fire. (rerathbun
on 2015 Jun 06)
|
| Sweep |
|---|
|
In playtesting this one I used a very compact French defense and the Italians had some lost halftracks and numerous morale failures. This time I tried a forward French defense with the guns up front with the idea of causing significant morale issues and hopefully some fun shots at the halftracks. All I can say is that if you roll like I did, don't use that approach. Pack in your defense and make the Italian player come to you. I went back to this one because it is a nice compact scenario and forces the Italian player to make some tough choices since he has 26 units (13 ground and 13 halftracks) and only 5 leaders. Any leader losses will be a significant issue for the Italians. In any event, I had no bad luck whatsoever for the Italians. There were only a few step losses (3) and the leaders were high quality and generally made their morale checks. The units themselves. On the other side of the hill the French were having a very tough time of it. By the time I hit turn 15 the Italians had already cleared their sixth 40m hill hex and were dominating the French completely. At that point the French commander signaled to abandon the heights and make for the west. They would have to fight another day. This is still a fun little scenario and the Blackshirt pieces are just fun to play with. The scenario itself is probably tilted towards the Italians so if you are playing with a newer player give the newer player the Italians. If you are playing solo try to gain the 6th 40m hill hex by turn 15 for a major victory. All in all, though, a pleasant and short little scenario and a great excuse to use the Blackshirt pieces. |
| 0 Comments |
| Stop the Fascist's Rushing Game! | ||||||||||||||
|---|---|---|---|---|---|---|---|---|---|---|---|---|---|---|
This was a refreshing change of pace: an exciting, 2-session, face-to-face, play-through with the determined & thoughtful Tubac52 as leader of the onrushing Italian side -- in halftracks! I played the defending French in this 20-turn, shoot 'em up. We used the consolidation, excess initiative, smoke/illum and FOW optional rules, and experimented with the following 2 house rules: 1) Road Movement for Mechanized & Foot Units All FOOT & MECHANIZED units may move on roads at the rate of 1/2 a Movement Point (MP) per road hex, just like MOTORIZED units, and 2) Standardized Movement for Mechanized Units All mechanized units may move through clear hexes at a movement cost of only 1 movement point (MP) per hex, instead of 1 1/2. Add one to this cost if moving up, across, or down slopes hexes. Both sides drew good sets of leaders, and the game was only marred by the 9 FOW-shortened turns that ended up favoring the French defenders. A combined 16 combat 7-die rolls were thrown in this fast-paced battle. Using suggestions provided by others in their AARs, the adoption of a relatively dense French hedgehog defense works well in this scenario, if one lengthens the Italian movement to contact as much as possible, by hanging back as far as tactically practical. By the time the Italians drew into close range, several of their APC-borne infantry and HMG units, and a leader, had been eliminated by accurate AT fire. Once in close range, things became very costly for both sides thanks to adjacent-hex DF and close assaults. I held the French in their initial hilltop positions as long as possible, but had lost 3 hill crest hexes to the Italians by the end of game turn 11. Both sides had lost leaders, as well by then - the Italians being reduced to only 2 remaining leaders after suffering a decapitation in turn 10. Throughout this fight, both sides generally had good luck in morale recovery rolls. With the excessive leader losses, the Italians slowly lost momentum and began having difficulty sequencing & reinforcing their close assaults, which resulted in higher casualties than the defending French garrison. By game turn 18, there were only 6 Italian combat units left due to vigorous French counter attacks. These resulted in serious casualties on both sides, but the Italians managed to hang on to three 40-meter hill hexes, and were thrown back in 2 others. We ended the game with 3 hill hexes each and declared a draw, due to excessive losses, when it was clear that with only a single Italian leader remaining and the last few French troops with serious morale problems, a draw was the best that either side could hope for. This is a good quick scenario for SOLO or SHARED play that merited a 3 in my estimation. It would have rated higher with me, but the lack sufficient of Italian leaders can make this a very hard scenario for the Italian player, even with the advantages that this side comes with. Too many difficult & usually unpleasant decisions must be made once a couple of of the few Italian leaders become casualties. As others have stated, the more experienced player should play the French side in this encounter, as the defense, and the multiple counter attacks must be tightly controlled & timed for the French to have a shot at victory. |
||||||||||||||
| 0 Comments |