
|
Operation Epsom, The First Day Beyond Normandy #3 |
||
|---|---|---|
| (Defender) Germany | vs | Britain (Attacker) |
| Formations Involved | ||
|---|---|---|
| Britain |  |
1st Middlesex (machine-gun) |
| Britain |  |
22nd Dragoons |
| Britain |  |
2nd Glasgow Highlanders |
| Britain |  |
79th Armoured Division |
| Britain |  |
7th Royal Tank Regiment |
| Britain |  |
7th Seaforth Highlander Infantry |
| Britain |  |
9th Cameronians |
| Germany |  |
12th SS Artillery Regiment |
| Germany |  |
12th SS Panzer Regiment |
| Germany |  |
12th SS Pioneer Battalion |
| Germany |  |
25th SS Panzergrenadier Regiment |
| Germany |  |
26th SS Panzergrenadier Regiment |

| Total | |
|---|---|
| Side 1 | 2 |
| Draw | 1 |
| Side 2 | 0 |


| Overall Rating, 3 votes |
|---|
|
3.33
|
| Scenario Rank: --- of 913 |
| Parent Game | Beyond Normandy |
|---|---|
| Historicity | Historical |
| Date | 1944-06-26 |
| Start Time | 07:45 |
| Turn Count | 26 |
| Visibility | Day |
| Counters | 339 |
| Net Morale | 1 |
| Net Initiative | 1 |
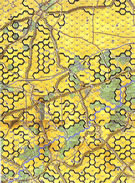
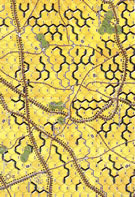
| Maps | 2: BN1, BN3 |
| Layout Dimensions | 88 x 58 cm 35 x 23 in |
| Play Bounty | 196 |
| AAR Bounty | 165 |
| Total Plays | 3 |
| Total AARs | 2 |
| Battle Types |
|---|
| Inflict Enemy Casualties |
| Rural Assault |
| Urban Assault |
| Conditions |
|---|
| Off-board Artillery |
| Randomly-drawn Aircraft |
| Severe Weather |
| Smoke |
| Scenario Requirements & Playability | |
|---|---|
| Beyond Normandy | Base Game |
| Introduction |
|---|
|
General Bernard Law Montgomery's plans for Operation Epsom centered on the observation by Allied intelligence that the opposing SS formations held a very long front for their numbers. Montgomery hoped to drive through the thinly-held line manned by elements of 12th SS Panzer Division and across the Odon River beyond. As the sun slowly rose the sons of Scotland formed up in the fields and made ready to move forward. Two sets of Beyond Normandy counters are required to play this scenario. Set up first, as directed in scenarios one and two. |
| Conclusion |
|---|
|
Though Montgomery would take solace in tying down German panzers and later claim that this had been his objective, Operation Epsom had a shaky beginning. Only Scottish valor had kept it from becoming an outright disaster. |
| Additional Notes |
|---|
|
Two sets of Beyond Normandy counters are required to play this scenario. |

|
|
|---|
| AFV Rules Pertaining to this Scenario's Order of Battle |
|---|
|
| Army |
|---|
|


| Heer |
|---|
|


| Luftwaffe |
|---|
|

| Schutzstaffel |
|---|
|


")
")
")
")


| 8 Errata Items | |
|---|---|

|
The "Optional Values" for the 17-Pdr given in an Avalanche Press Daily Content piece on the 17-Pdr Anti-Tank gun (and printed on a replacement counter sheet Download) are now the Official Ratings, published in games like Cassino '44, Grossdeutschland 1946, and Indian Unity, as shown in one of the two counter images. These are: 5-5 / 8-8 MA 0 (Towed). (caryn
on 2012 May 03)
|

|
The "Optional Values" for the Achilles---and by extension the Archer---given in an Avalanche Press Daily Content piece on the 17-Pdr Anti-Tank gun (and printed on a replacement counter sheet Download) are now the Official Ratings, published in games like Cassino '44, Grossdeutschland 1946, and Indian Unity. These are: 8-5 / 8-8 Full Strength and 4-5 / 8-8 Reduced Strength. (caryn
on 2012 May 03)
|

|
All Bren carriers should have a movement value of 7. (Shad
on 2010 Dec 15)
|

|
Ignore the direct fire values. (Shad
on 2010 Dec 15)
|

|
All SS 105mm guns should have white, indirect fire values. (Shad
on 2010 Dec 15)
|

|
The reduced direct fire value of the SS HMG is 5-5 in Beyond Normandy and Road to Berlin. (plloyd1010
on 2015 Jul 31)
|

|
The Units in Beyond Normandy were misprinted with a movement factor of 5. The movement factor should be 8. (rerathbun
on 2012 Mar 21)
|
|
|
Liberation 1944's counters are mislabeled 'PzIVF2.' The counter's ratings are correct (Armor 5, Move 8, DF 11-6, AT 6-8). (rerathbun
on 2014 Feb 14)
|
| Hedgerow Hell | ||||||||||||
|---|---|---|---|---|---|---|---|---|---|---|---|---|
The British have a tough row to hoe in this game. I played the British and my friend Ted played the Germans. I lost every armored unit I had. I think my strategy was more than a little off but I do think that Ted set up excellent lines of fire and use his commanders more effectively. I think the real key to winning this scenario is effective use of your commanders. He always seemed to activate the right units in response to my moves and I sometimes activated too many at once and paid for it later in the turn. |
||||||||||||
| 0 Comments |
| Curse the Mud! | ||||||||||||||
|---|---|---|---|---|---|---|---|---|---|---|---|---|---|---|
At CSW Expo 2018, 4 of us played this big scenario. Rolf van Ishem and I played the Brits, with Dave Davieau and Greg Tanner playing the Germans. Primarily I faced off against Greg, and Rolf against Dave. This scenario features a lot of Scottish troops going against fanatical 9/8 defense SS troops, and having to slog through a lot of mud to get to them. In most cases, tanks going in the open could move 1 hex per turn. The British had copious amounts of OBA and some pre-planned fire, and a number of flamethrower tanks. The Germans got late game PZIV reinforcements. My plan was to send one Battalion of Scots to the center of the German position, and one to the German left/Scottish right, both backed by tanks. The tanks on my right were going cross country, so it would take them several hours to do so. Our pre-plotted bombardments did some damage, however most of them fell on empty hexes, or hexes that were vacated after the 1st bombardment hit. Plus, against dug in 9/8 troops, we were mostly going for X results, not M. I gathered up my forces and launched my assault, with the advance partially being hidden by smoke. I achieved some good initial results in the center, although at a high casualty cost. On the right, things were slower to develop as I waited for the tanks. I ran into 2 problems. While Greg could often not seem to hit the broad side of a barn with his artillery, his small arms troops were doing just fine, and I couldn't seem to get any results with my artillery. In retrospect, I launched my center assault too soon. I had a 3rd battalion to reinforce the center, and my initial thought was to have the 1st fight until exhausted and replace it with #3. Unfortunately, #3 wasn't in position by the time #1's attack petered out. I think had I been able to do a 2nd wave immediately behind the 1st, I could have punched through his positions. It was an overcast day, so the Scots had very little air support, and it went to Rolf, who was having severe problems on his flank, especially from an 88mm gun that refused to die and was wreaking havoc on his tanks. We all agreed that the 88mm, which was Luftwaffe, probably should have had 8/7 morale, however the scenario didn't say that, so we played it at 9/8. I was making progress on my right flank once the tanks arrived, however the infantry again was taking heavy casualties attempting to push the fanatical SS out of their positions and I was nowhere close to my objectives. We played for about 3 days, real-time and finished about 2/3 of the scenario. In the end, the Scots were roundly defeated. They killed a lot of Germans (and suffered a lot of casualties themselves), however they did not even approach most of their objectives. I think a better battle plan would have aided us (my attack went in too soon, Rolf attacked on too broad a front). This was an interesting scenario, the biggest I've played to date, and I would play it again, although with so many scenarios out there, it's unlikely that I'd get back to it anytime soon. We all had a good time and look forward to playing more games together next year. |
||||||||||||||
| 0 Comments |