
|
Fuller's Counterattack Battle of the Bulge #12 |
||
|---|---|---|
| (Attacker) Germany | vs | United States (Attacker) |
| Formations Involved | ||
|---|---|---|
| Germany |  |
2nd "Vienna" Panzer Division |
| United States |  |
110th Infantry Regiment |
| United States |  |
707th Tank Battalion |
| United States |  |
Army |

| Total | |
|---|---|
| Side 1 | 5 |
| Draw | 7 |
| Side 2 | 11 |


| Overall Rating, 23 votes |
|---|
|
3
|
| Scenario Rank: 728 of 913 |
| Parent Game | Battle of the Bulge |
|---|---|
| Historicity | Historical |
| Date | 1944-12-17 |
| Start Time | 07:15 |
| Turn Count | 9 |
| Visibility | Day |
| Counters | 61 |
| Net Morale | 0 |
| Net Initiative | 0 |
| Maps | 2: 11, 9 |
| Layout Dimensions | 56 x 43 cm 22 x 17 in |
| Play Bounty | 76 |
| AAR Bounty | 141 |
| Total Plays | 23 |
| Total AARs | 6 |
| Battle Types |
|---|
| Exit the Battle Area |
| Urban Assault |
| Conditions |
|---|
| Off-board Artillery |
| Reinforcements |
| Terrain Mods |
| Scenario Requirements & Playability | |
|---|---|
| Battle of the Bulge | Base Game |
| Introduction |
|---|
|
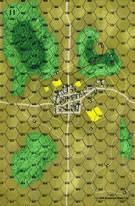
The German advances on the 16th had largely been held by American resistance, but contact with Company B of 110th Infantry Regiment at Marnach had ceased and German troops had been spotted moving west of the town. Colonel Fuller, commander of the 110th Infantry Regiment, proposed a three-pronged attack on Marnach using the whole of the division reserve, and received approval from division headquarters. The goal of the attack was the relieve the garrison, if it still existed, and to block German movement on Clerf. |
| Conclusion |
|---|
|
Only two of the three American prongs actually attacked, the third being decimated before reaching the battlefield. The two-company attack from Clerf was driven back with casualties, but the small tank-infantry team from Munshausen actually reached the outskirts of town only to discover that the garrison was no longer there. |

|
|
|---|
| AFV Rules Pertaining to this Scenario's Order of Battle |
|---|
|
| Heer |
|---|
|


| Army |
|---|
|


| 4 Errata Items | |
|---|---|

|
The reduced direct fire value of the Heer HMG became 5-5 starting with Fall of France. (plloyd1010
on 2015 Jul 31)
|

|
All SS PzIVH tanks should have a movement of 8. (Shad
on 2010 Dec 15)
|

|
All SPW 251s have an armor value of 0. (Shad
on 2010 Dec 15)
|

|
One Wespe (ID# 1201) should have an armor value of 1 on the front and back of the counter. (Shad
on 2010 Dec 15)
|
| Almost made it! | ||||||||||||
|---|---|---|---|---|---|---|---|---|---|---|---|---|
The Germans tried a run up the middle of the position (along the road) and although the Americans retreated in good order in a delaying action, it was to no avail. The ONLY thing that kept the Germans from winning this one was two turns. |
||||||||||||
| 0 Comments |
| Battle of the Bulge, Scenario #12, Fuller's Counterattack | ||||||||||||
|---|---|---|---|---|---|---|---|---|---|---|---|---|
After setting it up, I decided that there was no way the Americans could control all the town hexes on the other side of the board with one large German force already there and another one coming on turn two. So I decided to get one of the other two victory conditions. I could win either by eliminating 6 German steps or blocking all there reinforcement from exiting the western edge of play. As the German, I new I could control the town but I also had to exit all the reinforcements that entered on turn two off the board with only 2 step losses. So I attacked the Americans hard, with my Initial or first group of Germans, as they could loss any number of steps, hopefully less then 6 however! The Second group of Germans gathered in the town over the next 3 or 4 turns while the first group tried to soften up the Americans. As the Americans, I knew that the Germans didn’t have time to get all there reinforcements off the west edge through the forest and hills in 9 turns. So I put most of my forces in the center, where the road runs through and blocking forces on the North & South edge of the forest, to contain any flanking moves. I could risk as many step losses as I wanted, as long as I either contained all the reinforcement from exiting or get 6 total step losses on any of the German forces. I committed my German reinforces too late to break out. I started using my Armor from that second group with about four turns left, thinking the first group could do it with out help and I could just sail through to the other side with out risking the two step thing from my reinforcement group. Wrong, I should have committed that armor right away as the Americans only have one Sherman platoon. I kept it busy with the Stug IIIG and the PzIVF2 from the first group. I usually lose my Sherman Tanks in scenarios with only one platoon, but not this time! The Sherman counter #1508 must be one of the luckiest ones around! It survived 5 AT dice rolls and two assaults with only a disruption but he pulled back a little farther into the forest road hexes before the Panthers and more PzIVH’s came around. The Sherman also took out 1 step of Stug IIIG. The Americans did loss all of their Artillery after only one turn because of special rule number 3, I rolled a one after one turn but at least I got to disrupt one German Infantry unit with it. By turn 9, I had one more assault going on that would have freed up the whole road hex leading out of the West edge of the board. If I had just committed that second group of armor sooner, I would have opened up that whole bottleneck and poured my German reinforcements off the west edge for a victory but I was denied by that stubborn American Infantry. Good dice rolls might have helped also. The Americans won by steps and not allowing the German reinforcement group off the board! The casualty list included 9 American step and 3 Lieutenants, the Germans had 10 step losses, all from the initial German set up group. The Americans paid a price to get the victory and the German were too careful with their second force of reinforcements and didn’t help the first Elements of the 2nd Panzer Division until it was too late in the game to bust through. One thing I noticed about this scenario, towards the end of the game, you must keep track of which group of German is the first group and which is the second group, as they start to get mixed and you can only loss 2 steps from the second group. I think by the way I played the scenario, it should have been called, Fuller's delaying action! |
||||||||||||
| 0 Comments |
| Fuller gets overrun | ||||||||||||
|---|---|---|---|---|---|---|---|---|---|---|---|---|
This one is very interesting as the title makes you think the Americans are attacking, but give the American and German OOB's, I think the Americans need to be on the defense or at least "hit and run" tactics. The Germans have two forces to start with, either on is superior to the Americans, but there a trick. The reinforcements must move on and off the board for the Germans to win. So if the Americans can snipe at them they will be very limited in terms of response and if the onboard Germans try to help, the Americans can try to capture the towns. Given this the Americans setup in the woods on board 9 around the road ready to pounce. The Germans are in the towns on board 11. To begin the Germans move a company of troops up from the town to try to engage the Americans before the reinforcements enter. The Americans stay put and wait. The German company runs into the first American platoons waiting American Op fire slows them down but eventually the get close for the assault. Meanwhile the reinforcements slowly make their way down the road. The Americans look to their OBA to knock out the recon company, but it has no effect. The Americans need to get rid of the recon company. So move platoons get into Op fire positions. German on board and off board artillery start having effects on the Americans as the German tanks are moving on to board 9 into a support position. A third of the way through the scenario and the Americans are hurting with step loses and disruption. The Germans look to reinforce the company with more troops from the town as it look unlikely the Americans will mount an attack on the towns. Two companies more north and south of the road to try to flank the Americans. The recon company with tanks moves in for assaults. At this point in my notes, I was wishing for infantry AT, with came after this game. The German assaults were devastating, step losses and demoralizations on every assault. By turn 6, the Germans were at the crossroads on board 9. The lone American tank had be looking for a good ambush site. But was destroyed by a Panther before it could find a hiding place. With the road open the German reinforcements move easily off the board to with the game. Fullers command was destroyed and the remnants scattered into the woods. I like the scenario, but the American infantry need something to attack armor with. The German recon company was lucky with dice rolls but with the addition of Panthers, the Americans could not stop then. I am looking forward to playing again, this time with infantry AT guns. |
||||||||||||
| 0 Comments |
| Fuller's Counterattack | ||||||||||||
|---|---|---|---|---|---|---|---|---|---|---|---|---|
Looking for a quick game to play solo and thus gain promotion this month I looked through the BotB scenario book and came across this gem. Only 9 turns but with a reasonable amount of units this one caught my eye. Don't be confused by the title of this the US troops are unlikely to be attacking as a quick read of the VC and OOB will show. The VC state that the American player will win if all town hexes are American controlled at the end of the game. As the initial German forces start on the town board and are equal in strength to the US forces this aint going to happen. However look at the German VC, In effect do not lose 6 steps, all reinforcing unit must cross the board and not lose 2 steps in so doing and control all town hexes. This will be a tall order, the VC's are not clear if trucks are included in the step loss total (I presumed not) nor does it say if neither side win then the result is a draw ( I would also presume that). I also gave the INF/GREN on both sides A/Tank weapons. The battle started with an advance by the initial German forces towards the edge of the woods on board 9 where the US forces had set up. The idea was to pin then down in order that the reinforcing units could drive around the battle and exit the map. This worked after a fashion with US units disrupting but also cost the Germans 2 step losses. By GT3 2 US steps had also been lost and the US OBDA had run out of ammo. The German commander decided to run his units around the south flank and moved all his reinforcing units in that direction, the US player responded in kind but could only disengage 2 platoons initially however he had kept his sole tank unit on the road to the rear of the battle line and that swiftly moved southwards as well. The next turn saw a further 2 Ger steps lost due to accurate opportunity fire, this was meant that the German initiative dropped to below the US. The US commander then waited until the German flanking units had moved he had seen that the GREN units were still embussed the Sherman platoon then drove out of cover and were in LOS of the half tracks carrying a company of Panzer Grenadiers. It would all now depend on the initiative roll, If the US won he would destroy both half track and their hapless cargo if German player won the Panther's accompanying the half tracks would pulverize the Sherman's before they had chance to fire. The US won the die roll,the Sherman's fired 2 SPW destroyed along with 4 steps of GREN. GAME OVER. This is a very tough game for the German's to win and my FtF opponent would probaly not even have tried and gone for the draw digging his units in on the ridge and inviting the US player to attack. If the German player goes for it he needs to not make the mistake I did of leaving units on their transport in order to save 2 MP a turn, he will also need the best of the die rolls. I have rated this a high three because its quick,fun and does present the German player with an interesting problem to solve. Well worth a look if you have only limited time for a game. |
||||||||||||
| 0 Comments |
| Stopped Cold | ||||||||||||
|---|---|---|---|---|---|---|---|---|---|---|---|---|
Looking at this scenario, it looked like a certain win for the Germans. The first part to the US goal, clearing out all the Germans from a large town, just looked way too daunting, so holding a German rush to clear a large mechanized force through the US troops and off the board became the goal. Germans had to get all but 2 steps off of the force that starts entering on turn 1. Running this solo, the US sat up a solid line of infantry with HMGs just far enough inside the woods and hills on the east side of the table, with reinforcing infantry adding in while the reinforcing Shermans moved forward to the edge of the woods to draw fire and spot for the limited US artillery support. This had mixed results, with the Wespe exposing itself and taking a shot at the Shermans, doing no damage but the US artillery just managed to get that one turn of fire before they ran out of ammo (rolled a 1 after that one and only shot). The German reinforcement element headed for the US in the woods, Panthers and MkIVs up front, and the other German armor that start in the town joined in, since losses from them don't count against the German force trying to go through and exit the east edge. After several turns of US passing and Germans moving forward, it finally came time for a duel between the Shermans and the Panthers, taking a step loss and a disruption on the US platoon. The remaining step of US armor decided to move back rather than attempt a morale check in close proximity to the Panthers, and this drew the Germans that much closer to the US infantry waiting in the wood. The Shermans became demoralized when the time came to check again, but US infantry assaulted leading elements of German armor with telling results. By the end of turn 8, the starting German StuGIII had been eliminated (2 steps down), and an additional Mk IVH and APC loaded with Infantry were lost to US assaults while the US lost the final step of the Sherman to fire from one of the Panthers and an HMG platoon to the only really good assault the German armor was able to fight. End game, the Germans lost a total of 5 steps from the mobile force, giving the win to the US. Great game, definitely want to play again when I recruit some local folks for face to face play. |
||||||||||||
| 0 Comments |
| Through the woods |
|---|
|
An interesting scenario that at first confused me as there was no way the US forces could take the town. Upon reading the victory conditions further I did find that it was quite possible for them to win by stopping German troops from exiting the west side of the map. US troops ended up setting up to block the road through the woods and making a stand against the massive entering German force. Germans start by gathering their strike force together outside the town as units move in from off map and by turn 3 a massive assault takes place all at once. The M4 Sherman platoon desperately tried to hold off the German armor, only to be quickly overrun due to a bout of bad luck and poor rolling. Panzergrenadiers quickly unload under fire and lock into assault with the US infantry. On turn 4 the Sherman platoon was halved and demoralized, pulling back and the US had already lost a full platoon of infantry from German artillery and combined fire from armor. Slowly the US forces pulled back further into the woods trying to slow down the German advance for a conditional victory. German forces cause considerable casualties over the next two turns, while the halved Sherman platoon continues to cower. Due to well planned combined arms assaults, US infantry units can't do much of anything to the slowly advancing German armor due to the Panzergrenadiers in their halftracks keeping them pinned. On turn 8 the Germans evacuate most of their force alone the road while US troops ran away demoralized due to massive casualties. Germans evacuate all necessary troops on turn 9, suffering three step losses total for all troops compared to the American's 9. A decisive German victory. |
| 0 Comments |