
|
Africa Korps Advances Afrika Korps #43 |
||
|---|---|---|
| (Attacker) Germany | vs |
Australia
(Defender)
Britain (Defender) |
| Formations Involved | ||
|---|---|---|
| Australia |  |
Army |
| Britain |  |
5th Royal Tank Regiment |
| Britain |  |
9th Rifle Brigade |
| Germany |  |
5th Panzer Regiment |
| Germany |  |
8th Machinegun Battalion |

| Total | |
|---|---|
| Side 1 | 1 |
| Draw | 3 |
| Side 2 | 2 |


| Overall Rating, 7 votes |
|---|
|
3
|
| Scenario Rank: 723 of 913 |
| Parent Game | Afrika Korps |
|---|---|
| Historicity | Historical |
| Date | 1941-04-02 |
| Start Time | 09:45 |
| Turn Count | 33 |
| Visibility | Day |
| Counters | 65 |
| Net Morale | 0 |
| Net Initiative | 1 |
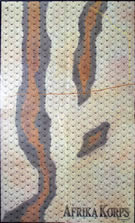
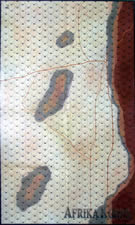
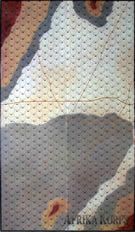
| Maps | 3: AK1, AK2, AK3 |
| Layout Dimensions | 174 x 119 cm 69 x 47 in |
| Play Bounty | 179 |
| AAR Bounty | 165 |
| Total Plays | 6 |
| Total AARs | 2 |
| Battle Types |
|---|
| Delaying Action |
| Exit the Battle Area |
| Rural Assault |
| Conditions |
|---|
| Terrain Mods |
| Scenario Requirements & Playability | |
|---|---|
| Afrika Korps | Base Game |
| Introduction |
|---|
|
Excellent intelligence informed the British that new Axis armored divisions had arrived in Libya - the Italian Ariete and German 5th Light. The same ULTRA source showed they had orders to stand their ground, so the Axis attack took the British by surprise anyway. The British 2nd Armored Division had just arrived in Libya, but had moved to the front without tank transporters - most of its tanks were broken down in a string leading from the front deep into Egypt. Desperately, they tried to repair abandoned Italian tanks to make up the difference. As the British withdrew from Libya, the weakened division tried to screen the other elements. Continuing its delaying action, 2nd Armored Division defended its reserve position twenty-five miles east of El Agheila after withdrawing from the initial attack on 31 March. |
| Conclusion |
|---|
|
At 1030 German infantry attacked with tanks while other enemy vehicles were seen attempting to drive around both flanks. The battalion withdrew, one company being lost when its transport was forced into a salt marsh. Standing again just north of Agedabia, the British were assaulted more closely by German tanks and saved only by a timely counterattack by 5th RTR. After the Axis advance, 2nd Armored Division would be dissolved. |
| Additional Notes |
|---|
|
Use Australian M13/40 counters for the British M13/40. |

|
|
|---|
| AFV Rules Pertaining to this Scenario's Order of Battle |
|---|
|
| Army |
|---|
|

| Army |
|---|
|


| Heer |
|---|
|


| 7 Errata Items | |
|---|---|

|
All Bren carriers should have a movement value of 7. (Shad
on 2010 Dec 15)
|

|
Two British infantry have their full strengths printed on the back. They should both be "2-3" when reduced. (Shad
on 2010 Dec 15)
|

|
This is an armored car. (Shad
on 2010 Dec 15)
|

|
Ignore the direct fire values. (Shad
on 2010 Dec 15)
|

|
The reduced direct fire value of the Heer HMG became 5-5 starting with Fall of France. (plloyd1010
on 2015 Jul 31)
|

|
The morale and combat modifiers of German Sergeant #1614 should be "0", not "8". (Shad
on 2010 Dec 15)
|

|
All SPW 251s have an armor value of 0. (Shad
on 2010 Dec 15)
|
| Attitude can be everything | ||||||||||||||
|---|---|---|---|---|---|---|---|---|---|---|---|---|---|---|
This scenario was played as a team event by my gaming group. I act as moderator and facilitator for each game, and I do not participate directly as a player. My listing of “winning” is based on the PG HQ site cannot support a neutral role in AARs. This scenario is based around the advance of the Afrika Korps, as a German unit overtook a rearguard British unit. Both sides were mobile and contained armor. Objective was for the Germans to get off the far (very far) edge of the (very large) board while minimizing losses; for the Brits, kill Germans or prevent them from exiting. The Brits made a decent withdrawal as the Germans cautiously advanced. Whenever the Brits set up a mobile blocking force the Germans, with longer range, slowly turned the flank and forced a withdrawal. The Brits chose a decent spot for their main defense line, but failed to properly prepare their positions or to properly locate their most powerful unit, the 25lber. Both sides made maneuvers to the south flank, and while the losses suffered by the Germans were almost to the point of defeat, the Germans kept their losses to the max allowed by the victory conditions. The Brits took significant losses in the south, and they continued to expend their strength in counter-flanking maneuvers and thereby weakened their main line. The Germans inched up to the Brit main line and began pouring in fire from longer range while their armor cut around the north flank and headed for the exit point. The Brits kept in place on the main line, sucking up losses while never considering a move against a relatively weak German position. Inflicting even minor losses on the Germans could have brought the Brits victory, but they were already mentally defeated by this point and chose to take on the roll as cannon fodder. The poor placement of the Brit 25lb gun unit left the exit point uncovered, and the German tanks easily drove around the Brit guns and exited the map for the victory. The Brits should have been able to pull off the victory, but a cautious German advance and a defensive mindset for the British left the British players mentally defeated. They could not comprehend launching an attack against the German line before it was strong enough to resist, and the superior German range just ravished the British units. Even if the Brits didn't have the moxie to attack, they could have at least dug in vs taking shots. If the 25lber had been placed in/near the exit, the tanks would have had to bring infantry to bust through, but the poor positioning left the exit uncovered with the Brits already accepting their fate as bullet catching devices. Defeating your opponent mentally can be as powerful as overwhelming force on the battlefield. I did like the scenario, though a strong Brit player should make this a nasty challenge for the German. |
||||||||||||||
| 0 Comments |
| Stop the Africa Korps in Cyrenaica | ||||||||||||||
|---|---|---|---|---|---|---|---|---|---|---|---|---|---|---|
This was an extended, 6-session, entertaining play-through with the deliberate & crafty Tankodactyl playing the advancing German side in a mobile firefight that we started last November. I played the British rearguard commander trying to stem the onrushing Africa Korps in what turned out to be a slightly frustrating, but hard fought draw. Happily both sides had armor units in this free-flowing, exit-based, scenario. We used the FOW, excess initiative, consolidation and extended assault optional rules, Since this was an introductory scenario for my rookie opponent, we skipped the AK random events table, but tried the following three experimental house rules: Standardized Movement for Mechanized Units All mechanized units may move through clear hexes at a movement cost of only 1 movement point (MP) per hex, instead of 1 1/2. Add one to this cost if moving up or down slopes hexes. Road Movement for Mechanized & Foot UnitsAll FOOT & MECHANIZED units may move on roads at the rate of 1/2 a Movement Point (MP) per road hex, just like MOTORIZED units. Dug In Units are Automatically in Limiting Terrain in Desert Games Unless prohibited by special scenario rules, ALL units that are dug-in on hill, slope or wadi & gully hexes are considered to be in limiting terrain and are spotted by enemy units approaching to within 3 hexes, or 4 hexes for reconnaissance units – unless they are marked with a spotted marker, see 8.22. Both sides drew decent sets of leaders. There were 11 FOW-shortened turns of the 33 we played. For the defending Tommies, this was a case of making a fighting withdrawal with fangs, in the form of several blocking positions and repeated counter attacks to try and slow the inexorable Axis flow to the east. As others have reported, the Germans were able to outmaneuver the blocking forces again and again thanks to their longer ranged gun, but not before having to repeatedly slow down & deploy their infantry to form combined arms attacks. The Tommies kept the 25-pdr gun back and as close to hex 3-2416 as was tactically possible hoping to be able to score some decent cross fire shots with British A-13 tanks, in a late game fall back situation. To begin, the Germans swing south en masse (right flank) and a fair amount of maneuver developed throughout our play-through. Naturally, the Rolls Royce A/C, Mark VIB light tank and the Pz-II platoon were all eliminated by the end of game turn 12. In the mid-game period, the Germans began moving their armor in a sweeping left flank advance to better flank the British strongpoints. Several, rather costly counter attacks with infantry and tanks cut off this threat. Both sides had too many casualties by the end of game turn 22, but we fought on until by mutual agreement we agreed to a draw. There were no Australians that we could can find in the AK scenario book. Must have been the captured Italian tanks in this scenario manned by Aussie crews? |
||||||||||||||
| 0 Comments |