
|
The El Wak Job Africa Orientale Italiana #4 |
||
|---|---|---|
| (Defender) Italy | vs |
Britain
(Attacker)
South Africa (Attacker) |
| Formations Involved |
|---|

| Total | |
|---|---|
| Side 1 | 1 |
| Draw | 0 |
| Side 2 | 2 |


| Overall Rating, 3 votes |
|---|
|
3.67
|
| Scenario Rank: --- of 913 |
| Parent Game | Africa Orientale Italiana |
|---|---|
| Historicity | Historical |
| Date | 1940-12-16 |
| Start Time | 06:30 |
| Turn Count | 28 |
| Visibility | Day |
| Counters | 103 |
| Net Morale | 0 |
| Net Initiative | 1 |
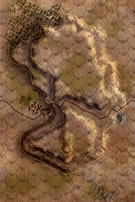
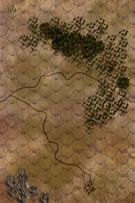
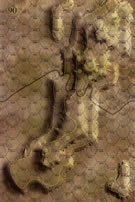
| Maps | 3: 84, 89, 90 |
| Layout Dimensions | 84 x 43 cm 33 x 17 in |
| Play Bounty | 187 |
| AAR Bounty | 171 |
| Total Plays | 3 |
| Total AARs | 1 |
| Battle Types |
|---|
| Inflict Enemy Casualties |
| Entrenchment Control |
| Conditions |
|---|
| Entrenchments |
| Reinforcements |
| Smoke |
| Scenario Requirements & Playability | |
|---|---|
| Africa Orientale Italiana | Base Game |
| Introduction |
|---|
|
With the arrival of a new commander and large-scale reinforcements, the British determined to open the campaign season with a series of raids on Italian-occupied border posts. The largest of these would take place at El Wak, a position consisting of five small border forts on either side of the frontier between Kenya and Italian Somaliland. Eager for a victory on the religious holiday of Dingaan’s Day, the 102nd anniversary of the Battle of Blood River, the 1st South African Division employed massive overkill in terms of force applied. The operation began with 1st South African Brigade commander Dan Pienaar hurling racist epithets at the West African troops involved in the operation while 24th Gold Coast Brigade commander C.E.M. Richards declared the white South African soldiers lazy and cowardly compared to his men. |
| Conclusion |
|---|
|
Afrikaners celebrated Dingaan’s Day as proof that God had ordained the white race to rule over black Africans, but on this day the British African soldiers proved themselves superior as their brigadier had predicted. As a condition of receiving his command, Pienaar had promised to drink no alcohol during the course of the war. Yet his command stumbled around the bush as if eager to prove Richards’ assessment correct, finally arriving on the battlefield hours late. The Gold Coast troops took their objectives readily, and the South Africans eventually pushed the Italian Colonials out of Italian El Wak on the eastern side of the battlefield despite several sharp counter-attacks. Eager to dismiss any problems, the South African government quickly awarded Pienaar the Distinguished Service Order. |

|
|
|---|
| AFV Rules Pertaining to this Scenario's Order of Battle |
|---|
|
| Army |
|---|
|


| Regio Corpo di Truppe Coloniali |
|---|
|


| Regio Esercito |
|---|
|


| Army |
|---|
|


| 2 Errata Items | |
|---|---|

|
Two British infantry have their full strengths printed on the back. They should both be "2-3" when reduced. (Shad
on 2010 Dec 15)
|

|
Ignore the direct fire values. (Shad
on 2010 Dec 15)
|
| Green Allied Troops Find Some Entrenchments Have 1917 Veterans | ||||||||||||
|---|---|---|---|---|---|---|---|---|---|---|---|---|
Synopsis - AOI #4 - El Wak Job The attack on 16-12-1940 by the Commonwealth started at 0630 and lasted only until 1000. However, it was more difficult than expected. The first eight turns saw a slow go by the Allies as tbe 103rd Gruppo Bande Coloniali Dubai held fast and shot straight from their secure bunkers. The scenario is divided into two geographical sectors, British and South African. The mission for the attackers is to capture Italian entrenchments strung along an E-W road. This certainly appears doable as the Italians are forccd to defend each board to gain VPs. They look understrength for the task. But this proved deceptive. But it is not easy to capture an entrenchment. To make matters worse, the South Africans have low morale at 7/6. The Italians proved especially difficult for the South Africans, who were overconfident in their approach towards their enemy. As they advanced within machine gun range of the Italians, they were met with surprisingly accurate fire. The Italians had a reputation for poor marksmanship, but this was a different game. The Italians had their backs against the wall; no where to run in this fight. They were safe in their entrenchments and impervious even to repeated Assaults. The South Africans slowly conquered each entrenchment in their sector, but lost a leader and three valuable steps, more than they could afford. In the British sector, the watchword was a slow, methodical attack. But it was more effective than losing troops. It was a grind; not exciting but better than the South African effort. In the end, the Italians were crushed by the sheer weight of the Commonnwealth attack. Their surprising resistance was still no match for the firepower of the South Africans and British. |
||||||||||||
| 0 Comments |