Panzer Grenadier Battles on April 27th:
Arctic Front Deluxe #40 - Children's Crusade Broken Axis #14 - Târgu Frumos: The Second Battle Scenario 3: Sledge Hammer of the Proletariat
Army Group South Ukraine #6 - Consternation Road to Berlin #73 - She-Wolves of the SS
Errors? Omissions? Report them!
Kasserine Pass: Egged On
An Army at Dawn #33
(Attacker) Germany
(Attacker) Italy
vs United States (Defender)
Formations Involved
Italy 31º Reggimento Corazzato
Italy 5º Reggimento Bersagliari
United States 26th Infantry Regiment
Display
Balance:


Overall balance chart for AAAD033
Total
Side 1 5
Draw 0
Side 2 0
Overall Rating, 5 votes
5
4
3
2
1
4
Scenario Rank: 116 of 913
Parent Game An Army at Dawn
Historicity Historical
Date 1943-02-20
Start Time 11:30
Turn Count 18
Visibility Day
Counters 109
Net Morale 1
Net Initiative 3
Maps 2: 76, 77
Layout Dimensions 56 x 43 cm
22 x 17 in
Play Bounty 154
AAR Bounty 165
Total Plays 5
Total AARs 2
Battle Types
Exit the Battle Area
Hill Control
Inflict Enemy Casualties
Conditions
Off-board Artillery
Smoke
Terrain Mods
Scenario Requirements & Playability
An Army at Dawn Base Game
Introduction

Rommel’s original plan had called for his troops to simply seal off the Kasserine Pass and make their breakthrough elsewhere; after the fighting on the 19th he decided prospects were actually better at Kasserine and shifted his point of attack accordingly. The pass would be opened by the Battle Group DAK, a division-sized collection of German Army, German Air Force and Italian Army troops with even a handful of German-officered Tunisian “volunteers.” Eager to push forward, Rommel visited group headquarters to egg the troops on.

Conclusion

The American engineers did what they could but did not possess infantry training, and so allowed the Italian tanks to work between their positions. Once this happened they could offer no effective defense and abandoned their positions in an uncoordinated withdrawal. The rest of Task Force Stark held on until 1700 hours when the Germans overran Colonel Stark’s headquarters. The colonel and his staff barely escaped, along with two army cameramen who wanted to get some action shots and received more than they bargained for. Stark’s counterpart, Colonel Bonfatti, ran out of luck and died leading his Bersaglieri to victory. The tanks from 131st Armored Division Centauro advanced five more miles without encountering any organized resistance before night forced them to laager.


Display Relevant AFV Rules

AFV Rules Pertaining to this Scenario's Order of Battle
  • Vulnerable to results on the Assault Combat Chart (7.25, 7.63, ACC), and may be attacked by Anti-Tank fire (11.2, DFT). Anti-Tank fire only affects the individual unit fired upon (7.62, 11.0).
  • AFV's are activated by tank leaders (3.2, 3.3, 5.42, 6.8). They may also be activated as part of an initial activating stack, but if activated in this way would need a tank leader in order to carry out combat movement.
  • AFV's do not block Direct Fire (10.1).
  • Full-strength AFV's with "armor efficiency" may make two anti-tank (AT) fire attacks per turn (either in their action segment or during opportunity fire) if they have AT fire values of 0 or more (11.2).
  • Each unit with an AT fire value of 2 or more may fire at targets at a distance of between 100% and 150% of its printed AT range. It does so at half its AT fire value. (11.3)
  • Efficient and non-efficient AFV's may conduct two opportunity fires per turn if using direct fire (7.44, 7.64). Units with both Direct and AT Fire values may use either type of fire in the same turn as their opportunity fire, but not both (7.22, 13.0). Units which can take opportunity fire twice per turn do not have to target the same unit both times (13.0).
  • Demoralized AFV's are not required to flee from units that do not have AT fire values (14.3).
  • Place a Wreck marker when an AFV is eliminated in a bridge or town hex (16.3).
  • AFV's do not benefit from Entrenchments (16.42).
  • AFV's may Dig In (16.2).
  • Open-top AFV's: Immune to M, M1 and M2 results on Direct and Bombardment Fire Tables, but DO take step losses from X and #X results (7.25, 7.41, 7.61, BT, DFT). If a "2X" or "3X" result is rolled, at least one of the step losses must be taken by an open-top AFV if present.
  • Closed-top AFV's: Immune to M, M1 and M2 results on Direct and Bombardment Fire Tables. Do not take step losses from Direct or Bombardment Fire. If X or #X result on Fire Table, make M morale check instead (7.25, 7.41, 7.61, BT, DFT).
  • Closed-top AFV's: Provide the +1 modifier on the Assault Table when combined with infantry. (Modifier only applies to Germans in all scenarios; Soviet Guards in scenarios taking place after 1942; Polish, US and Commonwealth in scenarios taking place after 1943.) (ACC)
  • Tank: all are closed-top and provide the +1 Assault bonus, when applicable
  • Tank Destroyer: do not provide the +1 Assault bonus, even if closed-top (SB)
  • Self-Propelled Artillery: do not provide the +1 Assault bonus, even if closed-top (SB)
  • Anti-Tank Gun Carrier: half-track with anti-tank gun, NOT a Tank Destroyer
  • Armored Cars: These are Combat Units. They are motorized instead of mechanized. All have their own armored car leaders, who can only activate armored cars (6.85). Do not provide the +1 Assault bonus (ACC).
  • Reconnaissance Vehicle: 8.23 Special Spotting Powers Both foot and vehicle mounted recce units (1.2) possess two special spotting abilities. The first ability is that they can spot enemy in limiting terrain at one hex further than the TEC specifies for other units and leaders. For example, an enemy unit in town can normally be spotted at three hexes or less, but a recce unit can spot them at four hexes.Their second ability is that they can place a Spotted marker on any one enemy unit they can spot per turn, just as if the enemy unit had "blown its cover" by firing. Such Spotted markers are removed as described earlier.
  • Unarmored Weapon Carriers: These are unarmored halftracks (Bufla and Sk7/2) or fully-tracked vehicles (Karl siege mortar) with mounted weapons. All are mechanized, except the BM-13 (Katyusha rocket launcher mounted on a truck). They are weapon units, not AFV's, so they are never efficient and cannot be activated by tank leaders. (SB)
  • Portees: Trucks with mounted Anti-Tank guns, Anti-Aircraft weapons, or artillery. Stack as combat units. Move like trucks, but fire like guns. Do not limber or unlimber. Have the truck's -1 armor value. Truck and gun are treated as a single unit, and do not transport other units. (SB)

Display Order of Battle

Germany Order of Battle
Heer
  • Motorized
Italy Order of Battle
Regio Esercito
  • Towed
United States Order of Battle
Army
  • Motorized

Display Errata (2)

2 Errata Items
Overall balance chart for 20

The reduced direct fire value of the Heer HMG became 5-5 starting with Fall of France.

(plloyd1010 on 2015 Jul 31)
Overall balance chart for 63

The morale and combat modifiers of German Sergeant #1614 should be "0", not "8".

(Shad on 2010 Dec 15)

Display AARs (2)

An Army At Dawn, Scenario #33: Kasserine Pass: Egged On
Author JayTownsend
Method Solo
Victor Germany, Italy
Play Date 2020-11-24
Language English
Scenario AAAD033

An Army At Dawn, Scenario #33: Kasserine Pass: Egged On

A nice looking scenario, the Americans and Germans setup a few hexes across from each other, both sides dug-in and the Italians enter the map on turn one as well. The Axis have three victory objectives to try and achieve different victory levels or not. So the Axis have to be the aggressor and the Americans have to defend kind of spread out across the map, as they want to prevent the Axis from getting one of their victory conditions of exiting 20 steps off the west edge of the map.

The Germans armor isn’t that great against dug-in Sherman tanks and suffer some losses but fortunately for them, a Large Italian Army comes on with some pretty strong units and the Sherman Tanks have to leave their dug-out positions to try and adjust their lines and defend the 60 meter hill but get blasted in that attempted. The Americans half-tracks have some nice weapons on them but are too weak to defend very long, same for the Italian AC90/53. The Infantry were in a melee across the battlefield and the Germans could not have fought this battle without their Italian reinforcements, no way but once those numbers came on, the American lines crumbled. Both sides have some nasty off board artillery and on board support weapons.

The Axis achieve all three of the victory objectives and in the first half of the game that didn’t look possible. I feel I shouldn’t have defended all three objective as the Americans, maybe just one big defensive position around the 60 meter hill and let the Axis have the west edge victory condition and hoped not to lose as many steps as they did on this game play. Great scenario, I just needed to setup a better defense.

One thing that is kind of odd, the conclusion of this scenario talks about both an Italian and an American Colonel but no Colonel leader counters were included in this scenario. I feel both should be added, just to make it more historical.

0 Comments
You must be a registered member and logged-in to post a comment.
One Must Break a Few Eggs to Make a Proper Omelette.
Author treadasaurusrex (Germany, Italy)
Method VASSAL
Victor Germany, Italy
Participants goosebrown
Play Date 2023-01-25
Language English
Scenario AAAD033

I played the attacking DAK Battle Group and the ingenious and indefatigable Goosebrown led Task Force Stark in holding Djebel Chambi in this fun-filled 6-session play-through. Thankfully, we ignored the FOW, but used the smoke, consolidation, strategic movement, excess initiative, extended assault and tank riders optional rules. We also experimentally used the following five house rules: 1) Road Movement for Mechanized & Foot Units All FOOT & MECHANIZED units may move on roads at the rate of 1/2 a Movement Point (MP) per road hex, just like MOTORIZED units 2) Standard Movement for Mechanized Units All mechanized units may move through clear hexes at a movement cost of only 1 movement point (MP) per hex, instead of 1 1/2. Add one to this cost if moving up or down slopes hexes. 3) Dug In Units are Automatically in Limiting Terrain in Desert Games Unless prohibited by special scenario rules, ALL units that are dug-in on hill, slope or wadi & gully hexes are considered to be in limiting terrain and are spotted if enemy units approach to within 3 hexes, or 4 hexes for reconnaissance units – unless they fire or move. 4) Tank Leader Forward ObservationEfficient tank leaders (full strength only) may spot for ALL artillery & air strikes in accordance with the normal spotting rules (8.0, page 19). Just as in the case of leader units spotting, this action does not require an activation. Nonefficient tank leaders may also attempt to spot for ON BOARD ARTILLERY ONLY by throwing a single die per attempt to spot a target. This action does require an activation. They spot the intended target on a die roll of 4-6. 5) Anti-Tank (AT) Gunnery Enhancement Unless prohibited by special scenario rules, ALL dedicated, dug-in, entrenched, or town-occupying AT gun units including Self-Propelled AT guns may fire TWICE just like tanks in the standard rule set. For example: dug-in, German PaK 36 (37mm); PaK 38 (50mm); or British 2-pdr and 6-pdr towed AT gun platoons would therefore be able to fire TWO times in either AT fire or OPFIRE. 
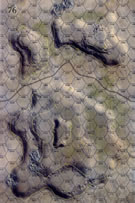
The initial session (game turn 1 & part of 2) featured an near-immediate German movement-to-contact on the hilltop of the 60-meter Djebel Chambi in two separate prongs on both the north and south flanks of the dug-in American positions that were – wisely placed – on the reverse slope. The supporting German 88mm gun platoon got off only two shots before being destroyed by accurate OBA fire. Only a single step of M-4 Sherman tanks was eliminated before the evil AT crew found themselves suddenly wandering in Valhalla. Fortunately, the Afrika Korps’ favorite mascot, Laszlo the Landser snail was unhurt in the heavy artillery barrage and proceeded to lay a glow-in-the dark, slime trail to guide the follow on Italian infantry battalion in their right flank movement-to-contact across the hilly north portion of Map 76. By the end of our first session, casualties stood at 11 steps lost for the defending Americans, and 5 for the attacking Axis force. This included the destruction of a section of an overeager Pz-IIIH tank platoon that ventured too close to an aroused, US engineer platoon that directed a “cold steel” close assault on their forward position. The second session (the balance of game turn 2, plus turn 3) was a bit less costly for both sides and the Italians seized the initiative in the north by moving aggressively into firing range of the US defensive positions atop the 40-meter hill in the NE corner of Map 76. In the center on Djebel Chambi, the Germans slowly advanced into decisive close assaults on both flanks of the American position on the reverse slope of the summit, having success in both close assaults. The US force on the south edge of the summit broke and fled. Further south, a mixed Axis armored probe began making its way west across the south margin of the battle map. By the end of the session, casualties stood at 12 steps lost for the defending Americans, and 8 for the Axis attackers. A combined NINE, futile combat 7-die rolls were thrown. The 3rd session (game turn 4) was another relatively costly one for the Americans with loss of an additional 3 steps, while the Germans lost another one. This was a longish turn that was interrupted by internet-related glitches while the contending forces were locked in a series of close range firefights and fiercely-contested close assaults on both the NE hill on Map 76, and also on the summit of Djebel Chambi. US step losses were at 15 by the end of this session, which fulfilled one of the German side’s 3 victory objectives. Highlights included the elimination of a pesky American M-6 AT portee, as well as another step of Sherman tanks on the margins of Djebel Chambi. In the north, the broad-front Italian attack was temporarily blunted by heavy defensive fire and OBA. 
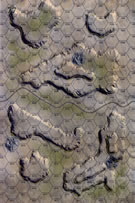
The fourth session (game turn 5 & part of 6) was characterized by continued fighting atop the Djebel Chambi with the American side still hanging on in a single hex by their fingernails (76-0611). Casualties included 6 more American steps of mixed arms and a platoon of Italian M-14/41 tanks. In the north, the Italians continued to press forward uphill supported by heavy mortar fire and OBA. They managed to clear one of the contested 40-meter summit hexes (74-0404) on the northern hill mass. Other highlights included a plague of a combined EIGHT combat 7-die rolls! When we quit for the night without finishing game turn 6: US step losses were 21, and the Axis had lost 15. The 5th session (game turns half of 6, plus 7-8) was a grim one for the defending American side with costly fire fights and close assaults on Djebel Chambi in the center, and also the Italian-led, close-range fight atop the northern 40-meter hill. The American Commander and a single platoon of riflemen held on in hex 74-0404, blocking the Axis from capturing all 5 hexes needed to secure the summit of Djebel Chambi. Another section of Sherman tanks was eliminated by long-range Italian AT fire in the south at the end of turn 6, and a scuttling Pz-II light tank platoon was able to exit the west edge of the board to credit the first 4 Axis victory points. These tidings inspired Corporal Laszlo, the German’s pet snail, to lay down another extra-thick slime trail across the German Mortar position. At the end of game turn 8: US step losses were 31, and the Axis had lost 16, causing the Axis initiative level to fall to a 2. Surprisingly, only a combined 2 combat 7-die rolls were thrown in this session. The sixth session (game turns 9-10) was a nightmarish one for the defending Americans with another 8 steps lost, to 0 for the attacking Germans. A great deal of close range action on both Chambi and the northern 40-meter hill ensued, mostly with negative results for the defenders. By the middle of game turn 10, all but one hex of Djebel Chambi was in Axis control, more than 15 steps of the US force had been eliminated (40), and 6 of the required steps of Axis units had already exited the west edge of the battle map – with 8 more within easy exit range in the next turn. By mutual agreement the American side conceded at the end of game turn, resulting in a decisive German victory. Corporal Laszlo proudly allowed the Americans the honors of war. I give this slightly unbalanced, but very fun to play - as the Boche - scenario a 4. All 5 of the experimental house rules worked well in this scenario.

0 Comments
You must be a registered member and logged-in to post a comment.
Errors? Omissions? Report them!
Page generated in 0.446 seconds.