
|
Battle Group Gerhardt An Army at Dawn #27 |
||
|---|---|---|
| (Attacker) Germany | vs | United States (Defender) |
| Formations Involved | ||
|---|---|---|
| Germany |  |
10th Panzer Division |
| United States |  |
1st "Old Ironsides" Armored Division |

| Total | |
|---|---|
| Side 1 | 6 |
| Draw | 0 |
| Side 2 | 5 |


| Overall Rating, 11 votes |
|---|
|
3.91
|
| Scenario Rank: 131 of 913 |
| Parent Game | An Army at Dawn |
|---|---|
| Historicity | Historical |
| Date | 1943-02-16 |
| Start Time | 16:15 |
| Turn Count | 15 |
| Visibility | Day & Night |
| Counters | 71 |
| Net Morale | 1 |
| Net Initiative | 1 |
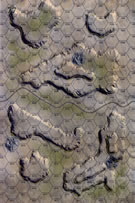
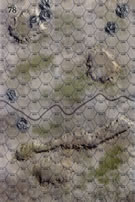
| Maps | 2: 77, 78 |
| Layout Dimensions | 56 x 43 cm 22 x 17 in |
| Play Bounty | 137 |
| AAR Bounty | 147 |
| Total Plays | 11 |
| Total AARs | 5 |
| Battle Types |
|---|
| Exit the Battle Area |
| Inflict Enemy Casualties |
| Conditions |
|---|
| Off-board Artillery |
| Smoke |
| Terrain Mods |
| Illumination |
| Scenario Requirements & Playability | |
|---|---|
| An Army at Dawn | Base Game |
| Introduction |
|---|
|
Despite propaganda to the contrary, the Wehrmacht ranks boiled with personnel rivalries and a lack of strategic planning. General Hans-Jürgen von Armin launched Operation Spring Wind early and without informing higher headquarters. Nor did he coordinate with the Afrika Korps as ordered. This meant that the overwhelming success of the previous two days could not be leveraged into a strategic victory. Even on the 16th, instead of aggressively exploiting their gains around Sidi Bou Zid, the Germans piddled away the whole morning dealing with the remnant Americans on Djebels Lessouda and Ksiara who were attempting to reach friendly lines. Not until the afternoon did a small force try to force their way into Sbeitla. |
| Conclusion |
|---|
|
German intelligence reports revealed that the Allies planned to abandon Sbeitla, but Gerhardt’s battle group found it strongly held. The American rear guard claimed 15 panzers destroyed while the Germans admitted to losing five. With Sbeitla still in American hands, First Army decided to fight for the strategic town instead and dispatched Combat Command B to join the defense. As if II Corps interference wasn’t enough, now Army headquarters was involved in ordering 1st Armored Division’s subordinate units around. |

|
|
|---|
| AFV Rules Pertaining to this Scenario's Order of Battle |
|---|
|
| Heer |
|---|
|


| Army |
|---|
|


| 4 Errata Items | |
|---|---|

|
The reduced direct fire value of the Heer HMG became 5-5 starting with Fall of France. (plloyd1010
on 2015 Jul 31)
|

|
All SS PzIVH tanks should have a movement of 8. (Shad
on 2010 Dec 15)
|

|
The morale and combat modifiers of German Sergeant #1614 should be "0", not "8". (Shad
on 2010 Dec 15)
|

|
All SPW 251s have an armor value of 0. (Shad
on 2010 Dec 15)
|
| Burning Panzers Lighting Their Path | ||||||||||||
|---|---|---|---|---|---|---|---|---|---|---|---|---|
This one has a dug-in force of a little more than an infantry company with lots of armor support, including 2 companies of Shermans, 2 of Lees, and 5 units of half-tracked weapons carriers and an M-6 tank destroyer against 8 halftrack-mounted panzer grenadiers with truck-mounted HMGs, Mortars, and a 75mm AT gun. While the German 16 and 24 OBA factors looks better, it still falls into the same 30 column as the US, so no real advantage there. Light fades after 4 turns, and having rolled for just how dark it would get, I got a night visibility of 2 hexes. The US troops and halftracks dug in on board 77 using the ridgeline to mask their positions, while the tanks spread out over board 78 taking advantage of hill, wadi and rocky terrain to always get at least a -1 modifier to incoming AT fire. The US OBA and armor played a surprisingly active roll this game, as shot after shot took effect. The OBA hit a stack of mortars right after they had unloaded on the east end of the hill on board 77, a roll of 2, and the only survivor a 7-0-0 LT sitting there wondering where everyone went. Shermans and Lees killed Panzers left and right, losing only a single step from one Sherman unit, and later, a step from one of the M-3/75s for a total of 3 steps lost. The Germans felt the fall of the OBA very heavily, with effective morale checks against the entire German infantry line after the infantry dismounted and started across the open terrain, trying hard to make smaller targets than they would remaining mounted. At the end of turn 8, with darkness having fallen, and 38 steps of Germans left in smoking ruins, 12 of those steps tanks, and with the Germans still on board 78 and facing a solid line of US armor and dug-in troops, who had the advantage that the Germans would have to walk into range before being able to do anything about them, I decided it was a good time for the Germans to take advantage of the darkness and pull back. High marks for it even though playing the full length seemed to be overkill. Great game. |
||||||||||||
| 0 Comments |
| If you have tanks and halftracks, you ARE cavalry. Behave like it! | ||||||||||||
|---|---|---|---|---|---|---|---|---|---|---|---|---|
This is a great scenario and a good one to play solo. The Americans are defending with a company of Shermans, a company of Grants a, load of tracks and solid Tank Destroyer elements (a whimsical term for guns bolted to tracks and trucks to make them easier to kill). They can set on the north south ridgeline and in thee wadis forward with a single east west ridge running the width of the Eastern map. The German 10th Panzer division is fully mechanized with Tracks for the infantry and a strong group of Panzer IIIs and IVs. They have to enter from the east and cross the board. The battle began at 16:15 with dusk closing in. The Americans emplaced their infantry dug in along the crest of the N-S hill with the tank destroyers in the center in a covered position. One company of infantry deployed in a wadi close to the eastern board edge on the north making the left flank, the American strong position. On the right, a half company of Shermans dug into the southern wadi without infantry support directly although there was a defense in depth on the hills to the rear of the American right flank. Having rare insight into the allied commander, the German commander, a crafty and brutal commander, surveyed the position from the approaches and switched his main axis of attack to the far left of the battlefield, initially driving all his panzers directly onto the Shermans waiting in the Wadi. The losses were steep and climbed rapidly as the entire panzer force charged directly at the Shermans. Like the grand charge at Waterloo they used their momentum and firepower to overwhelm the Shermans, finally getting two half step PzKw IIIs behind in the wadi and opening up a chance for cross fires for the PZ IVs in front working in a gun duel with the American tanks. It took an hour and 15 steps of Panzers to break the back of the forward Shermans leaving the last tank a burning hulk at 17:15 With the entire German force except the panzers remaining offboard, they represented a real threat to the American left, so the American player left his tanks there till it was quite obvious that the Germans had cleared a path. At that time, about 17:00, the Americans left their dug in positions in the northern wadi and moved directly south to intercept the flank of the German thrust which was obscured by the long small ridge running east west across the board. The American armored infantry moved back through the center of the American position to leave the track and push to set up a defense in depth along the south edge of the board on the far west edge of the board. The Germans panzers charged hell for leather directly down the south edge of the board only to be intercepted by the first Shermans and Grants of the pivoting American left flank directly at dusk. In a series of assaults with the American armor, the panzers continued to lose steps but were able to put the new American tanks into the same squeeze as they had the first an hour before setting up crossfires that ground the Americans into rubbish, with only one step of Grants managing to retreat after being demoralized in a close assault. At this point it was a race as the bulk of the German forces, originally held offboard and then following the panzers moved in the dark directly to exit the board. 15 minutes later the leading elements of the American left now repositioned to block the attempt along the south board edge where they dismounted in groups of platoons in an attempt to pin German units which would block their access to the East edge of the board. In another series of mounted PzGdr charges the tough German infantry pinned and then bear the American's to a pulp, opening a route past the now re-established right and off the board. Final results: Germans, 20 step losses, and 32 victory points. Americans 30 step losses. A clear decisive German victorry. |
||||||||||||
| 1 Comment |
| Move to Sbeitla at All Costs! | ||||||||||||||
|---|---|---|---|---|---|---|---|---|---|---|---|---|---|---|
This was an exciting 4-session play-through with the crafty and redoubtable, blackcloud6, as the American Commander seeking to hold off a combined arms German kampfgruppe on the move along the north margin of the game map. The first session (game turns 1-4) featured a somewhat, jumbled German movement to contact with APC-borne infantry and a spearhead of tanks on the north edge of Map 78. They faced a resolute set of defenders, well-positioned to inflict maximum casualties. This approach proved costly for the Germans, as alas, their overly-enthusiastic mechanized infantry was pushed forward too soon, and amazingly their supporting tanks managed to miss nearly every shot at the American’s 2 screening Sherman platoons that were dug-in, hull down in the northernmost wadi. Ah, if only they had been the more vulnerable M-3 Lee tanks of Combat Command B! The American side slowly wore down the German infantry formations and transport as they advanced and were forced to deploy. For Battle Group Gerhardt, the good news was that twilight hours had begun, and the Germans were able to move to west the darker it became. In addition, the Americans were forced to redeploy north and out of their original set of wadi and hillside dug-outs. The bad news for the Axis was that the US Force was destroying German halftracks, and halving their tank units at an alarming rate! While this scenario refreshingly becoming a game of maneuver, by the end of the 4th game turn: the score was 17 for the US, and 11 for the Germans. Both sides had zero initiative by the end of this session. The second session (game turns 5-6) was characterized by continuing German movement west as dusk approached. The final half-strength platoon of Sherman tanks was eliminated in the northern most wadi on Map 78, along with a company of US M-3/75 tank destroyers, clearing the way for a combined arms stream of Axis troops bent on setting up close assaults in the hilly northern portion of Map 77. As visibility decreased, the German advance picked up speed, and a company of their tanks broke off to the south in yet another attempt to setup AT crossfire opportunities to catch the remaining 4 platoons of M-4 tanks. Oddly, there we no German casualties this session, and the victory point (VP) total for steps lost at the end of turn 6 was: 15 for the German side and 17 for the Americans. The 3rd session (game turns 7-10) began after darkness fell, with the Afrika Korps in pursuit of the adroitly withdrawing elements of Combat Command A on Map 77. My opponent’s methodical, tactical withdrawal only cost the US force 3 steps, with a matching loss to the advancing Germans. In an epic feat of defensive fire power – and incredible die rolling – three platoons of German tanks were all demoralized in a failed close assault attempt against a dug-in, half-strength infantry platoon in Hex 77-0904! In addition, thanks to a successful illumination mission, yet another SPW-251 APC was eliminated by effective Sherman platoon AT fire. By the end of the session, the leading Germans elements were a only 4 steps from the map’s west margin. The US force had formed an extended, north-south, Napoleonic “thin blue line,” of units across the NW quadrant of Map 77. Step losses (victory points) totaled 19 for the Germans, and 21 for the American side by the end of turn 10. The 4th session (game turns 11-14) with the remaining German troops seeking to leave the western edge of the battle map as fast as possible and not adhering to their original plan of setting up a base of fire on the northwesternmost hill. When we called the game at the beginning of the 14th game turn, the final victory points were: 45 for the Germans (22 exited steps & 23 American step losses); and 22 for the American side (all German step losses). This resulted in a major German victory. Unexpectedly, both sides had only lost 4 steps of tanks during in the play-through by the end of the game. Had we continued, and played the last game turn, there likely would have been more Panzer losses. This was a fun-to-play, exciting scenario with lots of maneuver and many decision points for both sides. I give it an enthusiastic 4, and agree with my distinguished opponent that the optional extended assault rule gave the German side a decided advantage during daylight hours, in spite of his methodical and inspired play. |
||||||||||||||
| 1 Comment |
| Delay in the Dark | ||||||||||||||
|---|---|---|---|---|---|---|---|---|---|---|---|---|---|---|
This scenario turned out to be to what I expected. Although I had the choice in sides, I chose the Americans as they appeared to be at a disadvantage with an inferior force and not enough troops to adequately cover the map. I expected to roll up a flank and then bust out for the exit. I chose to defend the road with the infantry and the TDs on the flanks with the tanks forward to screen and slow down the German advance. The screen worked as it forced the Germans to deploy, stop and fight. Plus, I had set up the screen in a manner to gain crossfire. I scored a good number of enemy tank and halftrack kills. But my opponent was aggressive and hit my left flank hard and started to break through. part of screen got forced to stay and fight and died in place but took some bad guys with them. The HT TDs were tough to be effective with as they cannot stay and fight, they just get clobbered so using them to fall back and delay is what you use them for. Then night came and it was a different game. My Sherman screen fell back, and I was able to build a line to gradually fall ball with. this is the tactic to use. But it requires getting the initiative or the Germans will be able to crack the wall if they go first. this is what happened to me as in the last five turns of the game, I never won the initiative. But it still went down to the last turn as I counterattacked with all my Shermans against a bunch of 1 step German tank platoons. but again, I needed the initiative to be able to get off the shots to kill them, so the Germans just fell back and then maneuvered to the flank. But one good initiative roll, and the point margin would have dropped back to the US having a chance. This scenario was much fun. There were lots of maneuvers, proper positioning to be worked out and many crucial tactical decisions to be made. And there was always a notion of coming from behind with a chance to dos. We played with Extended Assault, and I felt this gave an edge to the Germans they did not need. I would not recommend that optional rule with this scenario. |
||||||||||||||
| 0 Comments |
| Stop the 10th Panzer at All Costs - NOT! | ||||||||||||||
|---|---|---|---|---|---|---|---|---|---|---|---|---|---|---|
This was a 5-session play-through with the flexible and hard-fighting, bugmaster, as the attacking German Commander of Battle Group Gerhardt of the 10th Panzer Division. I played the Commander of the defending Combat Commend A of the very green US 1st Armored Division. My job was to manage a tactical withdrawal and delaying action in the face of a substantial force of combined arms Axis troops. We played without the FOW, but with the smoke/illum, consolidation, and excess initiative optional rules. The initial session (game turn 1) was characterized by left and right flank German movements-to-contact on Map 78. Wisely, the Germans avoided coming straight west on the central road and instead pushed their mobile units in from the SE & NE corners of the map. In the north, accurate US AT fire from a pair of dug-in M4 platoons in the northernmost wadi eliminated a section of Pz-IVF2 tanks, so the session ended with the loss of 2 steps for the 10th Panzer and none for the defending US side. The 2nd session (game turns 2-3) was a costly, armor-on-armor slugfest for both sides, with another 12 steps lost for the Germans, and 16 for the defending Americans. It would have been even bloodier, had both sides not combined to throw SIX, futile combat 7-die rolls. In action, multiple loaded SPW halftracks went up in flames with infantry & leaders on board, and the Americans managed to lose half of their M-4 Sherman tanks in just 2 turns! The north (right flank) approach of the Germans was stymied, and they fell back behind the protection of the remaining 3 platoons of Pz-IIIJ Specials. A lucky American OBA strike demoralized the 50mm AT gun platoon in that sector. In the south, the German left wing attack survived a devastating fire storm of AT fire, and then proceeded to mop up the US overwatch of SPAT platoons and tanks in the wadi and the margin of the east-west ridge. At the end of game turn 3, total steps losses were 16 for the Americans and 14 for the Germans. The 3rd session (game turns 4-6) was another costly, long-range AT fire and OBA shoot ‘em up on both flanks. The northern (right flank) German attack was withdrawn, and the remaining units shifted south to the center of Map 78 to be able to proceed east in the gathering dusk along the main east-west road. In the south, the determined German left flank attack continued after the destruction of all remaining AT-capable US units in the vicinity. Artillery concentrations eliminated the last remaining German HMG platoon and another pair of leaders. By the end of game turn 6, total steps losses were 18 for the Americans and 26 for the Germans, plus 4 leaders eliminated. A combined total of ELEVEN combat 7-die rolled were thrown in this session – 9 by the German Commander. The victory point totals were: 26 for the Americans, and 18 for the attacking German battle group. The delayed 4th session (game turns 7-9) was a particularly frustrating & grim turn for the hapless American side in which they lost an additional 7 steps, mostly to short-range, nighttime fire! The left flank German armored pincer boldly advanced up the 40-meter hill mass on the east margin of Map 77 and close assaulted the few remaining Americans units on the hilltop. This attack was supported by the remaining 2 companies of Landser infantry that came directly west down the major east-west road to the central pass chokepoint in the vicinity of Hex 77-1109. The US side used up all but one of their OBA illumination rounds in support of fruitless long-range AT shots, as the two German thrusts came together at the contested pass. This time, the American Commander – only – threw FOUR combat 7-die rolls, thereby managing to derail four of his well-positioned, illuminated AT or OBA shots! The fifth session (game turns 10-11) was another lethal & costly nighttime slugfest with the same 2 close assaults playing out on the same 40-meter hill mass on Map 77. Ironically, the Americans were able to come out ahead on the infantry-heavy assault the north margin of the hill, and they lost the other on the actual hill summit (Hex 77-1113), as the remaining section of self-propelled 81mm mortars was overrun and crushed by onrushing German armor. The ill-fated and oft-disrupted German 50mm AT gun and a leader was knocked out in the last instance of illuminated long-range US tank gunnery. Only a single, half-strength, German infantry platoon was left at this late point. This set the stage for a triumphant parade of tanks to the west map edge exit for all but a pair of German Pz-IIIH tank platoons, thereby winning the game for the well-led, Battle Group Gerhardt at the end of the 11th game turn. At the end, a major victory was scored by bugmaster with a final victory point count of 54 for the Germans and a mere 31 for the defending Americans. |
||||||||||||||
| 0 Comments |