
|
Counterattacked An Army at Dawn #22 |
||
|---|---|---|
| (Attacker) Germany | vs | United States (Defender) |
| Formations Involved | ||
|---|---|---|
| United States |  |
1st "Old Ironsides" Armored Division |

| Total | |
|---|---|
| Side 1 | 4 |
| Draw | 0 |
| Side 2 | 2 |


| Overall Rating, 9 votes |
|---|
|
4
|
| Scenario Rank: 113 of 913 |
| Parent Game | An Army at Dawn |
|---|---|
| Historicity | Historical |
| Date | 1943-02-02 |
| Start Time | 14:45 |
| Turn Count | 25 |
| Visibility | Day & Night |
| Counters | 165 |
| Net Morale | 1 |
| Net Initiative | 2 |
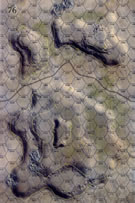
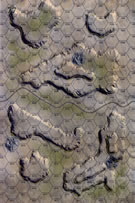
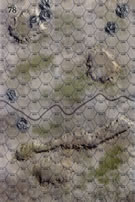
| Maps | 3: 76, 77, 78 |
| Layout Dimensions | 84 x 43 cm 33 x 17 in |
| Play Bounty | 173 |
| AAR Bounty | 159 |
| Total Plays | 6 |
| Total AARs | 3 |
| Battle Types |
|---|
| Exit the Battle Area |
| Hill Control |
| Inflict Enemy Casualties |
| Road Control |
| Conditions |
|---|
| Off-board Artillery |
| Randomly-drawn Aircraft |
| Smoke |
| Illumination |
| Scenario Requirements & Playability | |
|---|---|
| An Army at Dawn | Base Game |
| Introduction |
|---|
|
Fredendall raged furiously at his subordinates for taking all day to secure Sened Station. “It is of vital necessity for you to get forward and place your infantry on its objective four miles east of Sened Station,” he vented. “Too much time has been wasted already.” The troops captured the ridge line in due course by noon the next day. But could they hold it? |
| Conclusion |
|---|
|
The Americans quickly dug in to repulse the expected German counterattack which arrived in short order. On seeing enemy tanks for the first time some of the Americans broke but others held strong preventing a catastrophe. Nevertheless five panzers broke through and headed west to spread mayhem until confronted by American armor held in reserve. By 1900 the fighting quieted down for the night. When the Americans pulled back the following day the casualties for the drive on Maknassy totaled 51 killed, 164 wounded, and 116 missing. |
| Additional Notes |
|---|
|
Special rules for pre-start airstrike and panic. |

|
|
|---|
| AFV Rules Pertaining to this Scenario's Order of Battle |
|---|
|
| Heer |
|---|
|


| Army |
|---|
|


| 5 Errata Items | |
|---|---|
| Scen 22 |
It appears that there is a setup error here for both sides. Since the Germans receive VP's for exiting the west side of the map, they presumably must enter from the east edge on Turn One. Similarly, the US must set up at least seven hexes from the east edge. (Schoenwulf
on 2020 Mar 16)
|

|
The reduced direct fire value of the Heer HMG became 5-5 starting with Fall of France. (plloyd1010
on 2015 Jul 31)
|

|
All SS PzIVH tanks should have a movement of 8. (Shad
on 2010 Dec 15)
|

|
The morale and combat modifiers of German Sergeant #1614 should be "0", not "8". (Shad
on 2010 Dec 15)
|

|
All SPW 251s have an armor value of 0. (Shad
on 2010 Dec 15)
|
| A tough victory for the Germans | ||||||||||||
|---|---|---|---|---|---|---|---|---|---|---|---|---|
I always like looking through new PG games for the standout scenario in the game, I think I am a pretty good judge and of course I have my own foibles, I like the bigger scenarios on the whole for example. Counterattacked was the one that stood out for me in the "Army at Dawn" scenario booklet. A 3 mapper with the Germans on the attack, enough AFV's to make in interesting and a simple special scenario rule simulating the US Army's lack of combat experience at that time. The Germans have to take three hills and push units off the board as well as inflicting casualties to gain victory. The US set up was designed to make the German have to advance across the first board under heavy bombardment before they could reach the first line of US defenses, the Sherman's and Stuarts were kept in reserve to try and stop any breakthroughs with the strong US on board artillery capability further back. The game starts with a German air raid which did knock out some US mortars an caused some disruption in the Ami ranks. The Germans begin their long slog across board 78 losing several steps to artillery fire, the German attack was split into three prongs, basically one going for the Northern hill one for the Southern hill and one pushing down the road in the centre of the board, this attack was stopped in its tracks very early on, the southern attack was also stymied but the northern attack was more successful and the first 40m hill hexes fell reasonably easily. However after two hours of game time the Americans had mauled the German attacking force and were feeling confident of victory. The German commander though shaken was not stirred and regrouped and moved the centre probe to the south attacking the large hill mass there form two directions at once. The next hour saw lots of hand to hand fighting on both hills with the veteran German troops slowly getting the upper hand, both side committing their armor to try and shore up various attacks or defenses depending on which side you were on. Once again the Germans just shaded the armour battle. I was not keeping track of VPs but thought it was going to be a close run thing, but the US line finally began to buckle and more and more hilltop hexes were lost and gaps began to appear, the German commander sensing that though time was against him, victory could be in his grasp then sent A/Car and M/C units scurrying for the west edge of the map to score exit Vp's. The game ended with the US forces still holding the road but with German units bypassing them and heading to their rear. When I did tot up the VPs the Germans has 20 more that the US so could claim a major victory, however both sides had suffered heavy losses. A good scenario this one and one I thought it would end closer than it did, plenty of opportunity for both side to launch attacks and enough room for some maneuver. Highly recommended |
||||||||||||
| 0 Comments |
| A Long, Hard Fight in the Desert with a Pro and His Boys | ||||||||||||||
|---|---|---|---|---|---|---|---|---|---|---|---|---|---|---|
Lost count of the number of face-to-face sessions, or the amount of beer, that it took to finish this humungous, but well-designed, fight in Northern Tunisia. It was a fight to the finish with the playful and very bold Tubac52 as the American Commander in this 25-turn duel. We did this the old-fashioned way with pieces on the map on a table at his home and somehow managed not to upset the board since we started last October. No pets and no kids sure helped! I give this one a 4, and would have given it a 5, since it favors the Axis player. Sagunto, Chaco, the Tredasaurus and Miguelibal joined us periodically for beer and salsa - and to give us tactical advice. They were very helpful, especially to my embattled opponent. We decided not to use the ridiculous fog of war rule, until the end of the 8th turn, so that the attacking Germans could get established on the battlemap. This also meant that they took lots of casualties early, and even more toward the end, since they came right up the darn east-west road with flanking armor and scouts in the hills on either side.The sacrifice in Lanser infantry and engineers was worth it by the end of the scenario when the Americans ran out of armor and SP artillery support. This is a good one to learn how to maneuver large formations, and to fight and move at night. It might be better as a SOLO fight, but its too much fun for us not to recommend it for shared play. |
||||||||||||||
| 1 Comment |
This was a very big fight lots of units fought with an intractable opponent. Often, I tried setting up anti-tank crossfires, only to have one or both of the units involved - usually M-3/75 SPAT guns and Stuart light tanks, or even Shermans eliminated by return fire. I do see why the Treadasaur delights in destroying AT guns, now, as that darn towed 88 caused a great deal of havoc until my artillery finally got it in their sights.
| Stop or Delay Battle Group Stempel | ||||||||||||||
|---|---|---|---|---|---|---|---|---|---|---|---|---|---|---|
This was a fun-filled, action-packed & very lengthy 12-session play-through with the determined & hard-charging, Col. Sonichu, leading the powerful German Battle Group Strempel, and me leading the green, defenders of US Combat Command D of the 1st Armored Division. Both sides drew excellent sets of leaders. We played with the FOW, consolidation, smoke/illum, extended assault, tank riders, strategic movement and excess initiative optional rules. In addition, we experimentally used the following four house rules: 1) Road Movement for Mechanized & Foot Units - All FOOT & MECHANIZED units may move on roads at the rate of 1/2 a Movement Point (MP) per road hex, just like MOTORIZED units, 2) Standardized Movement for Mechanized Units - All mechanized units may move through clear hexes at a movement cost of only 1 movement point (MP) per hex, instead of 1 1/2. Add one to this cost if moving up or down slopes hexes, 3) Dug In Units on Slope Hexes are Automatically in Limiting Terrain in Desert Games - Unless prohibited by special scenario rules, ALL units that are dug-in on slope hexes are considered to be in limiting terrain and are spotted if enemy units approach to within 3 hexes, or 4 hexes for reconnaissance units – unless they are marked with a spotted marker, see 8.22, and 4) Tank Leader Forward Observation - Efficient tank leaders (full strength only) may spot for ALL artillery & air strikes in accordance with the normal spotting rules (8.0, page 19). Just as in the case of leader units spotting, this action does not require an activation. Nonefficient tank leaders may also attempt to spot for ON BOARD ARTILLERY ONLY by throwing a single die per attempt to spot a target. This action does require an activation. They spot the intended target on a die roll of 4-6. The initial session (game turns 1-2) began with a massive, 3-unit German Air strike before we threw for initiative and the beginning of a quite lengthy Axis movement-to-contact from the eastern edge of Map 78. The accurate air strike was remarkably successful resulting in the elimination of most of a convoy of American troops on a road hex on Map 77 for an immediate 6-step loss, plus a Captain! The bulk of Battle Group Strempel came on the map in a broad, 3-pronged front that then morphed into a central & left flank thrust and a much lighter right flank (northern) thrust. An over eager Marder III was destroyed, as well as a platoon and half of Stuart tanks by long-range AT fire in the 2nd game turn. The end of the session saw the Americans sill in dominant positions and holding a substantial lead of 60 to 4 victory points. Our slightly-truncated, second session (game turn 3) featured onrushing German scout elements on both flanks, coupled with strong central and left flank thrust up the main road and on the southern flank of the east-west ridge on Map 78. An exchange of accurate long-range AT fire accounted for the destruction of 3 steps of American M-3/75 tank destroyers, and a platoon of snoopy, German SK-233 armored cars. The step loss tally was now: 16 for the embattled Americans, and only 6 for the German side. The updated victory points were: 7 for the Teutonic Horde and 62 for the soon-to-be-decisively-engaged US side. The Americans threw THREE combat 7-die rolls. Our delayed, but action-filled & great fun, third session (game turns 4-5) was a costly one for both sides & featured the loss of an additional 9 steps of American units, and an amazing 18 steps for the rapidly-advancing German side. The broad front Teutonic advance diverged into a central (strong-side) and slightly weaker, right flank attack after these thrusts completed their crossing of the central valley on Map 78. There was a mass exchange of long-range AT and artillery fire that resulted in the elimination of the last of the German armored car platoons, a pair of SPW halftracks, the captured 25-pounder howitzer, and a wayward Pz-IIIH. The Americans lost both a towed and a portee 37mm AT platoon, a section of M-3/75 tank destroyers, as well as another section of Stuart tanks as the Germans emerged from a pair of mortar-placed, smoke screens covering their advance at the valley mouth just east of the dug-in American positions on the margins of the 60-meter hill mass on Map 76. The first German, combined arms close assault began in the valley as the flanking Landsers to the south began their climb up the big hill. A single German leader was eliminated this session along with an infantry platoon as the Axis grip began tightening around the forward positions of the remaining Allied force. A combined FIVE, useless combat 7-die rolls were thrown this session. The oft-delayed – but fun – 4th session (game turns 6-7 ) featured a set of ferocious adjacent-hex firefights as the Germans pressed forward under a 3-hex smokescreen against stubborn, dug-in American units on the margins of the large, 60-meter hill mass on Map 76. Strangely, although there were several exchanges of long-range AT fire, only single steps of German SPW halftracks and Pz-IIIH tanks were eliminated this session. The right (north) wing of the Germans onslaught diminished appreciably as their scout elements advanced behind the American front line defense and made contact with the GI’s second echelon. In the south, the combined arms German advance continued with the panzers initiating panic among a second American unit, forcing their withdrawal. In the center, short-range fire fights and an ongoing close assault continued as more and more German units closed in. Results from various artillery strikes were a mixed bag for both sides with errant OBA striking advance elements of the German tide in the center, and effective OBA targeting of a slow-moving Axis mortar company. In all, 6 steps of German units were eliminated this session, as well as an emplaced, American 37mm AT gun platoon. The victory point tally was now at: 23 for the German side, and 84 for the embattled Americans. The Americans managed to throw SIX combat 7-die rolls, saving multiple Axis units from demoralization or destruction. Our long-delayed, 5th session (game turn 8) was a lengthy & grim one for the embattled American defenders with very little for them to cheer about. In the north, many ineffective US activations resulted in no particular gain. The extended line of German recon elements continued their westward, while an armored counter attack pinned an over-eager company of US troops in the northwestern margins of Map 78. In the center, the very strong Axis ground attack moved inexorably into decisive engagement range and two more close assaults were initiated by landser units on the lower slopes of the large 60-meter hill mass on Map 76. In the south, Axis armor and recon elements continued moving in extended order to open up additional areas for Axis OBA targeting. Total steps lost were: 35 for the surging Germans, and 30 for the US at this point. The victory point tally was now: around 30 for the German side, and still 84, for the rapidly-dwindling, American defenders. The luckless Americans managed to throw EIGHT combat 7-die rolls, saving multiple Axis units from demoralization, disruption or destruction. The very bloody, sixth session (game turns 9-10) featured continued German motorcycle recon probes in the south & north margins of the battle map, and a very strong, combined arms, close-range, push in the center on the lower slopes of the large, 60-meter hill mass on Map 76. Amazingly lucky US armor piercing fire resulted in the elimination of several steps of Axis armor & the final unit of halftracks in the northwest and center sectors of the battle map. Fierce German close assaults on the lower slopes of the large hill mass were largely successful, though costly, but these resulted in the formation of a pair of infantry-only, 3-stacks that attracted a great deal of artillery and direct fire, which tragically fell on both sides. There was a great deal of attempted morale recovery action that was mostly completed fruitful for the attacking Germans, and less so for the embattled Americans. The steps lost tally was now: 56 for the Germans, and 39 for the US at this point. The updated victory point total was now: around 34 for the German side, and 110, for the diminished Americans. Once again the dice fates caused the Americans to throw EIGHT combat 7-die rolls, to the Germans to throw a mere 3! Our holiday-delayed, 7th session (game turns 11-12) was another costly adjacent-hex firefights, and close assault festival of death, mostly on the eastern & southern slopes of the 60-meter hill mass in the gathering darkness. Another 4 steps of German troops and Pz-III tanks were lost as their advance stalled in those two sectors. At the same time, they successfully eliminated the last of the US troops to the east, on the east-west ridge on Map 78. Additional Wehrmacht successes included the destruction of a platoon of self-propelled howitzers and a US Major by an accurate OBA concentration that was observed by an adroit set of probing motorcycle infantry. A plucky US light tank section managed to capture a truck loaded with a mortar platoon and a leader, while another probing halftrack unit captured a second truck outfit. In all, both sides have now lost 5 platoons of infantry and 4 leaders. The step loss tally was now: 61 for the advancing German side, and 44 for the bedraggled American defenders. The victory point score at this mid-point in the scenario was: 37 for the Germans, and 117 for the Americans. The Americans suffered from FOUR combat 7-die rolls at unfortunate moments in this session. The low visibility, but maneuver-heavy, eighth session (game turns 13-14) featured a good deal of concealed movement and the final elimination of the last US Stuart light tank unit behind enemy lines on Map 78, along with the unexpected desertion of single leaders from both sides! In addition, the first scouting Germans motorcycle infantry company & their leader was able to exit the west edge of the battle map, boosting the Axis victory point tally. The darkness of night reduced visibility to only a single hex, and the oncoming German wave began flanking the remaining American troops on the 60-meter hill mass. The next-to-the-last unit of panzers was eliminated by close assault on the southern flank of the big hill. Scrambling GIs and AFVs were able to reclaim several hill slopes hexes that had previously been occupied by the Germans. Updated step losses totaled: 63 for the German side, and 47 for the depleted Americans. The victory points were: 44 for the Axis, and 120 for the US side. Our dark-of-night, but exciting, ninth session (game turns 15-17) featured a substantial amount of strategic movement by the Germans, as well as the launch of and multiple star shells by both sides. Highlights included: 1) some very aggressive scouting by Jerry motorcycle infantry to set up OBA concentrations on the American SP & towed batteries located on the 40-meter hill mass in the southeast quadrant of Map 77, 2) the elimination of the penultimate Pz-IIIJ tank step, and 3) the final demise of the last platoon of demoralized GIs on the easternmost slope of large 60-meter hill mass on Map 76. The step loss tally for the German side increased by 4, and the Americans lost 2 more and an additional leader. The updated victory point totals were now: 128 for the embattled GIs, and 49 for the Jerries. The nighttime – very costly – 10th session (game turns 18-20 ) featured multiple, very bloody close assaults and adjacent-hex firefights as the two sides contended for the upper slopes of the large 60-meter hill mass. The step loss tally climbed quickly as another 11 American steps fell to the advancing Germans. Axis step losses for the session were limited to just five. The Landser infantry pushed forward slowly in 3 separate prongs in the center and both flanks of the 4-meter contour line. Overeager, US AFVs attempted to counter attack on both the south & north sides, but at significant cost in terms of armor steps. The updated victory points were now: 122 for the embattled GIs, and 59 for the Jerries, with only five game turns remaining. Our costly 11th session (game turns 21-22) featured 5 separate close assaults and some unexpectedly accurate American artillery strikes. The Germans were in decisive range in 3 adjacent sectors of the 60-meter hill mass seeking to strengthen their grip on key positions within the 40-meter contour line in the south, east and north margins of the embattled hill. The strong Jerry frontal attack on the eastern margin was successful, with an entire platoon of GIs being eliminated in a cold steel & grenade, close assault. In the south, the American counterattack succeeded in holding on in both assault hexes, and inflicted just enough casualties to keep things roughly even. In the north portion of the large hill mass, the landsers were barely-held in place by the ragged GI defenders who were now mostly in the open on the slopes and out of their original dug-in positions. An illuminated, artillery strike eliminated 3 steps and an excellent combat leader from a victorious 3-stack of German shock troops. This momentarily collapsed the attack in the eastern sector of the overall frontal attack. Previous American leader losses were now causing confusion and delaying morale recovery in multiple contested hexes. Feeble US armored probes failed to distract the German focus on the big hill, while renewed activity by German recon elements using strategic movement resulted in the seizure of the hilltop portion of one of the two smaller hills north of the big hill on map 76. Updated victory points were now around: 119 for the embattled GIs, and 69 for the attacking Germans. The final decision in this hard-fought, battle was still very much in doubt . . . The exciting final session (game turns 23-25) featured a great deal of maneuver in the dark, 5 stubbornly contested close assaults on the 60-meter hill mass, as well as some unexpectedly accurate OBA against illuminated targets. The terminal German surges on the 20-meter margins of the big hill were held off by the embattled GIs, mostly by dint of very hard fighting and excellent artillery support. Probing German motorcycle infantry were able to take several 40-meter hilltops in the northern half of the battle map. In all, there were 17 FOW-shortened turns, which in effect, materially benefited the American defenders. Total step losses in the scenario were 63 for the Americans, and 70 for the German side. This, and the various controlled hilltops resulted in a final victory point tally of: 117 for the US force and 74 for the Germans. An unexpected major American victory stopping the onslaught of Battle Group Strempel in a scenario that we started playing in July 2023 - 8 Months! This was a longish, but well-designed and fun-to-play scenario that we agreed rates an enthusiastic 4 of 5! While it is, somewhat unbalanced in favor of the German attackers, an experienced and opportunistic US player can do a great deal to even the odds with a decent, initial setup, luck in the leader draw, and opportunistic counter attacks with the limited reserves that are available. Nevertheless, this scenario is a much harder pull for the Allied player. We recommend it for both, SOLO & SHARED play with many opportunities for large-scale, maneuver in relatively-open, desert terrain. The 4 house rules we utilized, added significantly to ease of play and much better observation in this day-and-night encounter. |
||||||||||||||
| 1 Comment |