Panzer Grenadier Battles on April 27th:
Arctic Front Deluxe #40 - Children's Crusade Broken Axis #14 - Târgu Frumos: The Second Battle Scenario 3: Sledge Hammer of the Proletariat
Army Group South Ukraine #6 - Consternation Road to Berlin #73 - She-Wolves of the SS
Errors? Omissions? Report them!
Tank Chase
Sword of Israel #18
(Attacker) State of Israel vs Arab Republic of Egypt (Defender)
Formations Involved
Display
Balance:


Overall balance chart for SwIs018
Total
Side 1 1
Draw 0
Side 2 0
Overall Rating, 1 vote
5
4
3
2
1
3
Scenario Rank: --- of 913
Parent Game Sword of Israel
Historicity Historical
Date 1967-06-07
Start Time 17:00
Turn Count 12
Visibility Day
Counters 111
Net Morale 1
Net Initiative 2
Maps 3: 64, 65, 66
Layout Dimensions 84 x 43 cm
33 x 17 in
Play Bounty 182
AAR Bounty 171
Total Plays 1
Total AARs 1
Battle Types
Delaying Action
Exit the Battle Area
Inflict Enemy Casualties
Conditions
Reinforcements
Smoke
Terrain Mods
Scenario Requirements & Playability
Sword of Israel Base Game
Introduction

Tat Aluf (General Tal), as his next objective, intended for his Ugdah (84th Armored Division) to block the escape of the Egyptian 4th Tank Division from its large camp at Bir Gifgafa. The Israelis quickly threw a blocking force across the western road leading toward Ismailia, but the trap became complicated by the slow movement of a large part of the Israeli armored force from the south out of the Wadi Ml'ez and heading northwest to intercept the Ismailia road west of Bir Gifgafa. The slow accumulation of forces further challenged the Israelis as they needed a sufficiently strong force to attack. Together, this allowed the Egyptians to begin slipping away.

Conclusion

The Israelis tried valiantly to catch the fast-moving Egyptians. Two times a large Egyptian tank force swung out to face off with the Israelis, allowing the rest of the force to try to get away. In the end, the Egyptians were able to hold off the bulk of the Israelis until night fell and the force effected its escape.


Display Relevant AFV Rules

AFV Rules Pertaining to this Scenario's Order of Battle
  • Vulnerable to results on the Assault Combat Chart (7.25, 7.63, ACC), and may be attacked by Anti-Tank fire (11.2, DFT). Anti-Tank fire only affects the individual unit fired upon (7.62, 11.0).
  • AFV's are activated by tank leaders (3.2, 3.3, 5.42, 6.8). They may also be activated as part of an initial activating stack, but if activated in this way would need a tank leader in order to carry out combat movement.
  • AFV's do not block Direct Fire (10.1).
  • Full-strength AFV's with "armor efficiency" may make two anti-tank (AT) fire attacks per turn (either in their action segment or during opportunity fire) if they have AT fire values of 0 or more (11.2).
  • Each unit with an AT fire value of 2 or more may fire at targets at a distance of between 100% and 150% of its printed AT range. It does so at half its AT fire value. (11.3)
  • Efficient and non-efficient AFV's may conduct two opportunity fires per turn if using direct fire (7.44, 7.64). Units with both Direct and AT Fire values may use either type of fire in the same turn as their opportunity fire, but not both (7.22, 13.0). Units which can take opportunity fire twice per turn do not have to target the same unit both times (13.0).
  • Demoralized AFV's are not required to flee from units that do not have AT fire values (14.3).
  • Place a Wreck marker when an AFV is eliminated in a bridge or town hex (16.3).
  • AFV's do not benefit from Entrenchments (16.42).
  • AFV's may Dig In (16.2).
  • Open-top AFV's: Immune to M, M1 and M2 results on Direct and Bombardment Fire Tables, but DO take step losses from X and #X results (7.25, 7.41, 7.61, BT, DFT). If a "2X" or "3X" result is rolled, at least one of the step losses must be taken by an open-top AFV if present.
  • Closed-top AFV's: Immune to M, M1 and M2 results on Direct and Bombardment Fire Tables. Do not take step losses from Direct or Bombardment Fire. If X or #X result on Fire Table, make M morale check instead (7.25, 7.41, 7.61, BT, DFT).
  • Closed-top AFV's: Provide the +1 modifier on the Assault Table when combined with infantry. (Modifier only applies to Germans in all scenarios; Soviet Guards in scenarios taking place after 1942; Polish, US and Commonwealth in scenarios taking place after 1943.) (ACC)
  • Tank: all are closed-top and provide the +1 Assault bonus, when applicable
  • Assault Gun: if closed-top, provide the +1 Assault bonus, when applicable
  • Anti-Aircraft Weapon Carrier: apply a -1 modifier to an air attack if within three hexes of the targeted hex (15.14).
  • APC – Armored Personnel Carrier: These are Combat Units, but stack like Transports. They can transport personnel units or towed units. They are not counted as combat units for the +1 stacking modifier on the Direct Fire and Bombardment Tables (4.4). They may be activated by regular leaders and tank leaders (1.2, 3.34, 4.3, 5.43). They do not provide the +1 Assault bonus (ACC).

Display Order of Battle

Arab Republic of Egypt Order of Battle
El Geish el Masry
State of Israel Order of Battle
Army
  • Mechanized

Display AARs (1)

Could Havee Been Great
Author Blackcloud6
Method Solo
Victor State of Israel
Play Date 2022-06-27
Language English
Scenario SwIs018

7 
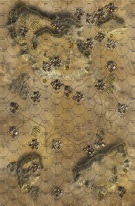
Elements of the Egyptian 4th Tank Division are moving west to escape a closing trap by Israeli forces. The Israeli 77th Tank Battalion of the 7th Armored Brigade moves to block the Egyptian escape attempt.

The Egyptian move a T-55 force quickly across the board to guard the exit point while another sets up to control the center of the map. The Israelis move in quickly taking the critical dunes in the center which will allow them to overwatch the track the Egyptians need to take to escape quickly.

In the north, Israeli M51s encounter the T-55 guard force and get hammered by the T-55s, but in the center the Israeli excellent gunnery proves decisive and the Egyptian armored force trying to control the center is defeated. The Egyptians try to move overland to the escape point, but the Israelis are too fast and move to block. Grimly, the Egyptian infantry dismount in a forlorn hope and take on the Israeli armor directly.

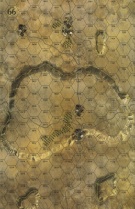
At this point, with two turns to go, the point count was way high in favor of the Israelis, so I called the game. Even if the infantry attack was successful against the Israeli tanks, the Egyptians would not get enough points. This has the potential to be a great scenario, due to the need to maneuver across three boards but suffers from a few flaws. First, and crucially, there is ambiguity on the tracks and dunes concentration that is not made clear in the scenario instructions. Also, making all the towns have dunes considerably slows down the Egyptians especially those in wheeled vehicles. Both allow the Israelis to be able to block the main track early on when in the real battle the Israelis c couldn’t get their act together to dos. Second, the initial Israeli force should only be allowed to set up on the track on Board 66 within 5 hexes of the north edge. As written, they can set up right next to Board 64 and enter that map to get to the center and control it. Third, the Israelis should not get two points for each Egyptian tank step destroyed. Without efficiency they are not worth as much as Israeli tanks. This would balance the scenario some.

This scenario could be great if not for its flaws. I would have rated it a five otherwise it got knocked down to three.

0 Comments
You must be a registered member and logged-in to post a comment.
Errors? Omissions? Report them!
Page generated in 0.22 seconds.